- Update - Automated deployment of Azure resources
- Manual deployment - Azure POC environment
- Manual creation of the Azure Function App
- Manual configuration of the Function App and network security group
- Code deployment to the Function App resource
- Conclusion

This is a continuation of an ongoing series of blog posts I have made on the topic of using cloud provider native services to provide high reputation redirectors for command and control HTTP/S implant traffic.
I have previously looked at this topic for services in GCP and AWS, and now I’m looking at Azure. This post will look at how we can use Azure Functions to forward implant traffic.
If you want some more details on why you might want to do this, check out the linked portion of this previous post here.
Update - Automated deployment of Azure resources
Update 4 June 2025: In the original version of this post I discussed how to manually setup all of the needed resources for this proof of concept domain fronting test, including basic C2 infrastructure to forward traffic to and the Function App Azure resource and code. The original manual steps are documented below. In doing further tests in Azure however, I have since created Azure Resource Manager templates that can be used to help automate these setup steps.
This inclues a “base” template set to create the “Azure POC environment” of a VPC and VM running Sliver as discussed in the Manual deployment - Azure POC environment section below.
It also includes a “functionapp” template set that creates the Azure resources for the Function App and configures them as described in sections Manual creation of the Azure Function App and Manual configuration of the Function App and network security group.
The templates are available here including deployment documentation, and are discussed in more detail in a post here.
Manual deployment - Azure POC environment
Similar to what I did for the GCP POCs discussed in previous posts, I needed some simple C2 infrastructure to forward traffic to.
To this end, I created the following using the Azure Portal, using West Central US (West US 2) for regional resources:
- A resource group
C2VMRGused to collect all the related infrastructure used for the POC - A Virtual Network, with network range
10.0.0.0/16, with adefaultsubnet network with range10.0.0.0/24where the C2 VM instance will be attached - A Linux virtual machine with the Sliver C2 installed and a public IP address that I could use to access the instance by SSH. The internal IP of this instance was
10.0.0.4. - A network security group associated with the instance, configured with custom rules, restricting SSH traffic to my home IP address only. SSH is the means by which I accessed the instance to configure the Operating System and operate the C2 service.
With this basic infrastructure available to forward to, the Function App can be created.
Manual creation of the Azure Function App
The Function App and associated resources needed for the POC can be created using the Azure Portal here
Start the new app wizard using the Create button to start the “Create Function App” wizard.
Select Flex Consumption as the hosting method and then the following options in the associated steps of the wizard.
Basics
- Function App Name: Select a function app name. The value you choose must be globally unique and will form part of the URL used to access the app. I chose
mytestfunctionxyz123as my name. - Region: West Central US
- Runtime stack: Python
- Version: 3.12
- Instance size: 2048 MB
Storage
- Storage account: Create new
Azure OpenAI
- Does not need to be enabled
Networking
- Enable public access: On
- Enable virtual network integration: On
- Virtual Network: Select the existing network
- Inbound access: Enable private endpoints: Off
- Outbound access: Enable VNet integration: On
- Outbound subnet: You wont be able to use the
defaultsubnet so selectCreate newand create a subnet within the existing VPC associated with your instance - I called my new subnetfuncsubnetand assigned range10.0.1.0/24.
Monitoring
- Enable Application Insights: No
Deployment
- Continuous deployment: Disable
- Authentication Settings - Basic authentication: Disable
Authentication Accept the defaults for authentication for storage access
Tags Accept the defaults or set tags as required
Hit Create to start the wizards deployment process - it will create the Function App and a few other required services for you.
Manual configuration of the Function App and network security group
Once the Function App deployment process is done there are a few config steps we need to complete in the Azure Portal.
In the settings of the newly created Function App, go to the “Environment variables” section and set the DESTINATION variable with the internal IP address of your C2 VM instance. This was 10.0.0.4 in my case.
It is also necessary to modify the network security group of the C2 VM instance to allow traffic from the network address range of the newly created subnet (10.0.1.0/24 in my case) to port 80 on the VMinstance.
Code deployment to the Function App resource
Deployment will require installing and setting up the Azure CLI. We can deploy code to an existing Function App with the CLI using the zip file deployment approach, which uses a command in the format shown below. The command references the resource group and name of the function and the local zip file containing the source code to deploy in the App.
az functionapp deployment source config-zip -g <RESOURCE_GROUP> -n <FUNCTION_NAME> --src <CODE_ZIP_FILE>
Get the function code from here, clone it locally and change to the root of the source as your present working directory.
You can the make a zip file /tmp/dep.zip with the needed files from the repo like so.
zip -r /tmp/dep.zip ./function_app.py ./host.json ./requirements.txt
In my example case, I did the deployment using the following command, given my resource group of C2VMRG, function name mytestfunctionxyz123 and zip file of /tmp/dep.zip.
az functionapp deployment source config-zip -g C2VMRG -n mytestfunctionxyz123 --src /tmp/dep.zip
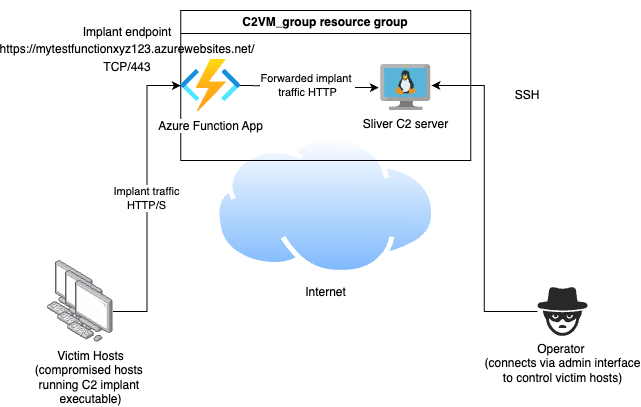
After deployment, the app was running at https://mytestfunctionxyz123.azurewebsites.net/.
The architecture looks like the following.
Conclusion
I intend to keep investigating Azure to see if there are any more ways to use their cloud services to forward for C2, and if I find more I’ll do a follow up post to discuss them. Are you aware of any? Let me know!