- Create the POC environment
- Allow HTTP traffic to instance
- Protection/filtering for the C2 servers HTTP endpoint
- Enabling HTTPS
- Conclusion

Another quick entry in my ongoing series where I find ways to use cloud native services to receive command and control traffic - Azure edition.
A simple trick we can use in Azure environments to get a trusted domain for a C2 endpoint is automatically generated VM domain names. A VM you create in Azure can have a DNS record in the format <domainNameLabel>.<region>.cloudapp.azure.com automatically created for you and linked to the public IP address for your VM, where <domainNameLabel> is a (globally unique) value chosen by you and <region> is the Azure region your VM is running in.
Unlike some of the other fronting approaches I’ve discussed in previous posts, this method only gets you a DNS name and not a certificate, so you dont get HTTPS by default with this approach. You can easily create your own SSL certificate for your unique domain name in the <region>.cloudapp.azure.com domain using LetsEncrypt or similar services, however this will result in a brand new (unaged) certificate that will appear in certificate transparency logs, which does have some minor downsides. To enable HTTPS in this scenario you also need to be able to create a C2 SSL listener/forwarder that uses the LetsEncrypt certificates for the domain for it to be considered “trusted”. I’ll discuss an approach for doing this below.
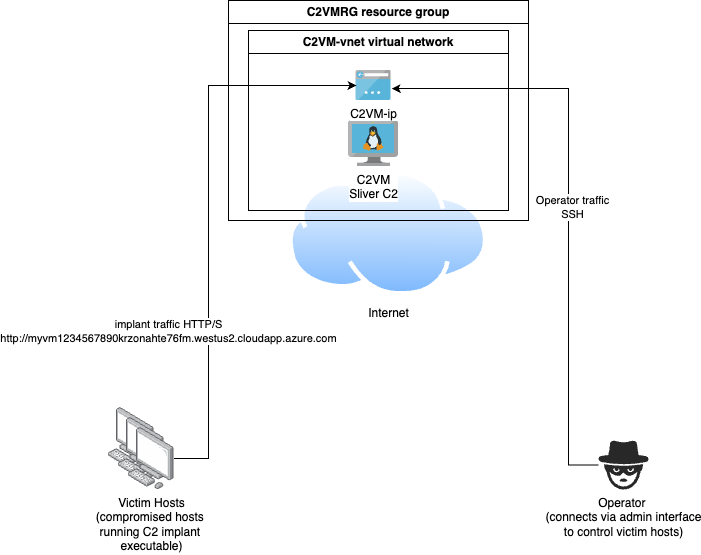
I’ve updated the Azure C2 POC base template set I’ve been using in my other Azure entries in this series to add this DNS entry automatically to the C2 VM based on a DNS label you provide before deployment. Lets have a look at how the whole setup would work.
Create the POC environment
Create a ssh key to use when accessing the vm, if you dont already have one.
$ ssh-keygen -t ed25519 -f ~/.ssh/id_ed25519_azure
Make sure the Azure CLI is installed and working.
Create the C2VMRG resource group.
$ az group create --name C2VMRG --location westus2
Clone the POC deployment templates locally
$ git clone https://github.com/stephenbradshaw/AzureC2PocDeployment.git
Modify the base deployment templates for your environment (which uses your Internet facing IP and public key data for access) and deploy the resources.
$ cd AzureC2PocDeployment/base
$ export PUBLIC_IP=$(curl ipinfo.io/ip)
$ sed -i "s/<YOUR_IP_ADDRESS_HERE>/$PUBLIC_IP/g" parameters.json
$ export PUBLIC_KEY=$(cat ~/.ssh/id_ed25519_azure.pub | sed 's/\//\\\//g')
$ sed -i "s/<YOUR_PUBLIC_KEY_HERE>/$PUBLIC_KEY/g" parameters.json
$ export DNS_LABEL=myvm1234567890
$ sed -i "s/<YOUR_DNS_LABEL_HERE>/$DNS_LABEL/g" parameters.json
$ az deployment group create --resource-group C2VMRG --template-file template.json --parameters @parameters.json
Once the deployment is done, you can also get the public IP address of your VM as follows:
$ az vm list-ip-addresses -g C2VMRG --query "[].virtualMachine[].network.publicIpAddresses[].ipAddress | [0]"
Add an ssh hosts file entry for your VM as follows, replacing <PUBLIC_IP_ADDRESS> with the output of the above.
Host azurevm
    hostname <PUBLIC_IP_ADDRESS>
    identityfile ~/.ssh/id_ed25519_azure
    user ubuntu
You should now be able to ssh into that instance once it has fully deployed - which will take a few minutes. Access will be limited to the Internet facing IP address of the machine you performed the deployment from using a Network Security Group deployed with the resources defined in the templates.
The DNS name created for your VM can be obtained using the following command. The label provided before deployment (myvm1234567890 in my case) has been combined in the template with a randomly generated value based on the Azure subscription ID to help ensure that the label will be globally unique in Azure and wont cause a deployment error due to the name aleady being in use.
az network public-ip list -g C2VMRG --query "[].dnsSettings.fqdn | [0]"
Allow HTTP traffic to instance
By default, the deployment templates block all inbound traffic to the VMs public IP address apart from port 22 (SSH) from the Internet facing IP deployment host. If we want to also allow implant traffic to reach the VM in this scenario, we also need to allow HTTP (and optionally HTTPS) traffic from the Internet.
For HTTP traffic, we can add the appropriate Network Security Group rule using the AZ cli from our deployment machine like so.
az network nsg rule create \
  --resource-group C2VMRG \
  --nsg-name C2VM-nsg \
  --name AllowPublicHttpInbound \
  --priority 1020 \
  --direction inbound \
  --source-address-prefixes '*' \
  --source-port-ranges '*' \
  --destination-address-prefixes '*' \
  --destination-port-ranges 80 \
  --protocol TCP\
  --access Allow
This will give us a working C2 environment, where implants can reach our C2 via HTTP using a name sitting within the cloudapp.azure.com domain. In my example case, the address is http://myvm1234567890krzonahte76fm.westus2.cloudapp.azure.com/.
Protection/filtering for the C2 servers HTTP endpoint
At this point its worthwhile discussing a simple protection that the POC environment has implemented to prevent the C2s HTTP endpoint from being made available directly from the Internet. What Ive done with the C2 host setup in this deployment template setup is install and run Apache in proxy mode on port 80, which will in turn forward certain incoming HTTP traffic on to the Sliver C2 HTTP endpoint, which is listening internally on port 8888.
The filtering is pretty simple, configured in /var/www/html/.htaccess and works in the following manner:
- Any requests for any file that exists in the Apache web root (
/var/www/html) will be served directly by Apache - there is a default index page, a robots.txt and a randomly named php script that exists for troubleshooting - Any requests for any URL that does not exist in the Apache web root will be forwarded to the C2 endpoint if it comes from a non-bot/automated/command-line user agent, otherwise the request will get a generic 404 response
This is not perfect, and can be refined to filter more stringently based on the HTTP communication profile of a particular C2, but it does help prevent against casual identification of the C2 or certain direct attacks against its implant endpoint, as the robust and tested Apache server receives the web traffic first and does some response header modifications. The use of Apache also gives us an easy and well tested way of setting up a HTTPS listener that forwards traffc in the exact same manner as the HTTP listener (see next section for details).
A setup where the Apache forwarder and C2 are on different VM hosts seperated using cloud provider traffic filtering would be an additional improvement, although for a simple POC/testing environment this single VM approach is a more cost effective compromise.
Enabling HTTPS
The previous steps enable HTTP access to the implant endpoint only. If we want to enable HTTPS as well, we can do this by generating our own LetsEncrypt certificate and configuring the Apache forwarder to use the certificates for HTTPS. Be aware that issuance of these certificates will result in the creation of a few indicators increasing the visibility and apparent “newness” of the endpoint (not ideal for C2). This includes placing the endpoint address into the certificate transparency logs and having an associated SSL certificate that has todays issuance date. You may even get some casual probing of your endpoint from scanners that consume the certificate transparency logs to identify potentially malicious servers. I left my server online for a day after requesting a certificate to see how many web requests I would get specifically to the DNS domain name (as opposed to the IP address, indicating the trigger for the request is likely the transparency log), and got a small number of requests from six different IP addresses during the next 13 hours, mainly looking like vulnerability scans. Be aware that this increase in visibility is a “cost” of enabling HTTPS in this manner, in a way that didnt apply for some of the other fronting approaches I have discussed in previous posts.
To set up HTTPS, start by SSHing into the Azure VM and install certbot and request a certificate for your VMs hostname. This will require that the previous steps allowing HTTP traffic to the instance have already been completed as the certificate request process involves hosting content using the Apache server on port 80.
sudo apt install certbot
sudo certbot certonly --webroot -w /var/www/html -d myvm1234567890krzonahte76fm.westus2.cloudapp.azure.com --staple-ocsp -m [email protected] --agree-tos
If successful this will provide some output, including the locations of the certificate chain and private key which will look similar to the following.
Certificate is saved at: /etc/letsencrypt/live/myvm1234567890krzonahte76fm.westus2.cloudapp.azure.com/fullchain.pem
Key is saved at:         /etc/letsencrypt/live/myvm1234567890krzonahte76fm.westus2.cloudapp.azure.com/privkey.pem
We need to then update the Apache SSL config to refer to these files. I have included a usable SSL template on the instance in file /etc/apache2/sites-available/ssl-forward-http.conf, so edit this file:
sudo vi /etc/apache2/sites-available/ssl-forward-http.conf
And modify the following lines to point to the LetsEncrypt files, similar to the examples below:
    SSLCertificateFile      /etc/letsencrypt/live/myvm1234567890krzonahte76fm.westus2.cloudapp.azure.com/fullchain.pem
    SSLCertificateKeyFile   /etc/letsencrypt/live/myvm1234567890krzonahte76fm.westus2.cloudapp.azure.com/privkey.pem
Once those modifications are done, enable the SSL module and the new SSL site like so.
sudo a2enmod ssl
sudo a2ensite ssl-forward-http
sudo systemctl reload apache2
The SSL config should now be setup and working, and all that remains is to allow traffic to port 443 on the instance.
On your deployment machine use the following az CLI command to allow HTTPS traffic to the instance.
az network nsg rule create \
  --resource-group C2VMRG \
  --nsg-name C2VM-nsg \
  --name AllowPublicHttpsInbound \
  --priority 1030 \
  --direction inbound \
  --source-address-prefixes '*' \
  --source-port-ranges '*' \
  --destination-address-prefixes '*' \
  --destination-port-ranges 443 \
  --protocol TCP\
  --access Allow
The network diagram of our POC C2 setup now looks as follows, with two listening endpoints provided by the Function App and the Front Door that can be used by implants to talk to the C2.
When you are done with the POC environment, you can easily delete the resource group and all associated resources as follows:
az group delete --name C2VMRG
Conclusion
I intend to keep investigating Azure to see if there are any more ways to use their cloud services to forward for C2, and if I find more I’ll do a follow up post to discuss them. Are you aware of any? Let me know!