Heres the final (for now at least) entry in my series on abusing Azure services to provide high reputation redirectors for Command and Control. This time around, we are looking at Azure’s API Management (APIM) Service. This service actually gives us a number of different configurations we can use to stick a trusted HTTP frontend in front of other Azure components, however in the example below I will be chosing a simple approach that leverages some of the other work I have previously done in this space.
In this POC I will outline an approach that has an APIM API instance forwarding traffic to an Azure Function App that in turn sits in front of an Azure VM running our C2. The Function App approach was discussed in part 1 of this Azure series, and the approach of adding another Azure service to the front of the Function App chain was also used in part 2 of the series where I talked about Azure Front Door.
In essence this essentially adds another Internet accessible front end to our C2 setup - allowing both to be used to get traffic into the environment.
I’ve again updated the Azure C2 POC base template set I’ve been using in my other Azure entries in this series to make it easy to setup your own iteration of this POC.
Lets look at how we can use these templates to setup a working APIM C2 POC environment. We will need to do the following:
- Setup the base resources (resource group, networking, C2 vm, etc) for the C2 we will forward to
- Setup the Azure Function App that forwards traffic to our C2
- Setup the APIM service instance and an API that will forward traffic to the C2 via the Function App
Create the base resources
Base resources for this POC environment include a Linux VM with an Apache forwarder and the Sliver C2 software installed and running, plus the necessary network plumbing. Ive discussed details about these resources previously in a post here and how the deployment templates work in a post here, but I will briefly cover how to set these up here so you can easily start from scratch.
Create a ssh key to use when accessing the VM, if you dont already have one.
$ ssh-keygen -t ed25519 -f ~/.ssh/id_ed25519_azure
Make sure the Azure CLI is installed and working.
Create the C2VMRG resource group.
$ az group create --name C2VMRG --location westus2
Clone the POC deployment templates locally
$ git clone https://github.com/stephenbradshaw/AzureC2PocDeployment.git
Modify the base deployment templates for your environment (which uses your Internet facing IP and public key data for access) and deploy the resources.
$ cd AzureC2PocDeployment/base
$ export PUBLIC_IP=$(curl ipinfo.io/ip)
$ sed -i "s/<YOUR_IP_ADDRESS_HERE>/$PUBLIC_IP/g" parameters.json
$ export PUBLIC_KEY=$(cat ~/.ssh/id_ed25519_azure.pub | sed 's/\//\\\//g')
$ sed -i "s/<YOUR_PUBLIC_KEY_HERE>/$PUBLIC_KEY/g" parameters.json
$ export DNS_LABEL=myvm1234567890
$ sed -i "s/<YOUR_DNS_LABEL_HERE>/$DNS_LABEL/g" parameters.json
$ az deployment group create --resource-group C2VMRG --template-file template.json --parameters @parameters.json
Once the deployment is done, you can also get the public IP address of your VM as follows:
$ az vm list-ip-addresses -g C2VMRG --query "[].virtualMachine[].network.publicIpAddresses[].ipAddress | [0]"
Add an ssh hosts file entry for your VM as follows, replacing <PUBLIC_IP_ADDRESS> with the output of the above.
Host azurevm
    hostname <PUBLIC_IP_ADDRESS>
    identityfile ~/.ssh/id_ed25519_azure
    user ubuntu
You should now be able to ssh into that instance once it has fully deployed - which will take a few minutes. Access will be limited to the Internet facing IP address of the machine you performed the deployment from using a Network Security Group deployed with the resources defined in the templates.
To access the installed C2 you can ssh in and run the Sliver client like so:
/opt/sliver/sliver-client
The VM is setup using a userdata script that installs Apache and Sliver and configures it, etc, on initial VM launch, and it should be basically “ready to go” once the script completes. The script creates a setupdone file in the user home directory to let you know when its finished, because it is possible to ssh in before this setup is done. On some occaisions however, for reasons I’m not entirely clear on, parts of the install process will fail - most likely the creation of the Sliver listener job on local port 8888. You can see what steps are performed to help troublshoot any issues by looking at the install.sh in the base template directory (this is essentially a plaintext copy of the base64 userData field in parameters.json). Its also possible to pull this script from the VMs metadata service like so:
curl -s -H "Metadata:true" "http://169.254.169.254/metadata/instance?api-version=2021-02-01" | jq -r .compute.userData | base64 -d
Create the Function App
To deploy the Function App we need the Azure C2 POC base template set used in the last section to create the Function App resource and the Function App code available here
We will start with deploying the Function App azure resources. Change to the functionapp folder in the Azure template set
From here, we need to choose a name for our function app instance, by which the app will be reachable from the Internet. This name must be globally unique in Azure - in this example I will use mytestfunctionxyz123 (you need to choose something else). The Function App will be accessible from a subdomain under the azurewebsites.net domain - one way you can find an unused name is to test out domain resolution for your chosen name such as <yourlabel>.azurewebsites.net and see if it returns a valid answer.
export FUNCTION_APP_NAME=mytestfunctionxyz123
sed -i "s/<FUNCTION_APP_NAME_HERE>/$FUNCTION_APP_NAME/g" parameters.json
Now deploy. If things fail at this point, one likely reason is that the app name you chose is not globally unique - change the value to something else.
az deployment group create --resource-group C2VMRG --template-file template.json --parameters @parameters.json
Now change to the directory where you cloned the Function App code and package it into a zip file (/tmp/dep.zip in the example below) for deployment.
zip -r /tmp/dep.zip ./function_app.py ./host.json ./requirements.txt
Now you can deploy the code to your Function App
az functionapp deployment source config-zip -g C2VMRG -n $FUNCTION_APP_NAME --src /tmp/dep.zip
Once deployed your C2 should be reachable by the Function Apps domain. We can then get the name and test connectivity.
Get the Function App hostname and store it in a variable.
az functionapp list --query '[0].hostNames[0]'
export FAHOST=$(az functionapp list -g C2VMRG --query '[0].hostNames[0]' | jq -r)
Perform a curl request to fetch the index page from the C2 hosts Apache forwarder.
$ curl https://$FAHOST/
<html>
</html>
Setup the APIM service instance
Now we get to the new content - the API Service instance. We need to create an APIM service which is the framework and infrastructure to host your APIs, and then create an API instance within that service that will actually forward the traffic.
It is actually possible to have multiple forwarding APIs within the single API service, each available at sub paths under the main service URL, however we will just deploy a single API accessible at the root path /.
To deploy, change to the apim folder in the Azure C2 POC base template set.
Now we need to choose a API service name, where our API service will be accessible. The name needs to be globally unique like your previously created Function App - find an unused value by checking for no correct DNS resolution of <your-label>.azure-api.net. Im using myapi987755321 in the example below. You also need to specify an email address - this address will be notified when the deployment is complete (it does take a while).
export API_NAME=myapi987755321
sed -i "s/<API_NAME>/$API_NAME/g" parameters.json

export NOTIFY_EMAIl='[email protected]'
sed -i "s/<NOTIFY_EMAIL>/$NOTIFY_EMAIl/g" parameters.json
Now do the deployment of the service.
az deployment group create --resource-group C2VMRG --template-file template.json --parameters @parameters.json
This will take a while to complete, and the az process will usually not return/exit til the deployment is done. The email you configured in the previous step will get an email once the service is ready. Its also possible to monitor the deployment (waiting for the “Succeeded” status) using the following command:
az apim list -g C2VMRG --query '[0].provisioningState'
Once the API service is setup we next need to setup an API to actually forward traffic. First we need to setup an environment variable with the location of our Function App if this is not still set from the previous step.
export FAHOST=$(az functionapp list -g C2VMRG --query '[0].hostNames[0]' | jq -r)
Now we setup the API.
az apim api import -g C2VMRG -n $API_NAME --specification-format OpenApiJson --api-id myapi --path '/' --display-name 'MyAPI' --subscription-required false --service-url https://$FAHOST/ --api-type http --protocols http https --description 'My API' --specification-url https://raw.githubusercontent.com/stephenbradshaw/AzureC2PocDeployment/refs/heads/main/apim/azure_api_management_service_def.json
At this point our API should be setup and forwarding to the C2, and we can get the URL at which our new API is available like so:
az apim list --query '[0].gatewayUrl'
We can test this to make sure it is working by fetching the index content from the C2 Apache forwarding server by doing something like the below:
$ export APIGW_URL=$(az apim list --query '[0].gatewayUrl' | jq -r)
$ curl $APIGW_URL
<html>
</html>
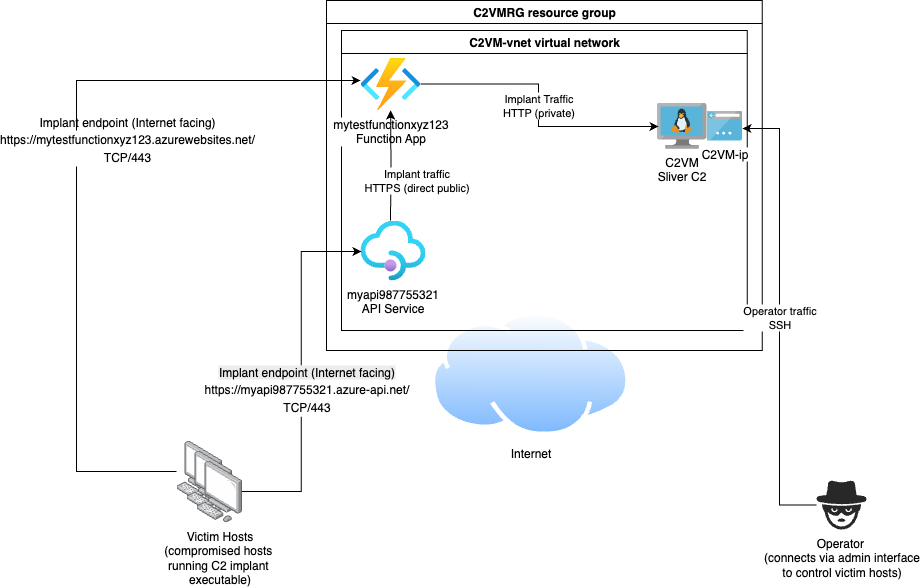
The architecture we have deployed looks something like the following, with two externally accessible endpoints for implant traffic to reach our C2:
When you are done with the POC environment, you can easily delete the resource group and all associated resources as follows:
az group delete --name C2VMRG
Conclusion
This is most lkely the final post I will do on this subject for Azure, as I think Ive fully explored the available options at this point, but if you’re aware of any Azure services Ive missed, please let me know.