Heres a second entry in my series on abusing AWS services to provide high reputation redirectors for Command and Control. The first AWS part in this series was all the way back in 2023, and in that entry I discussed abusing the following services to provide a trusted endpoint for C2 implant communications:
- API Gateway direct proxying,
- Lambda receiving traffic through either Function Urls or the API Gateway,
- Amplify apps and,
- CloudFront distributions.
Check out that post if any of those topics interest you.
This time around, after diversions into the abuse of Azure and GCP, I’ve looped back for a second look at AWS, to catch any services I missed the first time around.
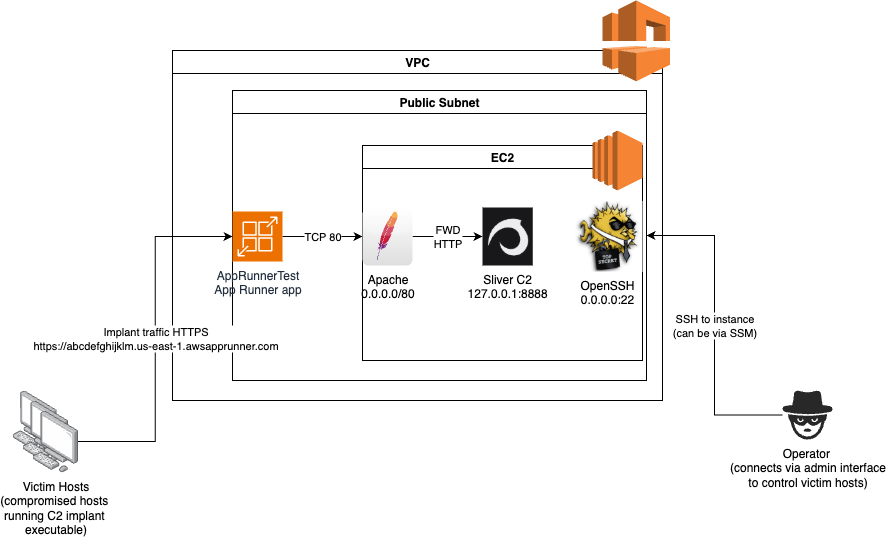
In this post I will be looking at AWS App Runner, which is an AWS service for easily deploying web applications, to see how it can be used to provide a trusted endpoint to receive incoming implant traffic and forward it to a C2 service on EC2 instance in a private AWS VPC.
Overview
The POC environment we will be looking at will use the following AWS resources:
- A VPC that our C2 instance and App Runner app will use for internal communications. At minimum this will need one public subnet, that our EC2 instance and App Runner app will be connected to.
- At least one EC2 instance running a C2 service to receive the traffic.
- A security group associated with the EC2 instance to control access to it.
- A security group for our App Runner app
- A copy of the HTTPForwardContainer container in the Elastic Container Registry in the AWS account
- An App Runner app executing the
HTTPForwardContainerapp
For the purpose of this post I will discuss parts 1-3 in the section named The C2 Server and supporting networking, and 4-6 in the section named App Runner instance. Given a lot of this is pretty straightforward to deploy I will just provide general clickops creation instructions using the AWS web console.
The C2 server and supporting networking
The C2 service and supporting networking will use a VPC, an EC2 instance attached to that VPC and a security group associated with the EC2 instance to control network access to the instance.
VPC
An appropriate VPC can be deployed by visiting the VPC section of the AWS console, hitting the Create VPC button, and using the Wizard to create VPC and more.
In the wizard you can get away with the following minimal settings to create something functional for this POC:
- 1 availability zone
- 1 public subnet
- 0 private subnets
- 0 NAT gateways
- 0 VPC endpoints
This will look something like the following:
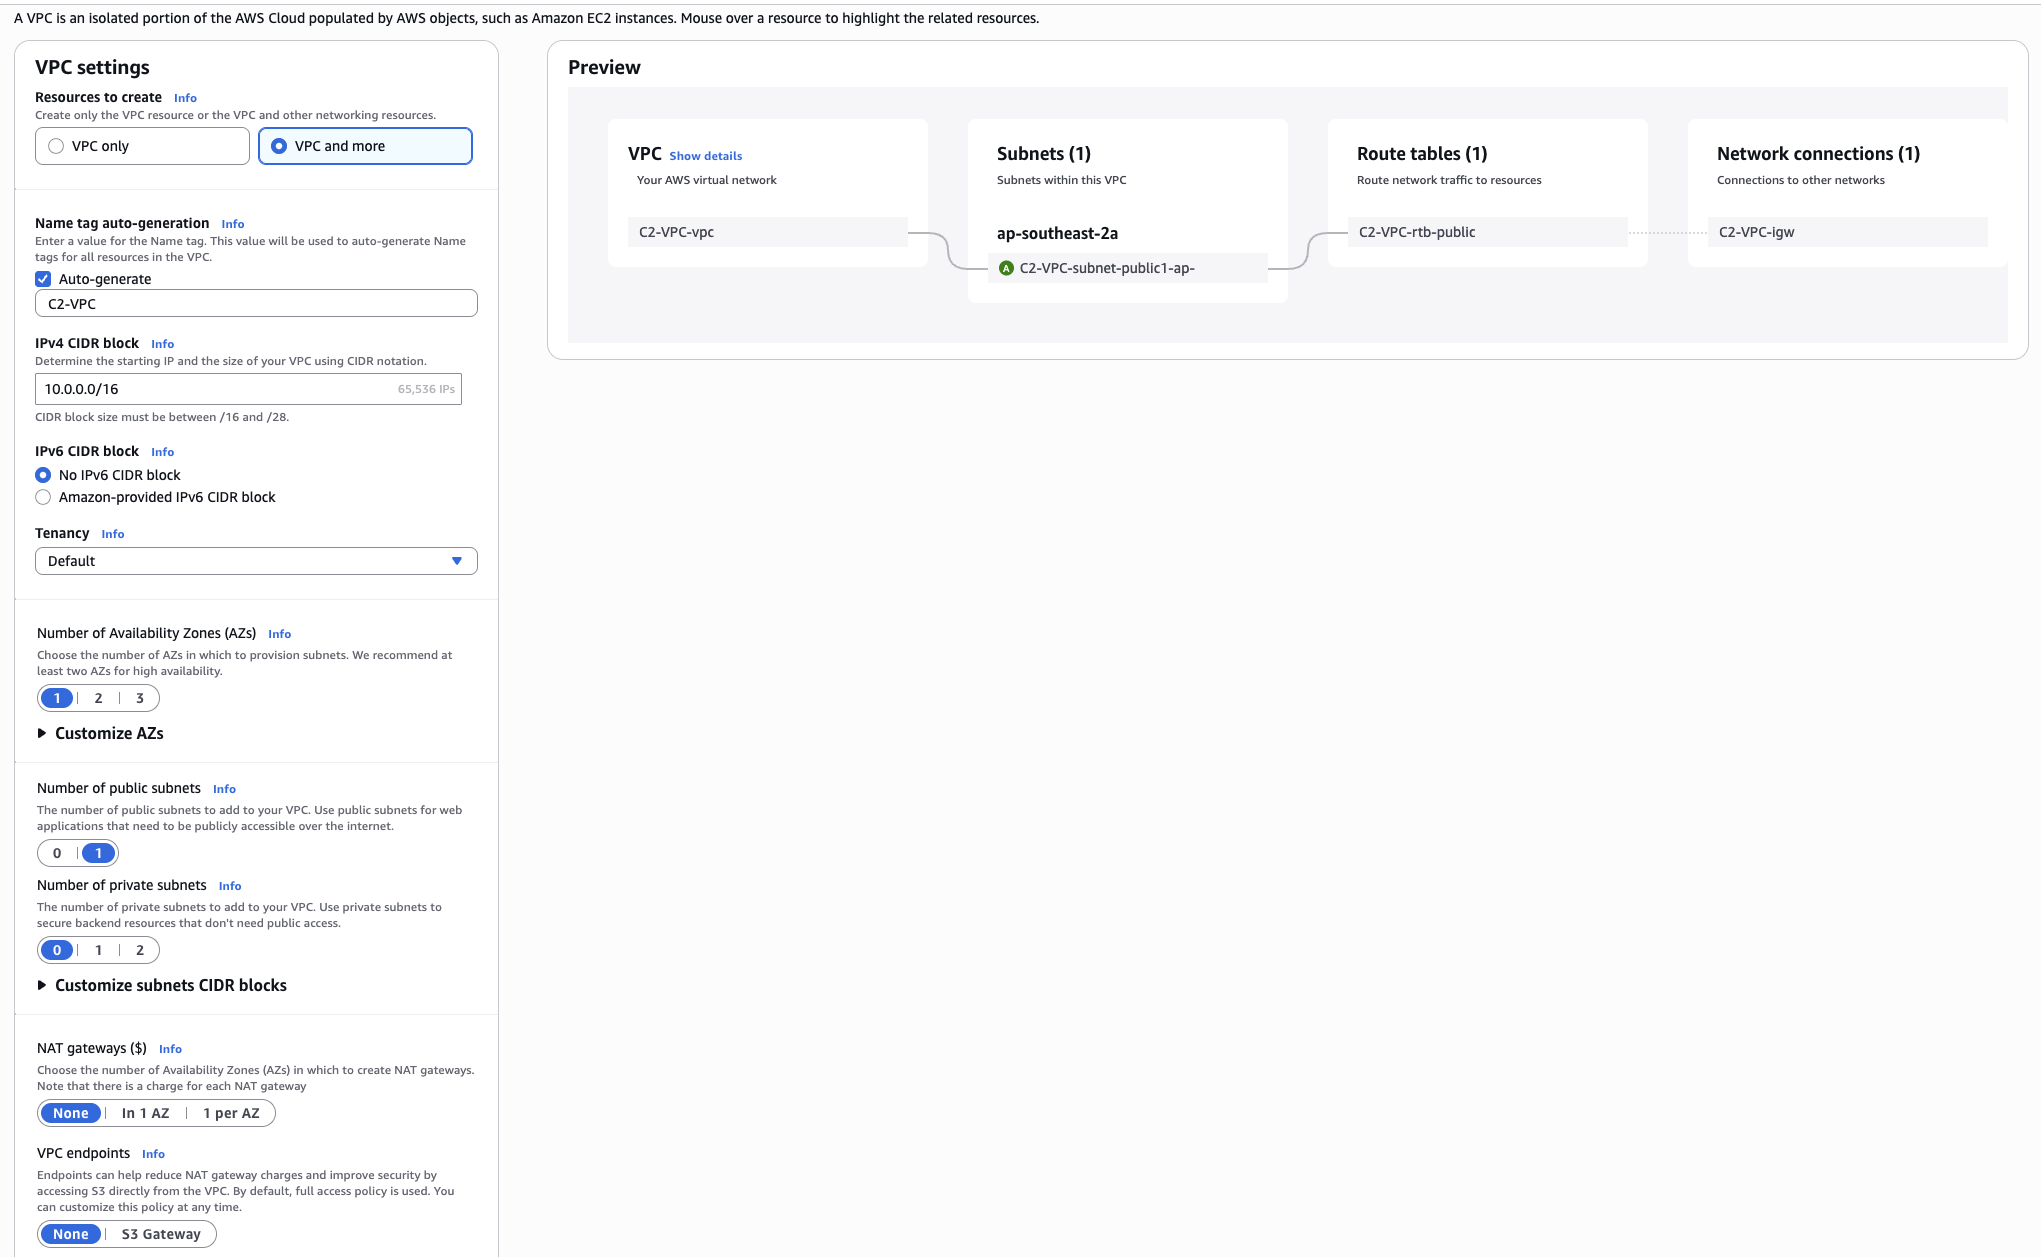
After creation, ensure all of the following resources that you create are associated with this new VPC and in the same AWS region.
EC2 and Security group
We can create the EC2 instance and security group in one step. Visit the EC2 section of the console and hit Launch Instance to start the new instance wizard.
The settings below are some simple guidelines and minimums to consider when configuring the instance in the wizard.
Machine image
- AMI: Ubuntu Server 24.04 (HMV), SSD Volume type
- Architecture: 64 bit architecture
Instance type
- Instance type: Minimum of
t2.nanoort3.nano
Key Pair
- Key: Generate a new key or reuse an existing key
Network settings
- Network: Select your new VPC
- Subnet: Select the public subnet in your new VPC
- Auto assign public-ip:
Enable - Security Group: Create a new security group and give it a sensible name and description (you cant change the name later, so pick sensibly!)
- SSH Access: Allow SSH from your IP address in the security group config for direct access, or you can assign an
IAM instance profilein theAdvanced detailssection allowing SSM access if you want to access the instance via SSM intermediated SSH
Configure storage
- Volume type: Choose
30GBof storage and thegp3volume type
Advanced Settings
Go down to the User data - optional and include this script. This will configure the instance as a Sliver C2 server with an Apache forwarder listening on port 80 that receives implant traffic.
Once the instance is up and running and the user data script has completed running, the environment will look something like the following:
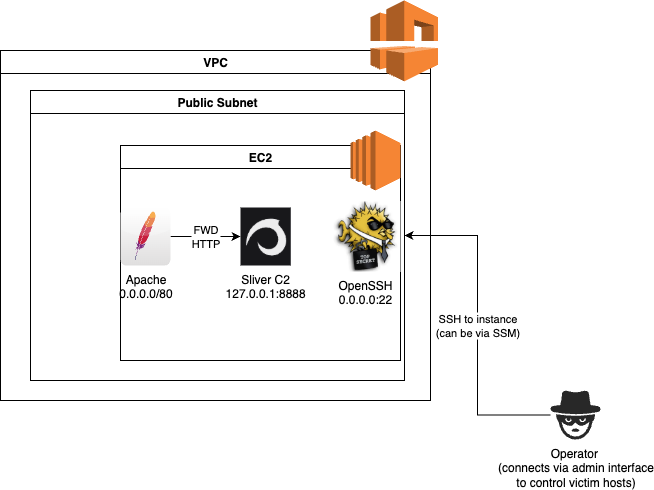
We have a C2 server running, but at the moment we have no way to route implant traffic into the environment. This will be setup in the next section.
App Runner instance
The App Runner application we will be running is a simple Python Flask app that has been containerised to run in Docker. The source code is available here and the container is also available on the Docker hub here.
Upload the container image to ECR
The first thing we will have to do is upload the container to the Elastic Container Registry of the AWS account you are using.
The first thing you need to to is create a private repository.
Go to your list of Private Repositories and select Create repository. Create a repository with the name httpforwardcontainer. You can accept the defaults.
Then we need to push the image to the private repository. For this you need docker installed locally and a copy of the httpforwardcontainer image downloaded to your local docker instance.
To get the container image stored locally you can either:
- Clone the source and build
sudo docker build -t stephenbradshaw/httpforwardcontainer:latest .from the source directory, OR - Pull the latest build from the docker hub using
sudo docker pull stephenbradshaw/httpforwardcontainer:latest.
Then follow the instructions for pushing a local container to the private ECR registry here
The commands to upload the image will likely look something like the following (replacing <ACCOUNTID> with you AWS account ID and <REGION> with the region in which you are deploying all your resources):
aws ecr get-login-password --region <REGION> | sudo docker login --username AWS --password-stdin <ACCOUNTID>.dkr.ecr.<REGION>.amazonaws.com
sudo docker tag stephenbradshaw/httpforwardcontainer:latest <ACCOUNTID>.dkr.ecr.<REGION>.amazonaws.com/httpforwardcontainer:latest
sudo docker push <ACCOUNTID>.dkr.ecr.<REGION>.amazonaws.com/httpforwardcontainer:latest
Create the App Runner security group
We need to create a security group for the App Runner app we are about to create. This can be done from the AWS console here. Just make sure its created in the VPC we made earlier. We dont need to set any specific rules in the group, we will use it as a source to allow the App Runner app we create to talk to the EC2 instance we created in the previous section.
Create the App Runner application
We can create the App Runner application in the AWS console here. Then hit the Create service button to start the wizard.
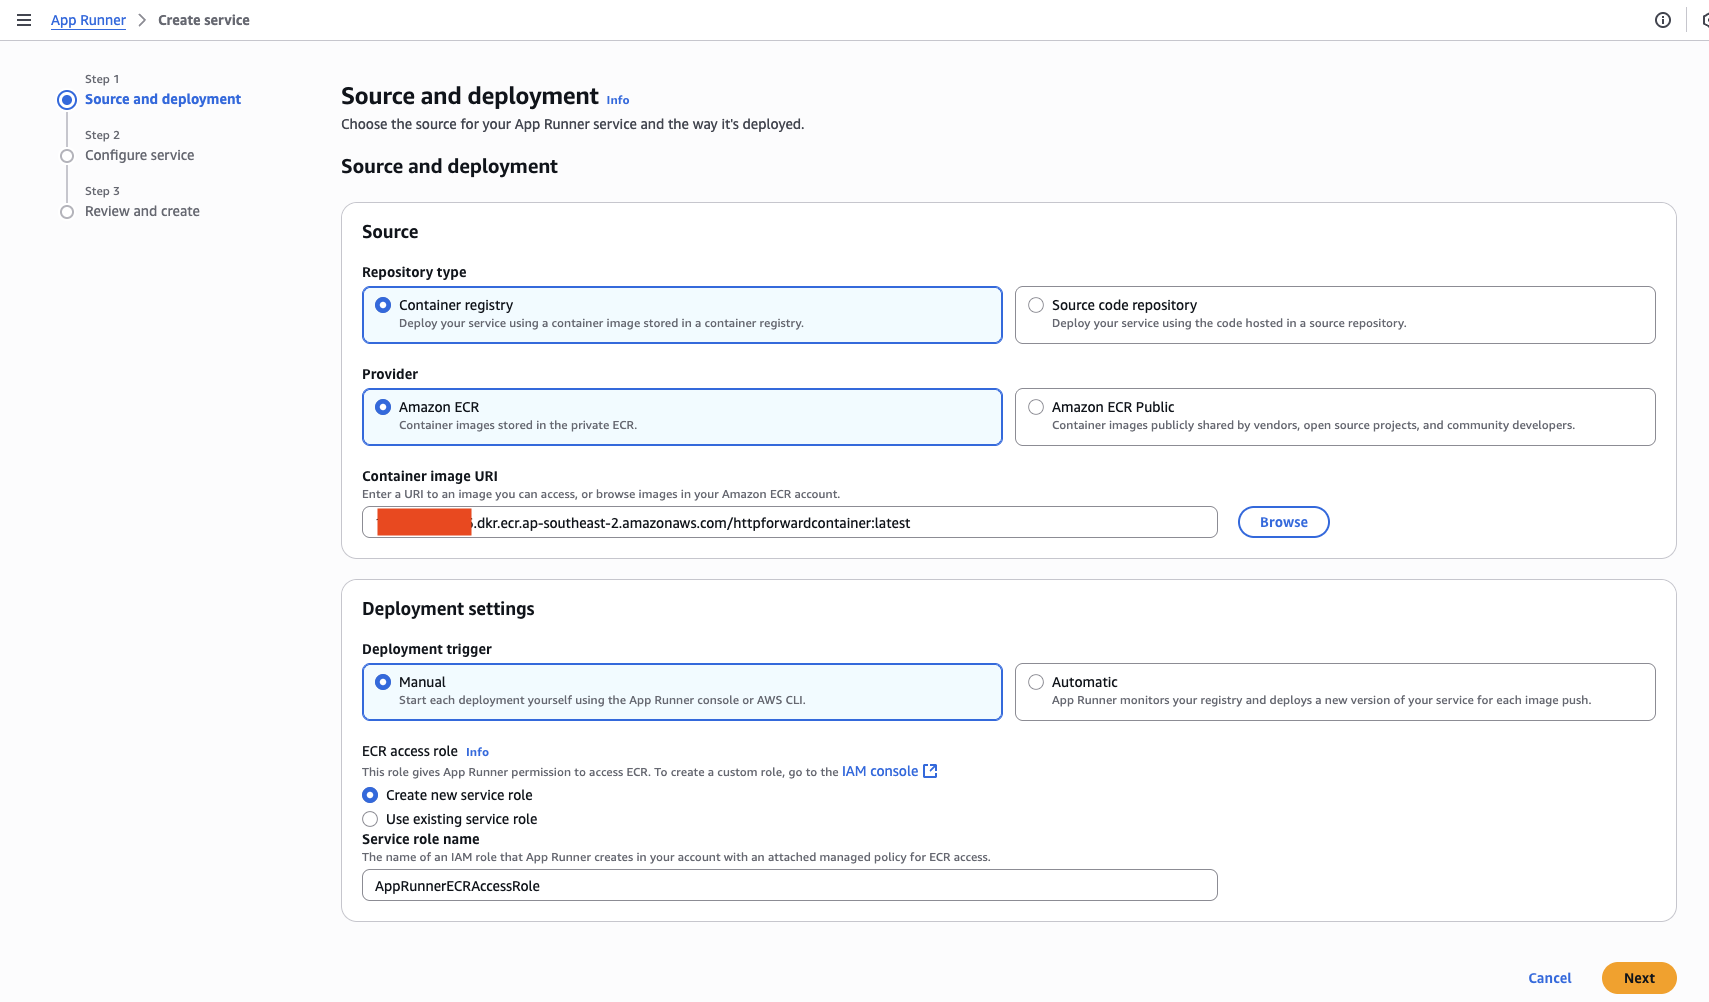
The first section of the wizard Source and deployment, allows you to select the container image we uploaded in the previous section to use for our app.
In the Source section, select Container registry as the Repository type, and Amazon ECR as the Provider.
The use the Browse button next to the Container image URI to select the image we uploaded. The wizard screen will now look something like the following.
The other options can be left at the default. Hit Next to move to the next section of the wizard.
The next section of the wizard Configure service, allows us to set the app configuration.
There are a few things we need to change here, first in the Service settings section of the window. Here, we need to set a Service name (the value is only for internal use, choose whatever your want, I’ve selected AppRunnerTest), we need to set a DESTINATION environment variable in which we set the internal (private) IP address of the EC2 instance we created earlier.
We also need to change the Port variable to 80. This will end up looking something like the following:

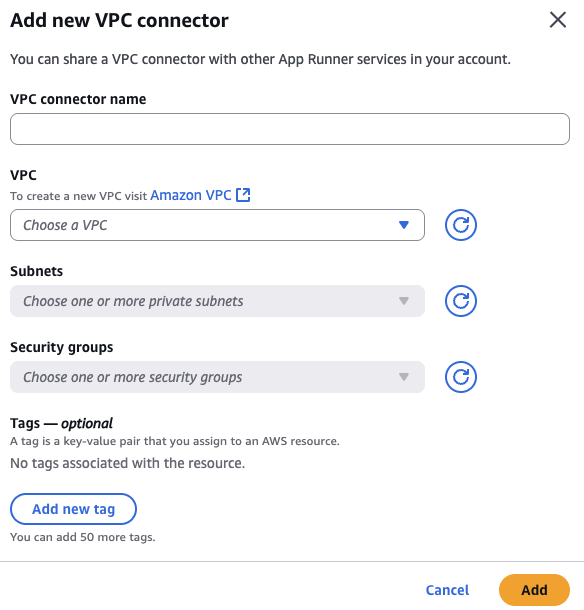
The other section of this part of the wizard that we need to change is the Networking section. We need to modify the Outgoing network traffic to be Custom VPC. This is shown in the screenshot below. Next to the VPC connector drop down box hit the Add new button to create a VPC connector we can use to connect this app to the VPC we created earlier.
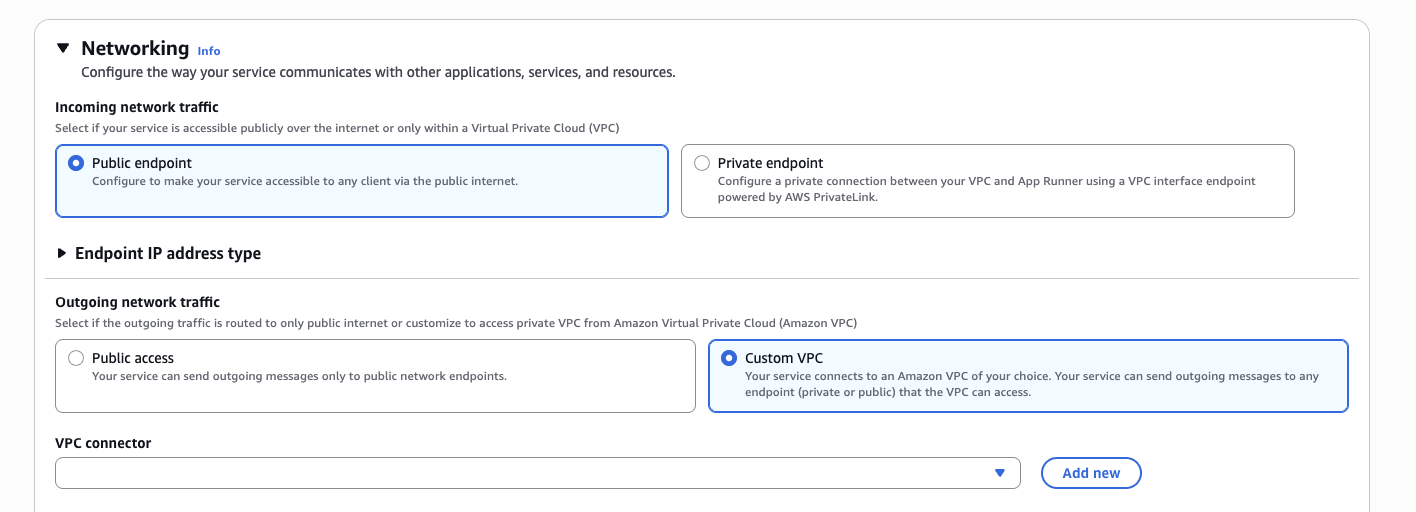
The VPC connector creation box looks like the following. Select the VPC, VPC subnet and app runner security group we created earlier and hit Add. Select this new VPC connector in the VPC connector drop down.
Skip through the rest of the wizard to complete the App Runner configuration. Once the app has been created the Default domain of the new app can be found in the App Runner section of the AWS console - this is the endpoint by which our implant traffic can enter the C2 system, and will be of the form https://<RANDOMVALUE>.<REGION>.awsapprunner.com.
Allow traffic to flow between the App Runner app and the EC2 instance
Now that the App Runner app is running, there is one final step we need to take to get things working - we need to go to the Security group associated with the EC2 instance (this was created at the same time as the instance itself using the Launch wizard), and we need to allow traffic on port 80 (for the HTTP service) from the security group that we created for the App Runner app.
Once this is done, we should be able to verify the setup is working by making a HTTP request to the endpoint address obtained from the previous step - it should retrieve the contents of the /var/www/html/index.html page created by the User Data setup script we provided when we setup the EC2 instance. Heres how that looks for a domain of https://abcdefghijklm.us-east-1.awsapprunner.com/.
$ curl https://abcdefghijklm.us-east-1.awsapprunner.com/
<html>
</html>
The setup we now have is represented by the following network diagram.