Back in July this year I released the fourth and (I thought) final entry in my series on exploiting Azure native services to provide high reputation C2 redirectors. Well, things move fast in cloud land, and I’ve discovered yet another Azure service that can be abused for this purpose - Azure Container Apps. So now here is the final FINAL entry in the Azure specific series. (I also have entries talking about GCP and AWS if you’re interested).
Azure Container Apps provide an easy way to run a containerised applications in the cloud, with internal VPC connectivity and Internet accessibility (with an included TLS certificate and HTTPS support) at the .azurecontainerapps.io domain.
Similar to other entries in the series, this blog post will demonstrate how you can setup your own POC C2 environment with some base resources (dedicated resource group, VPC, Linux VM instance running Sliver, etc) fronted by an Azure Container App that routes traffic from infected hosts into the C2 application.
I’ve again updated the Azure C2 POC base template set I’ve been using in the other entries in the series to make it easy for you.
Lets look at how we can use these templates to setup a working Container App C2 POC environment. We will need to do the following:
- Create the base resources (resource group, networking, C2 vm, etc) for the C2 we will forward to
- Create the Container App application that will forward traffic to the C2
Create the base resources
Base resources for this POC environment include a Linux VM with an Apache forwarder and the Sliver C2 software installed and running, plus the necessary network plumbing. Ive discussed details about these resources previously in a post here and how the deployment templates work in a post here, but I will briefly cover how to set these up here so you can easily start from scratch.
Create a ssh key to use when accessing the VM, if you dont already have one.
$ ssh-keygen -t ed25519 -f ~/.ssh/id_ed25519_azure
Make sure the Azure CLI is installed and working.
Create the C2VMRG resource group.
$ az group create --name C2VMRG --location westus2
Clone the POC deployment templates locally
$ git clone https://github.com/stephenbradshaw/AzureC2PocDeployment.git
Modify the base deployment templates for your environment (which uses your Internet facing IP and public key data for access):
$ cd AzureC2PocDeployment/base
$ export PUBLIC_IP=$(curl ipinfo.io/ip)
$ sed -i "s/<YOUR_IP_ADDRESS_HERE>/$PUBLIC_IP/g" parameters.json
$ export PUBLIC_KEY=$(cat ~/.ssh/id_ed25519_azure.pub | sed 's/\//\\\//g')
$ sed -i "s/<YOUR_PUBLIC_KEY_HERE>/$PUBLIC_KEY/g" parameters.json
$ export DNS_LABEL=myvm1234567890
$ sed -i "s/<YOUR_DNS_LABEL_HERE>/$DNS_LABEL/g" parameters.json
Then deploy:
$ az deployment group create --resource-group C2VMRG --template-file template.json --parameters @parameters.json
Once the deployment is done, you can also get the public IP address of your VM as follows:
$ az vm list-ip-addresses -g C2VMRG --query "[].virtualMachine[].network.publicIpAddresses[].ipAddress | [0]"
Add an ssh hosts file entry for your VM as follows, replacing <PUBLIC_IP_ADDRESS> with the output of the above.
Host azurevm
    hostname <PUBLIC_IP_ADDRESS>
    identityfile ~/.ssh/id_ed25519_azure
    user ubuntu
You should now be able to ssh into that instance once it has fully deployed - which will take a few minutes. Access will be limited to the Internet facing IP address of the machine you performed the deployment from using a Network Security Group deployed with the resources defined in the templates.
To access the installed C2 you can ssh in and run the Sliver client like so:
/opt/sliver/sliver-client
The VM is setup using a userdata script that installs Apache and Sliver and configures it, etc, on initial VM launch, and it should be basically “ready to go” once the script completes. The script creates a setupdone file in the user home directory to let you know when its finished, because it is possible to ssh in before this setup is done. On some occaisions however, for reasons I’m not entirely clear on, parts of the install process will fail - most likely the creation of the Sliver listener job on local port 8888. You can see what steps are performed to help troublshoot any issues by looking at the install.sh in the base template directory (this is essentially a plaintext copy of the base64 userData field in parameters.json). Its also possible to pull this script from the VMs metadata service like so:
curl -s -H "Metadata:true" "http://169.254.169.254/metadata/instance?api-version=2021-02-01" | jq -r .compute.userData | base64 -d
Create the Container App application
Now we get to the new content - the container app. We will be deploying a copy of my http forwarding container, the latest version of which will will be pulled from the docker hub here by the automation templates. If you want to see the source for the container, its available here.
The template will setup a Container App in a new Container App environment that is connected to our internal VPC, allowing traffic to be routed between our new forwarding app and the internal C2 VM over this private network.
To deploy, change to the containerapp folder in your local copy of the Azure C2 POC base template set.
Now we need to choose an APP_NAME for our container app. This will form part of the address by which our app will be accessible on the Internet, so pick something sensible. I’ll use testabc123xyz for this example.
export APP_NAME=testabc123xyz
sed -i "s/<APP_NAME>/$APP_NAME/g" parameters.json
Now do the deployment of the service.
az deployment group create --resource-group C2VMRG --template-file template.json --parameters @parameters.json
Once deployment is done you can get the domain name at which your container app is available at using a command like the following:
az containerapp list -g C2VMRG --query '[0].properties.configuration.ingress.fqdn'
The domain you will get back will be in the form <APP_NAME>.<RANDOM_WORD>-<HEX_VALUE>.<REGION>.azurecontainerapps.io.
Mine was testabc123xyz.kindrock-8322fc0c.westus2.azurecontainerapps.io. In this case the kindrock-8322fc0c.westus2.azurecontainerapps.io component of the name is associated with the Container Apps environment created to host our app, and it gets it’s own wildcard certificate generated for use with HTTPS. This means that the HTTPS certificate presented for connections will be new (with an “Issued” date matching the time of creation of the Container App Environment) and this component of the name will appear in certificate transparency logs, so keep that fact in mind.
We can test this to make sure it is working by fetching the index content from the C2 Apache forwarding server by doing something like the below (making sure you see the contents of the /var/www/html/index.html in the curl response - its empty HTML by default):
$ export CADOMAIN=$(az containerapp list -g C2VMRG --query '[0].properties.configuration.ingress.fqdn' | jq -r)
$ curl "https://$CADOMAIN/"
<html>
</html>
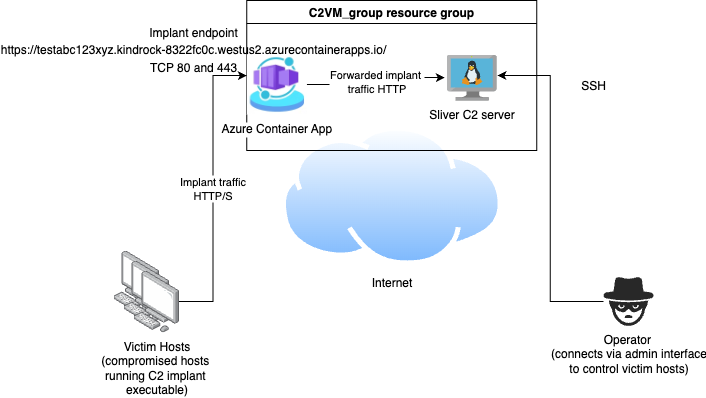
The architecture we have deployed looks something like the following, with two externally accessible endpoints for implant traffic to reach our C2:
When you are done with the POC environment, you can easily delete the resource group and all associated resources as follows:
az group delete --name C2VMRG
Conclusion
Well, Ive said this before and been wrong but who knows - I think this is (really truly) the final Azure post I will do on this subject. However if you’re aware of any Azure services Ive missed that could be abused in this way please let me know.